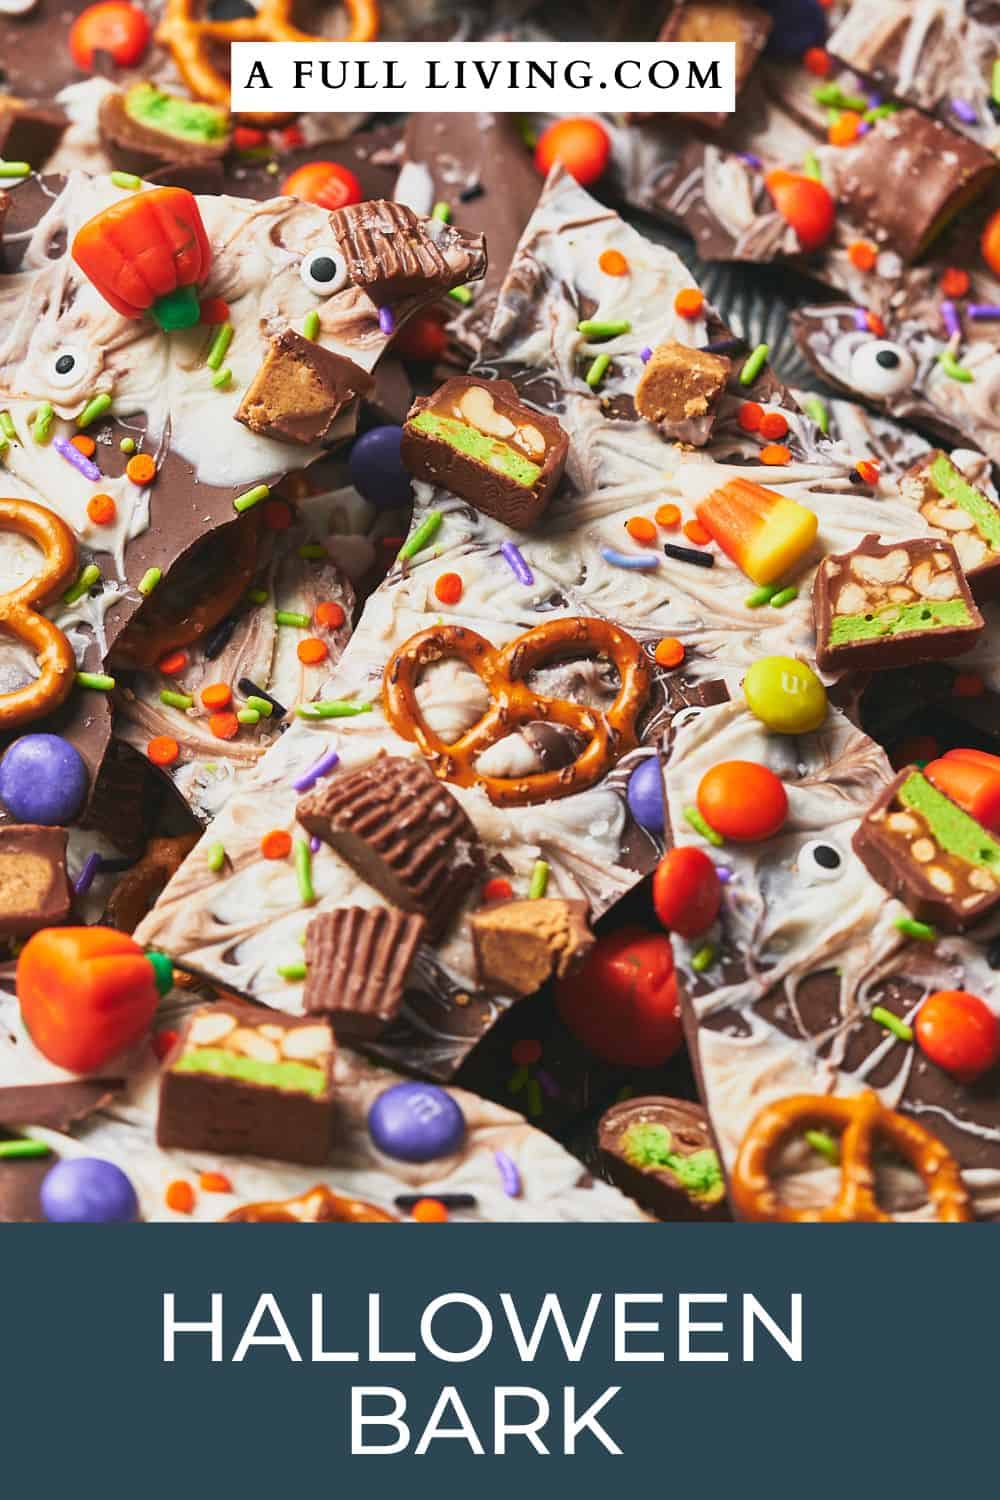
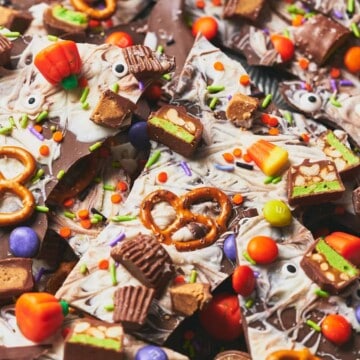
Unleash the Halloween spirit with this delightful and spooky Halloween Chocolate Bark, a delicious blend of dark and white chocolate, with candies and salty snacks. It promises both fun and flavor in every bite, and is easy to make!
Save This Recipe! 💌
Whether you're getting an awesome sweet treat together for a Halloween party, or you're looking for a great recipe to use up some leftover candy from trick-or-treating, this festive treat is probably the easiest thing to make!
If you've got a sweet tooth, this fun treat is the perfect easy Halloween dessert to celebrate spooky season!
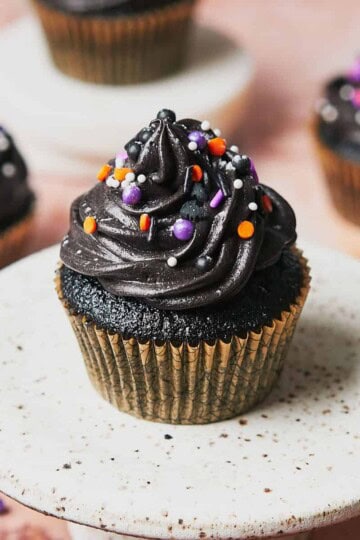
Looking for more Halloween recipes? Check out our Halloween charcuterie board, spooky spaghetti with meatball eyeballs, this vampire's kiss cocktail, this Halloween snack mix, these black velvet cupcakes, and black velvet cake!
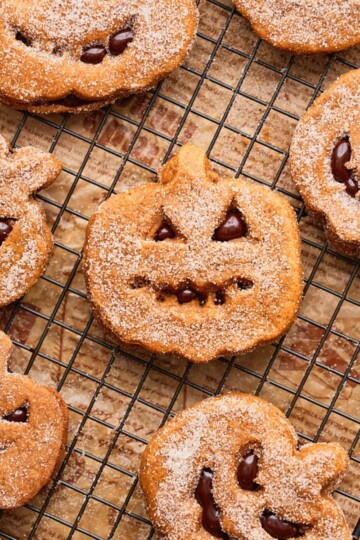
Don't forget to check out these delicious Halloween jack-o-lantern cookies or these fluffy Halloween pancakes!
Jump to:
❤️Why we love this recipe
- Festive and fun. The vibrant colors and spooky candy eyes make it a perfect treat for a spooky soiree. It's visually appealing with bold, fun colors!
- Customizable. It can easily be customized with your favorite candies and toppings to suit your tastes.
- Simple, no-bake recipe. No oven needed, just melt the chocolate, decorate it, and let it chill!
- Shareable. It's an ideal treat to share at parties and gatherings!
- Tasty combo. We love a sweet and salty combo. The blend of chocolates, candies, and a sprinkle of flaky salt strikes the right balance of flavors and textures!
- Kid-friendly. Children can participate in assembling the bark, making it a fun family activity.
- Giftable. It can be broken into pieces, packaged in decorative treat bags, and given as a tasty homemade gift.
- Crowd-pleaser. These easy Halloween treats are loved by all! Whether you're a chocolate lover, a fan of fun-themed treats, or just looking for a creative way to use up leftover Halloween candy, this bark is sure to be a hit!
🎃Ingredients
Here are the ingredients we used for this recipe. You can find more information for substitutions below.
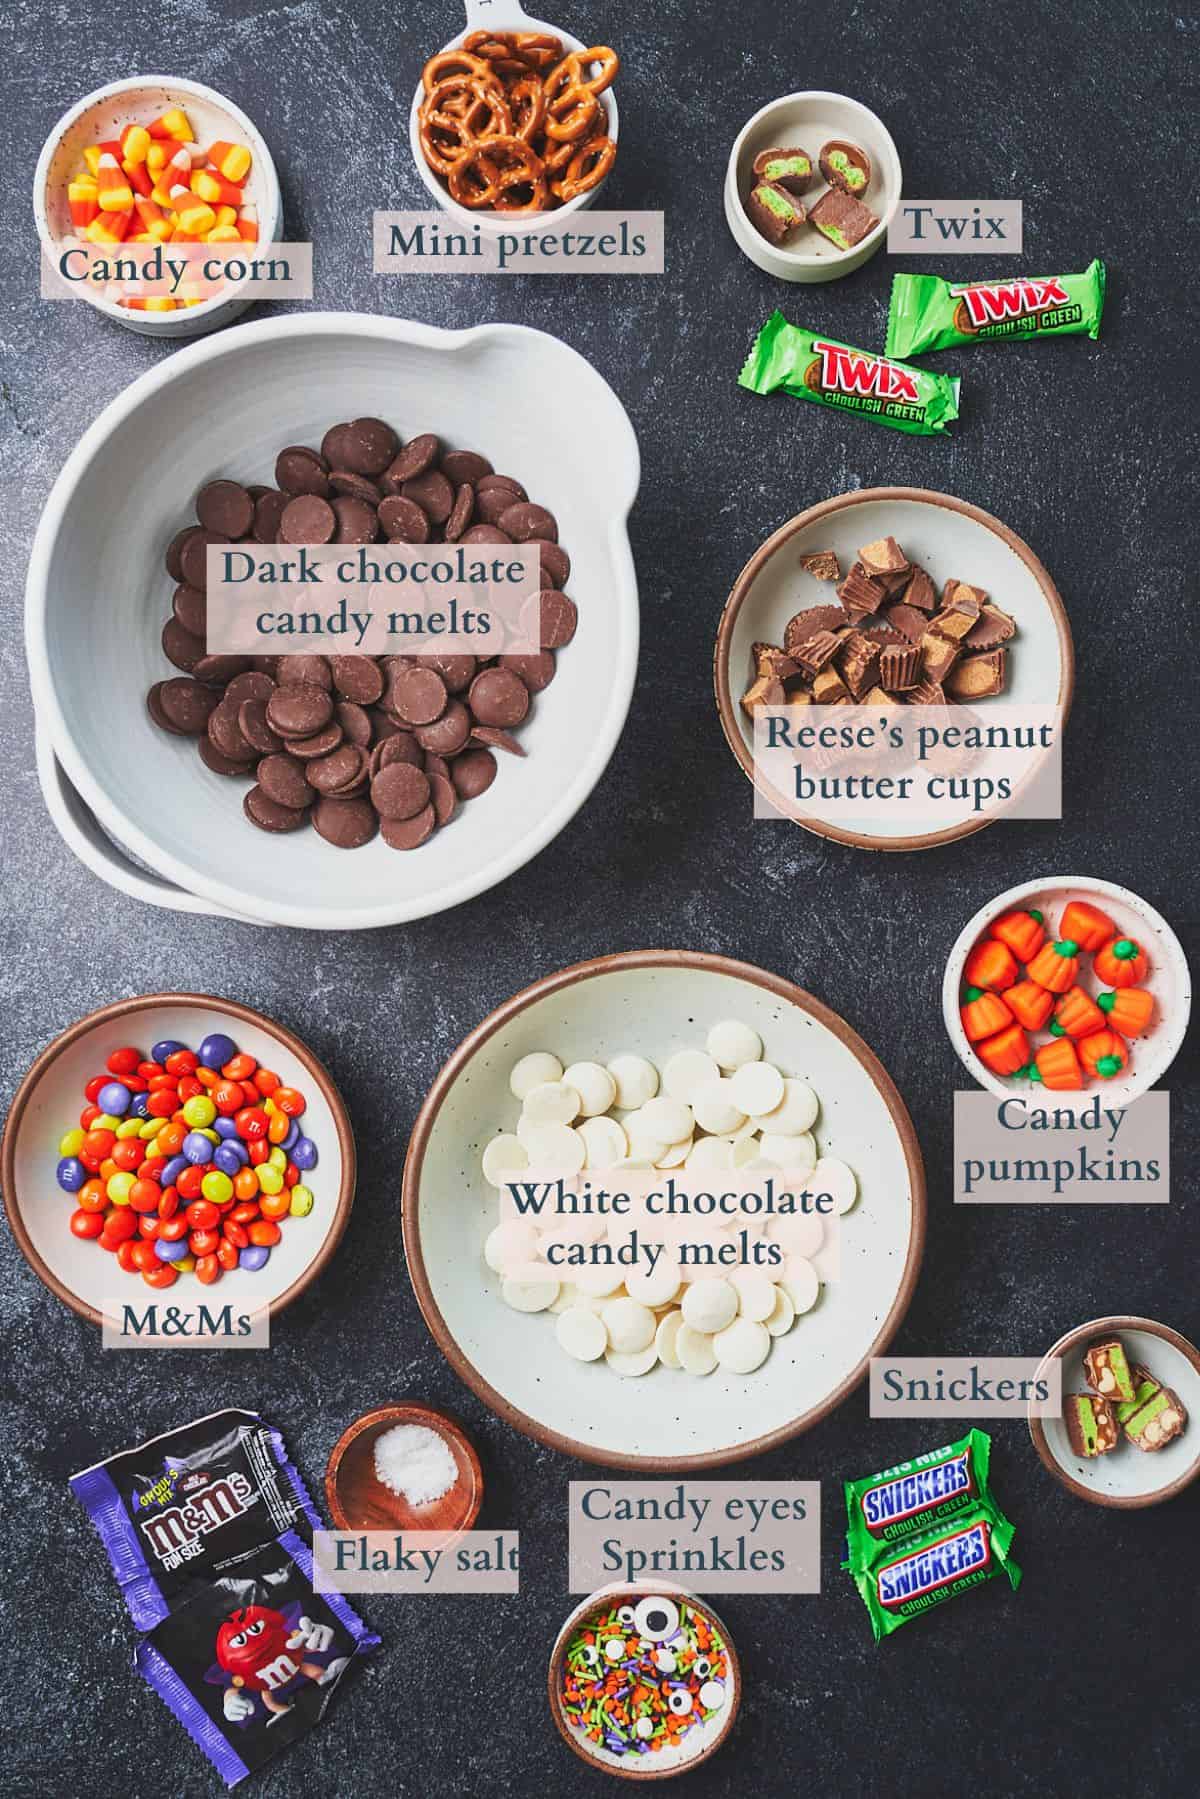
- Candy melts. You can find candy melts in the confectioners or baking aisle in your local grocery store. They are slightly different than regular chocolate because they aren't made with cocoa butter, and they melt more easily. It's essential to melt these slowly to prevent the chocolate from seizing up, but it will work better than using chocolate chips. If you don't have candy melts, use a chocolate bar, and cut it into small pieces with a sharp knife. Avoid chocolate chips if possible, because they are meant to retain their shape and won't melt as well.
Visit the recipe card for the full quantities and nutritional information.
✨Substitutions & variations
Here are a few suggestions on additional flavors to try, or simple variations to this recipe.
- Make monster bark. A fun twist on this Halloween park would be to make the base with green candy melts and add more candy eyeballs to make them look like monsters!
- Add more different colors. You can use any color candy melts or white candy melts and add food coloring to make your candy melts more colorful. Purple, green, and orange candy melts are also popular colors for Halloween.
- Add cookies. Halloween Oreo cookies would be great additions to this candy bark crush Halloween Oreos in a bag with a rolling pin and add the pieces to the bark along with the other mix-ins.
- Customize the mix-ins. Use whatever candy or mix-ins you like. Some popular choices would be drizzling melted peanut butter over top, adding Kit Kats, gummy worms, salted peanuts, graham crackers, marshmallows, and even caramel corn. You may even enjoy drizzling it with some of this salted caramel!
🔪Prep work
- Cut candy bars into pieces.
- Line a large baking sheet with parchment paper, allowing enough to hang off the sides for easy removal. Set aside.
- Measure out the remaining ingredients and have everything ready to go. This chocolate bark is ready really quickly so it's important to have everything ready in advance.
📋Instructions
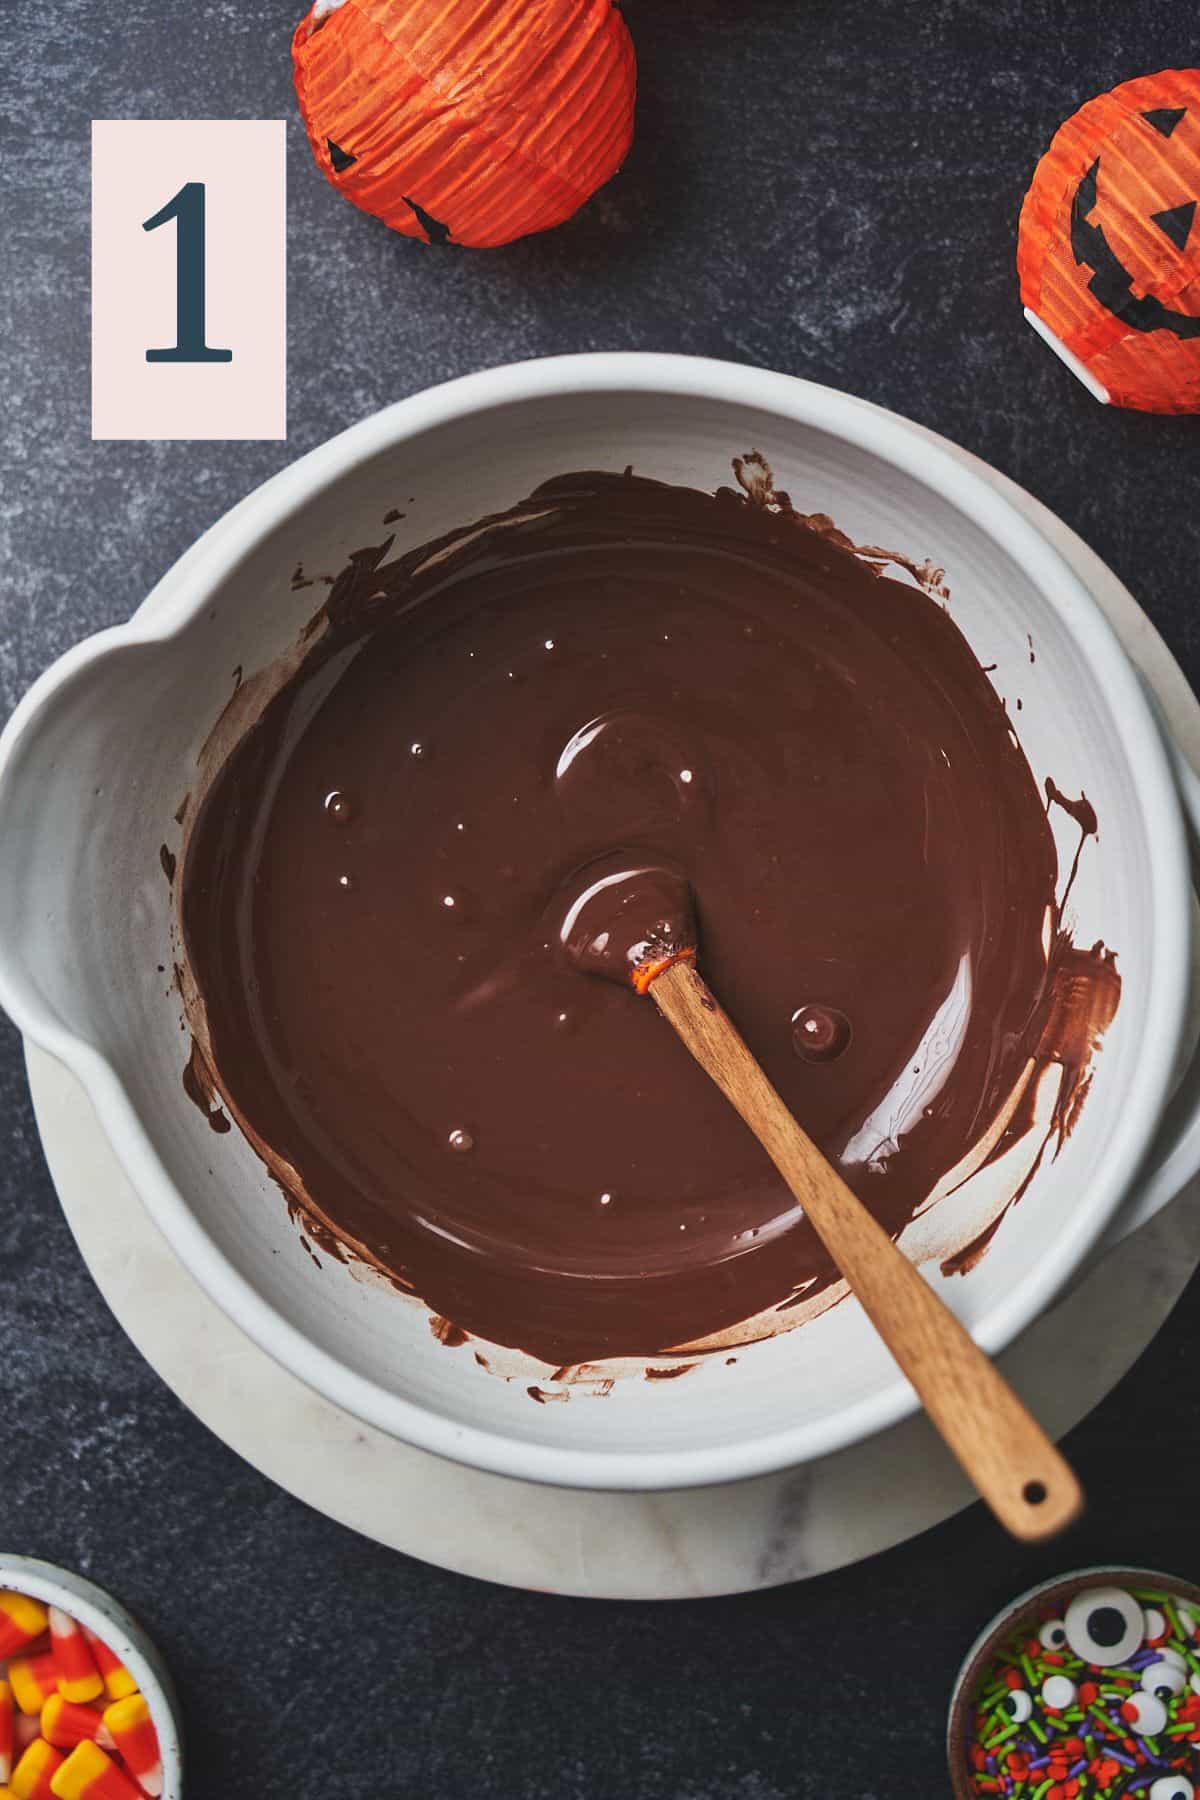
Melt the dark chocolate wafers. Use either a double boiler method or microwave in a microwave-safe bowl to melt the wafers in 15-20 second intervals at 50% power. Stir thoroughly. If not melted, continue for 15-second increments until melted, or until just about melted. Continue stirring, to melt the rest of the chocolate with the residual heat. (Image 1)
Once the dark chocolate is completely melted, pour it onto the parchment-lined baking sheet and spread it evenly in a thin layer to the edges using an offset spatula. (Image 2)
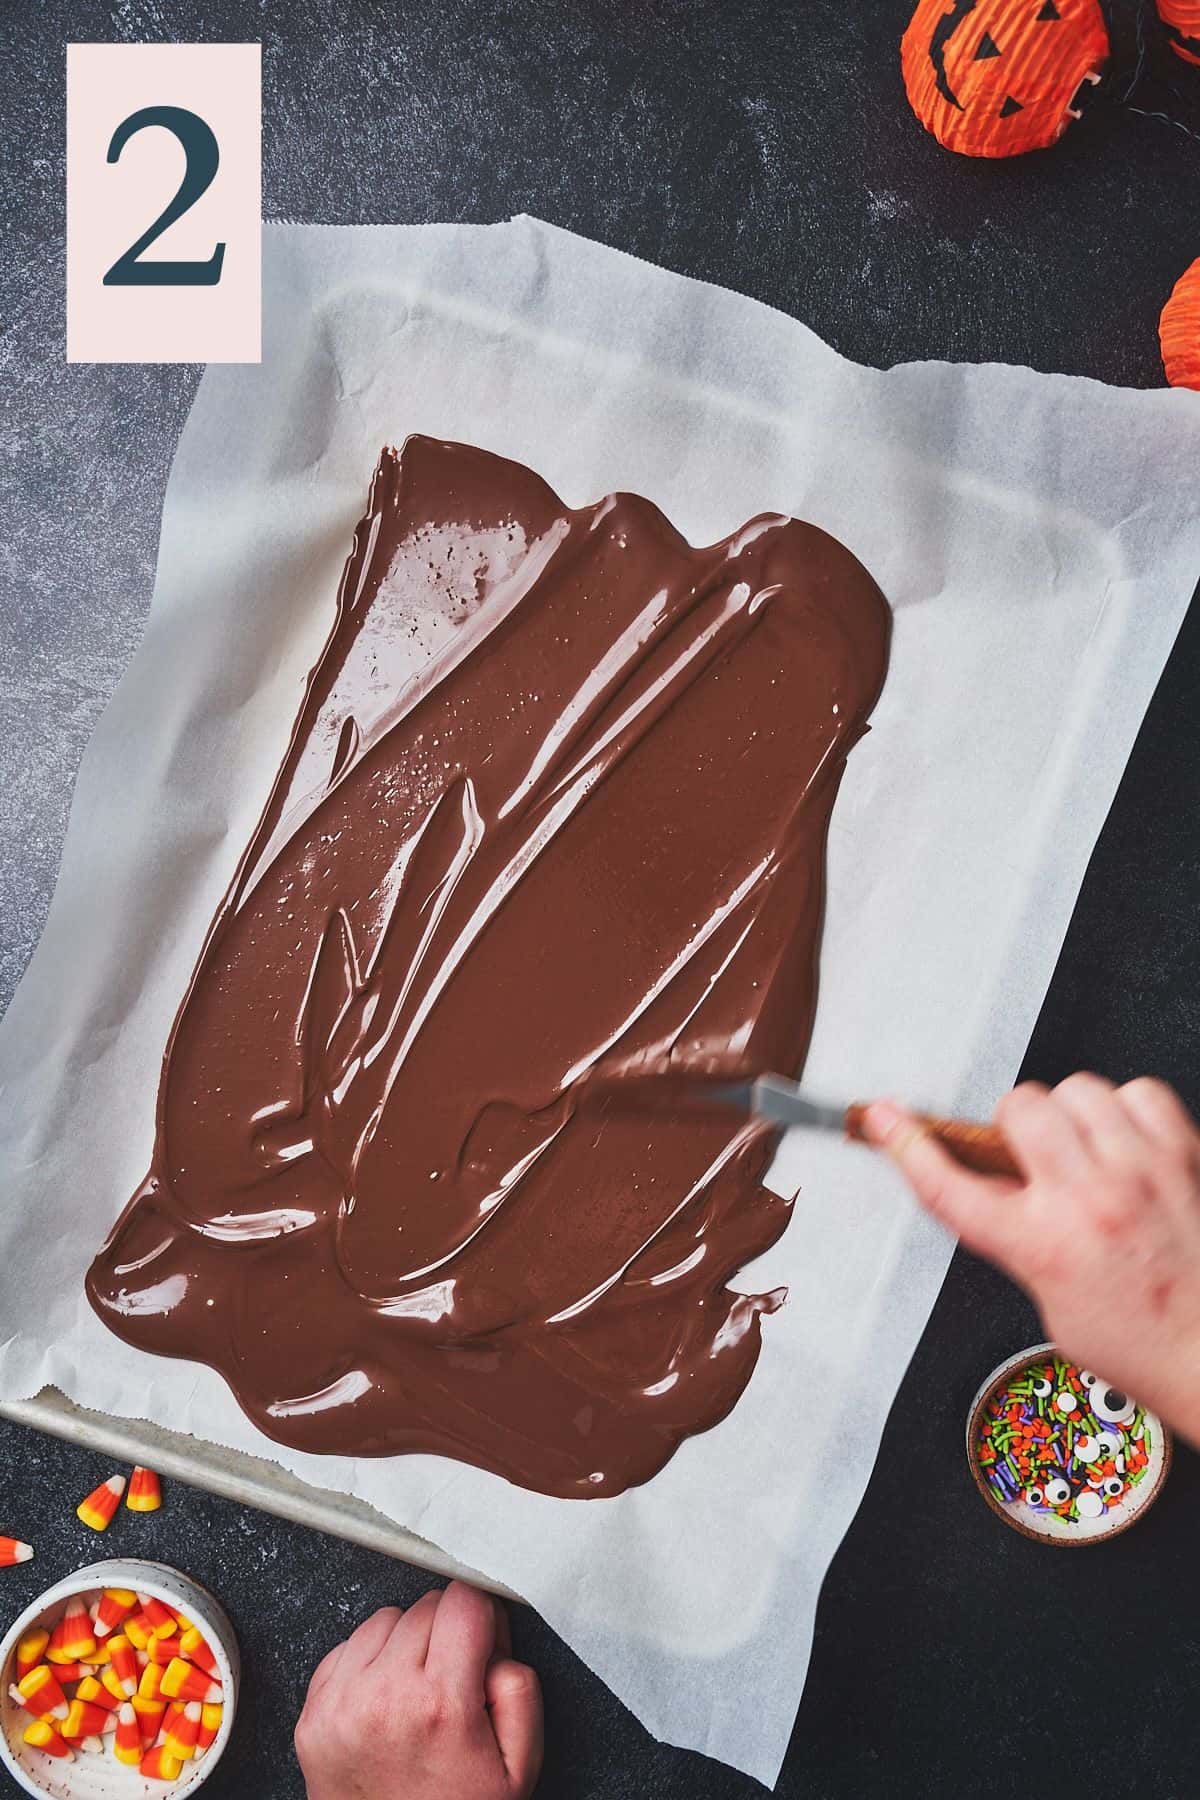
✨Pro Tip: Melt the chocolate very gently to avoid seizing it! Before it is all the way melted, you can stir it continuously and the residual heat will continue to melt it.
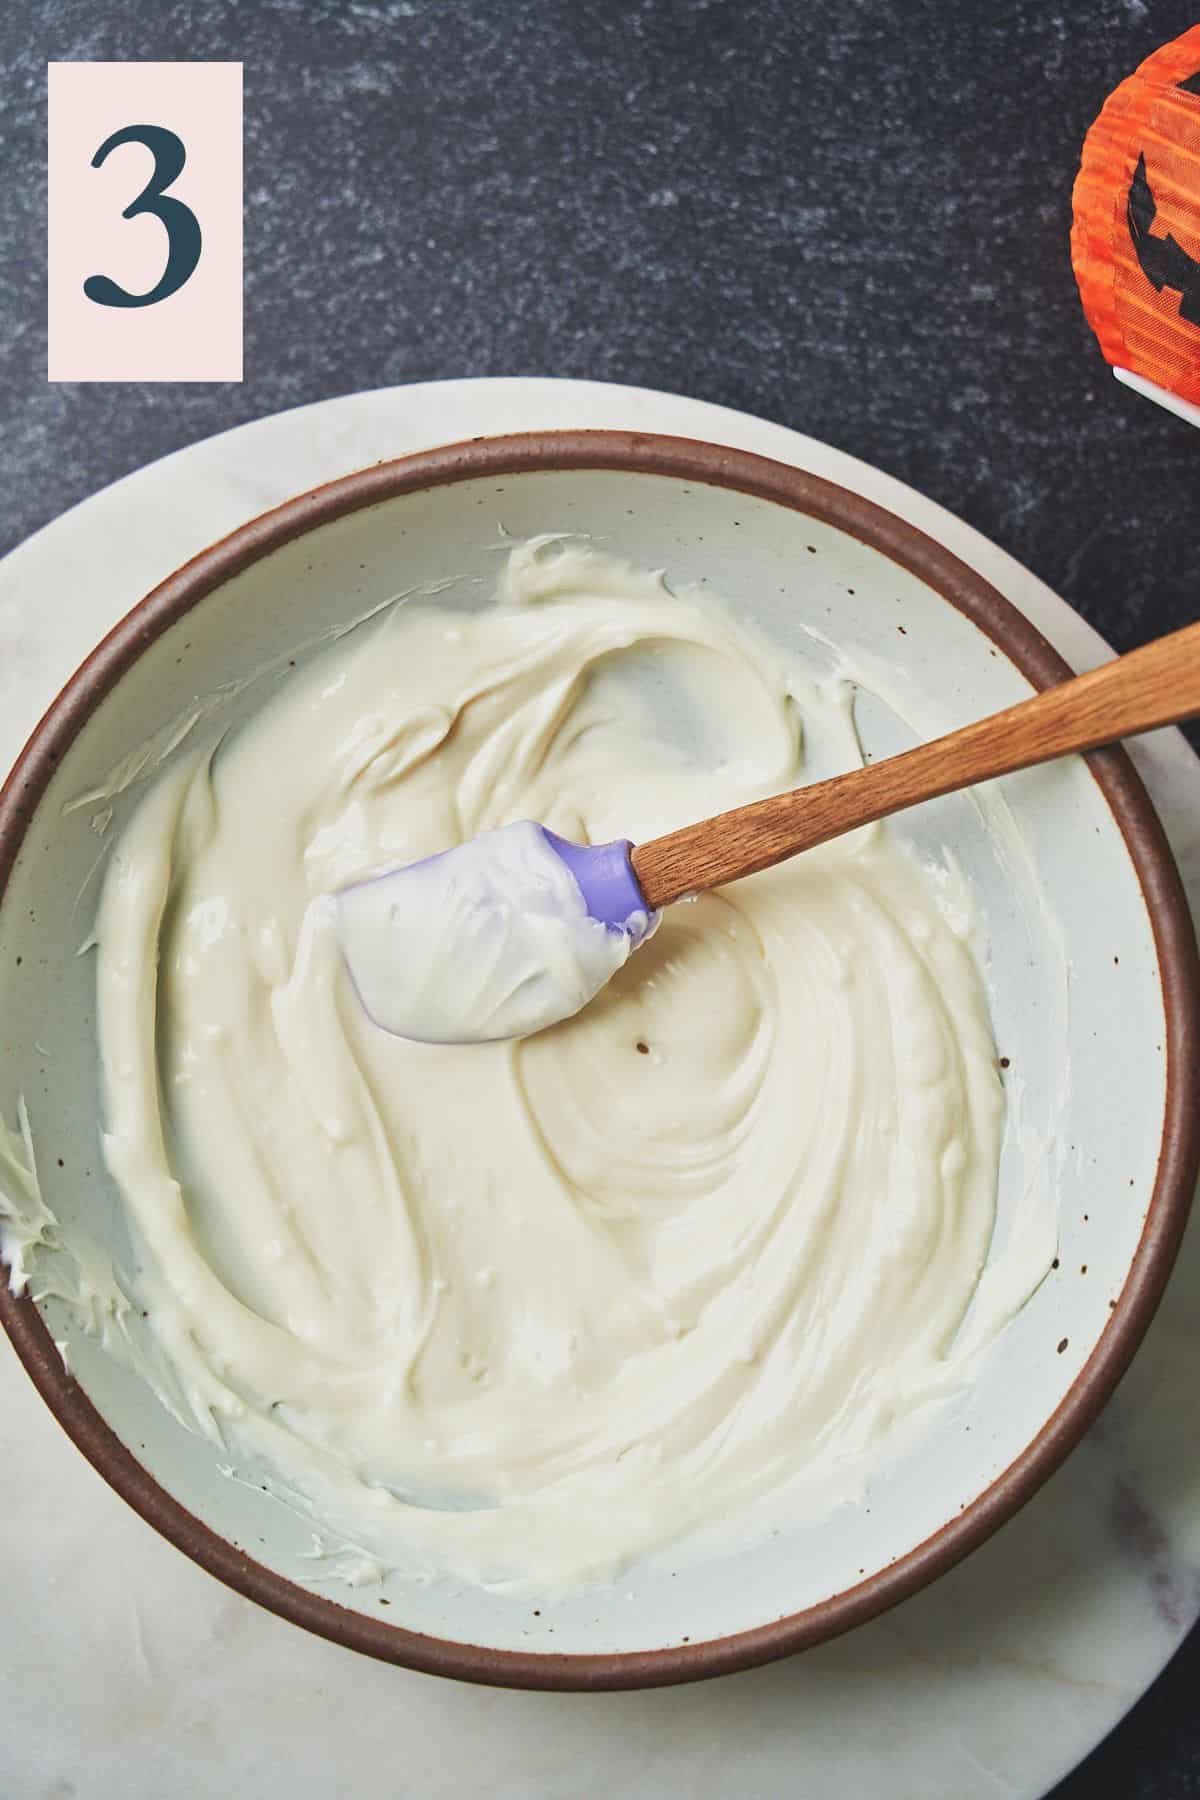
Melt the white candy melts in a separate bowl, quickly and efficiently, in quick intervals in the microwave at 50% power, or using the double boiler method. (Image 3)
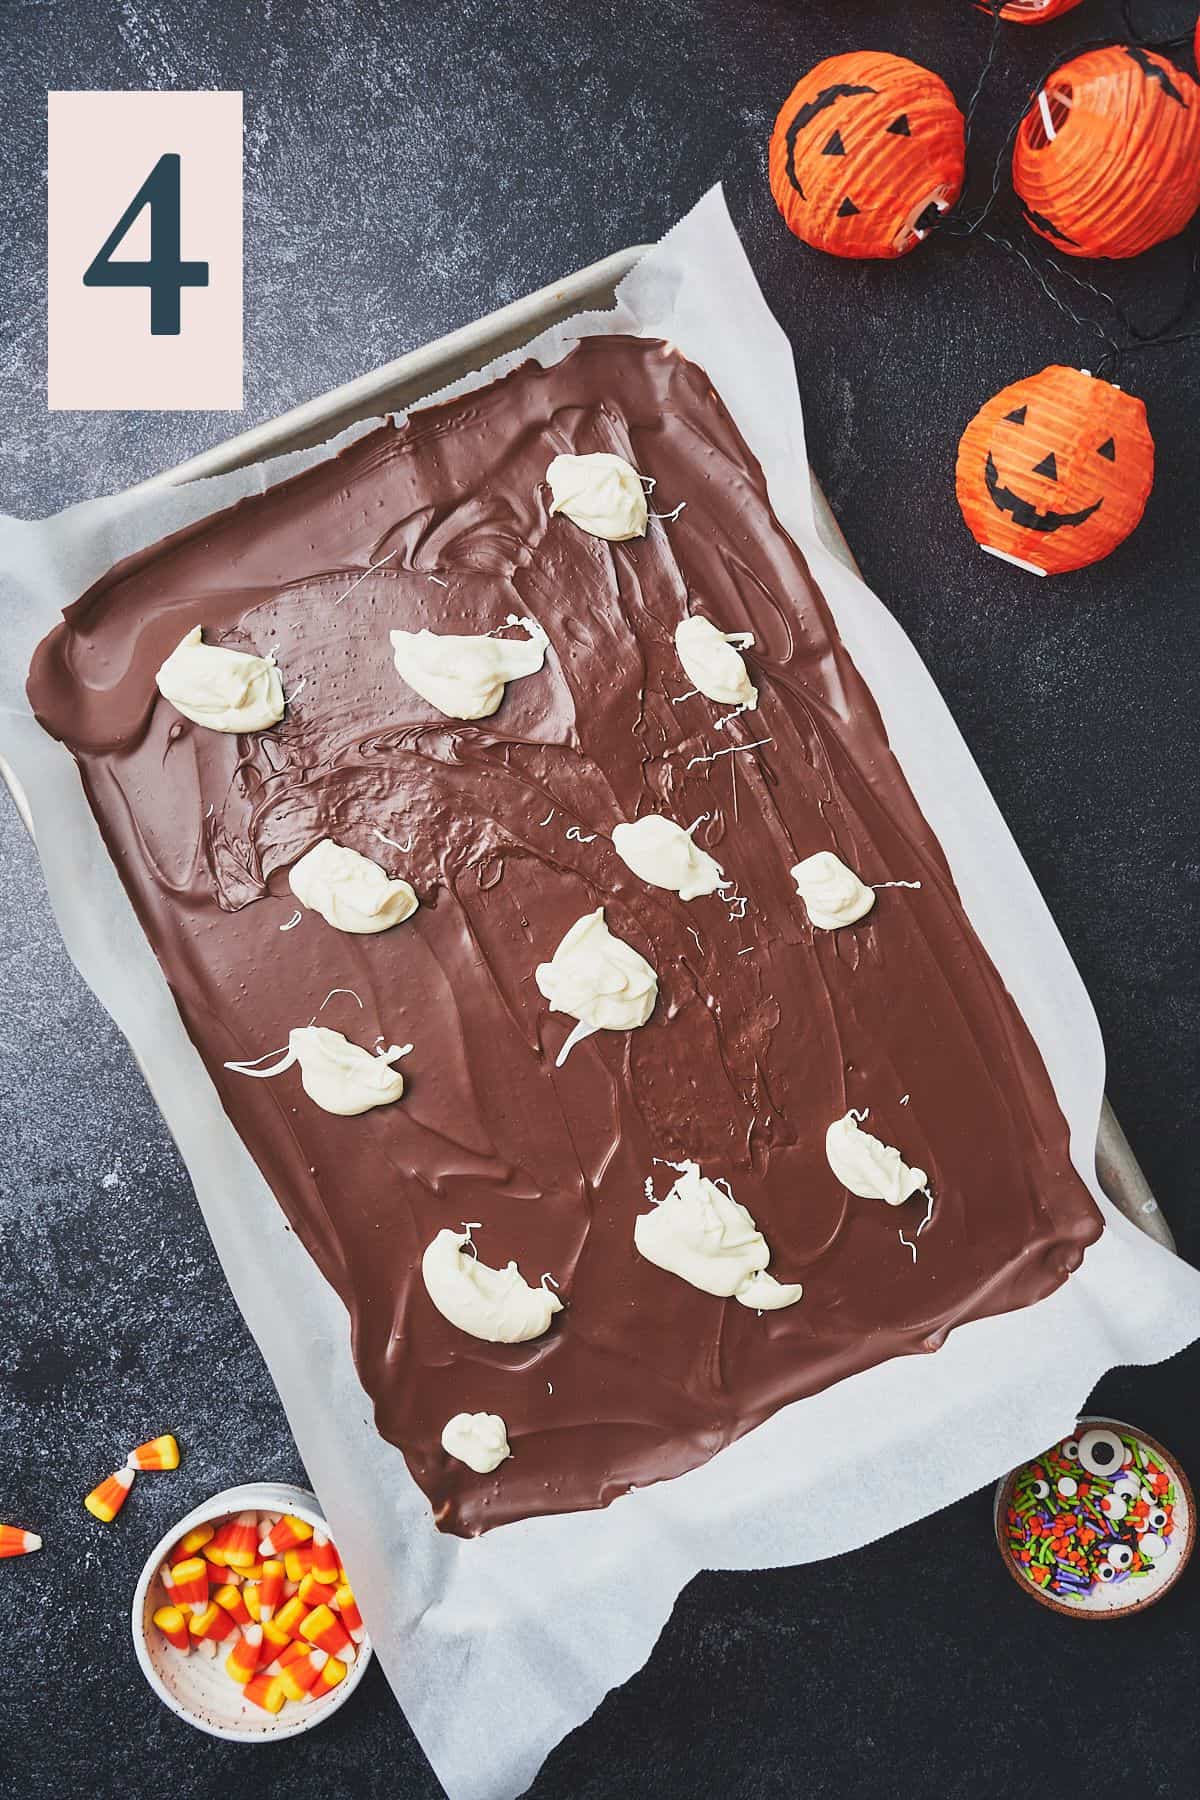
Now, add dollops of the melted white chocolate over the top of the dark chocolate, (Image 4) about 1-2 inches apart. Create circular swirls using the back of a spoon, a toothpick, or wooden skewer. (Image 5) Have fun with the design!
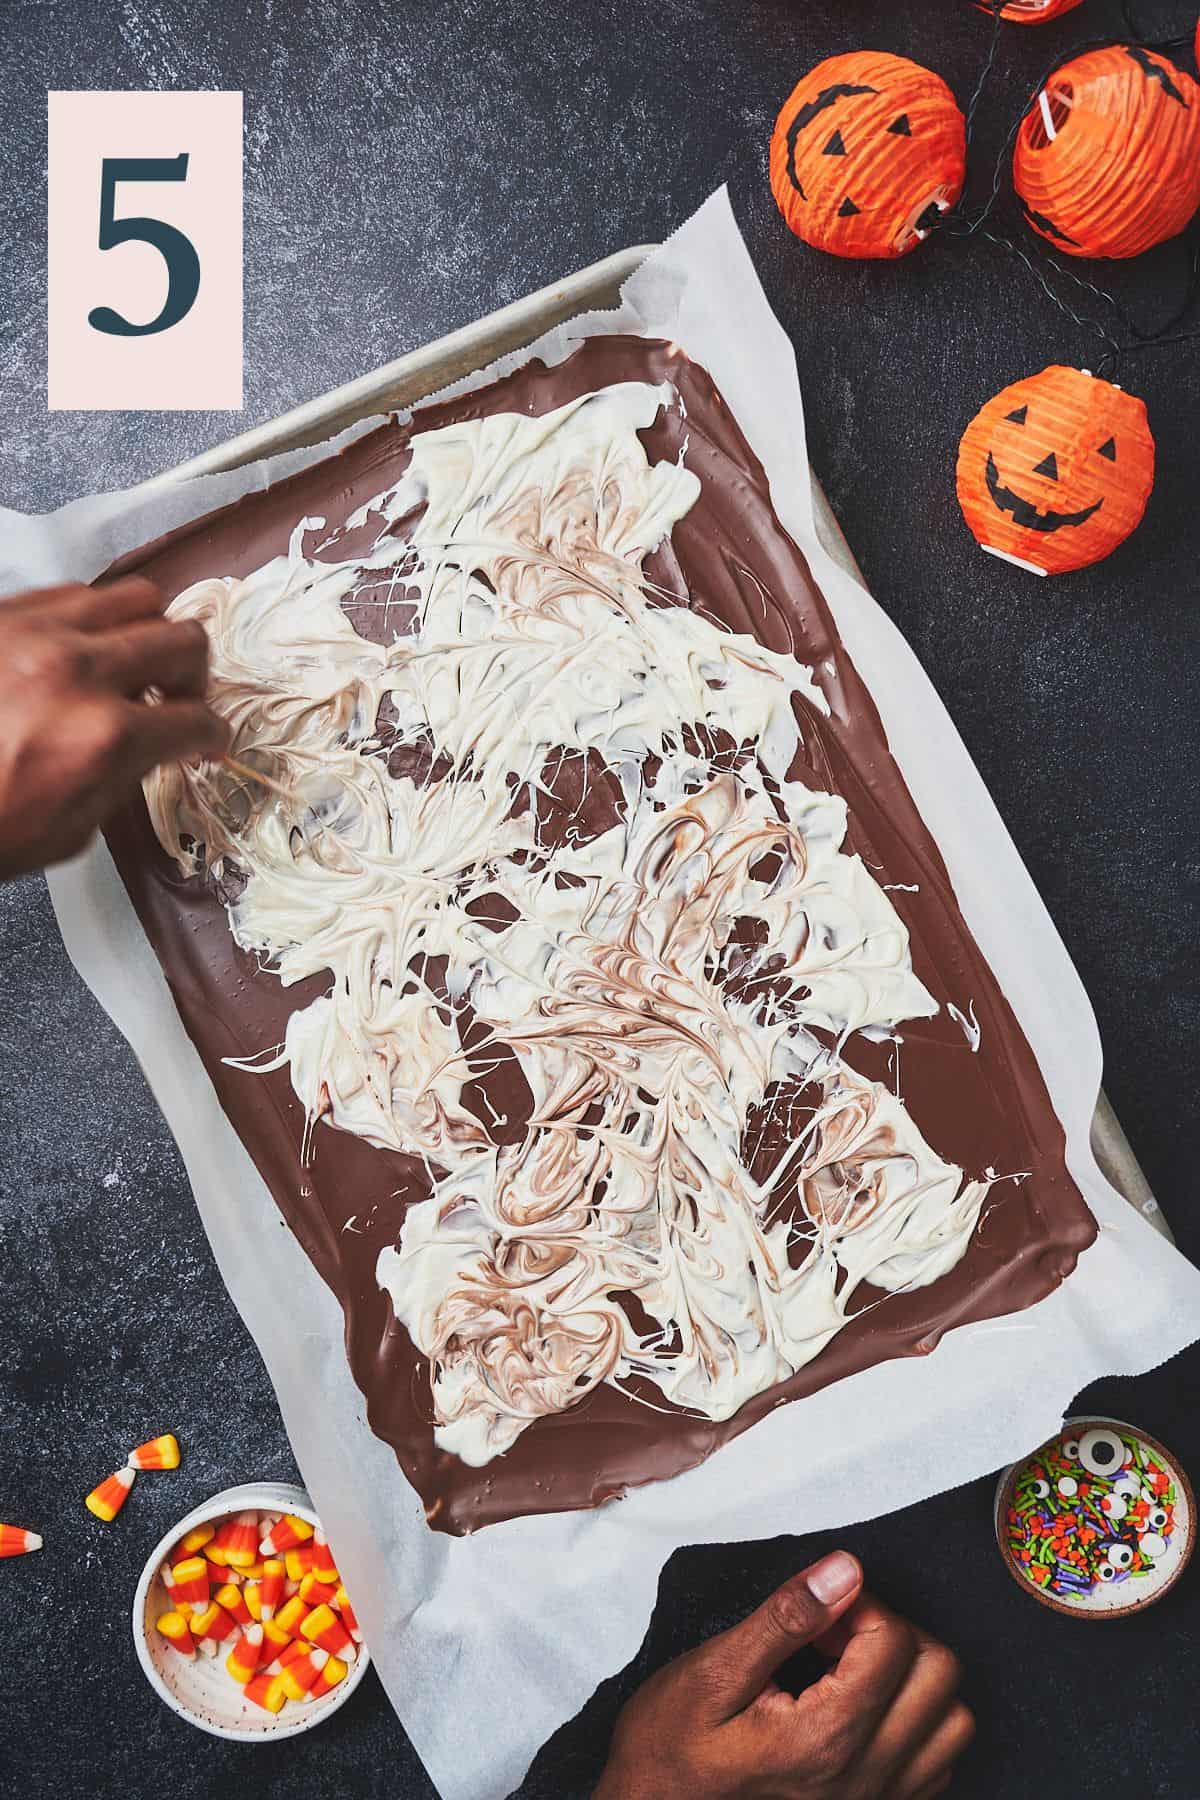
✨Pro Tip: Work quickly, as the chocolate will begin to cool and harden fast.
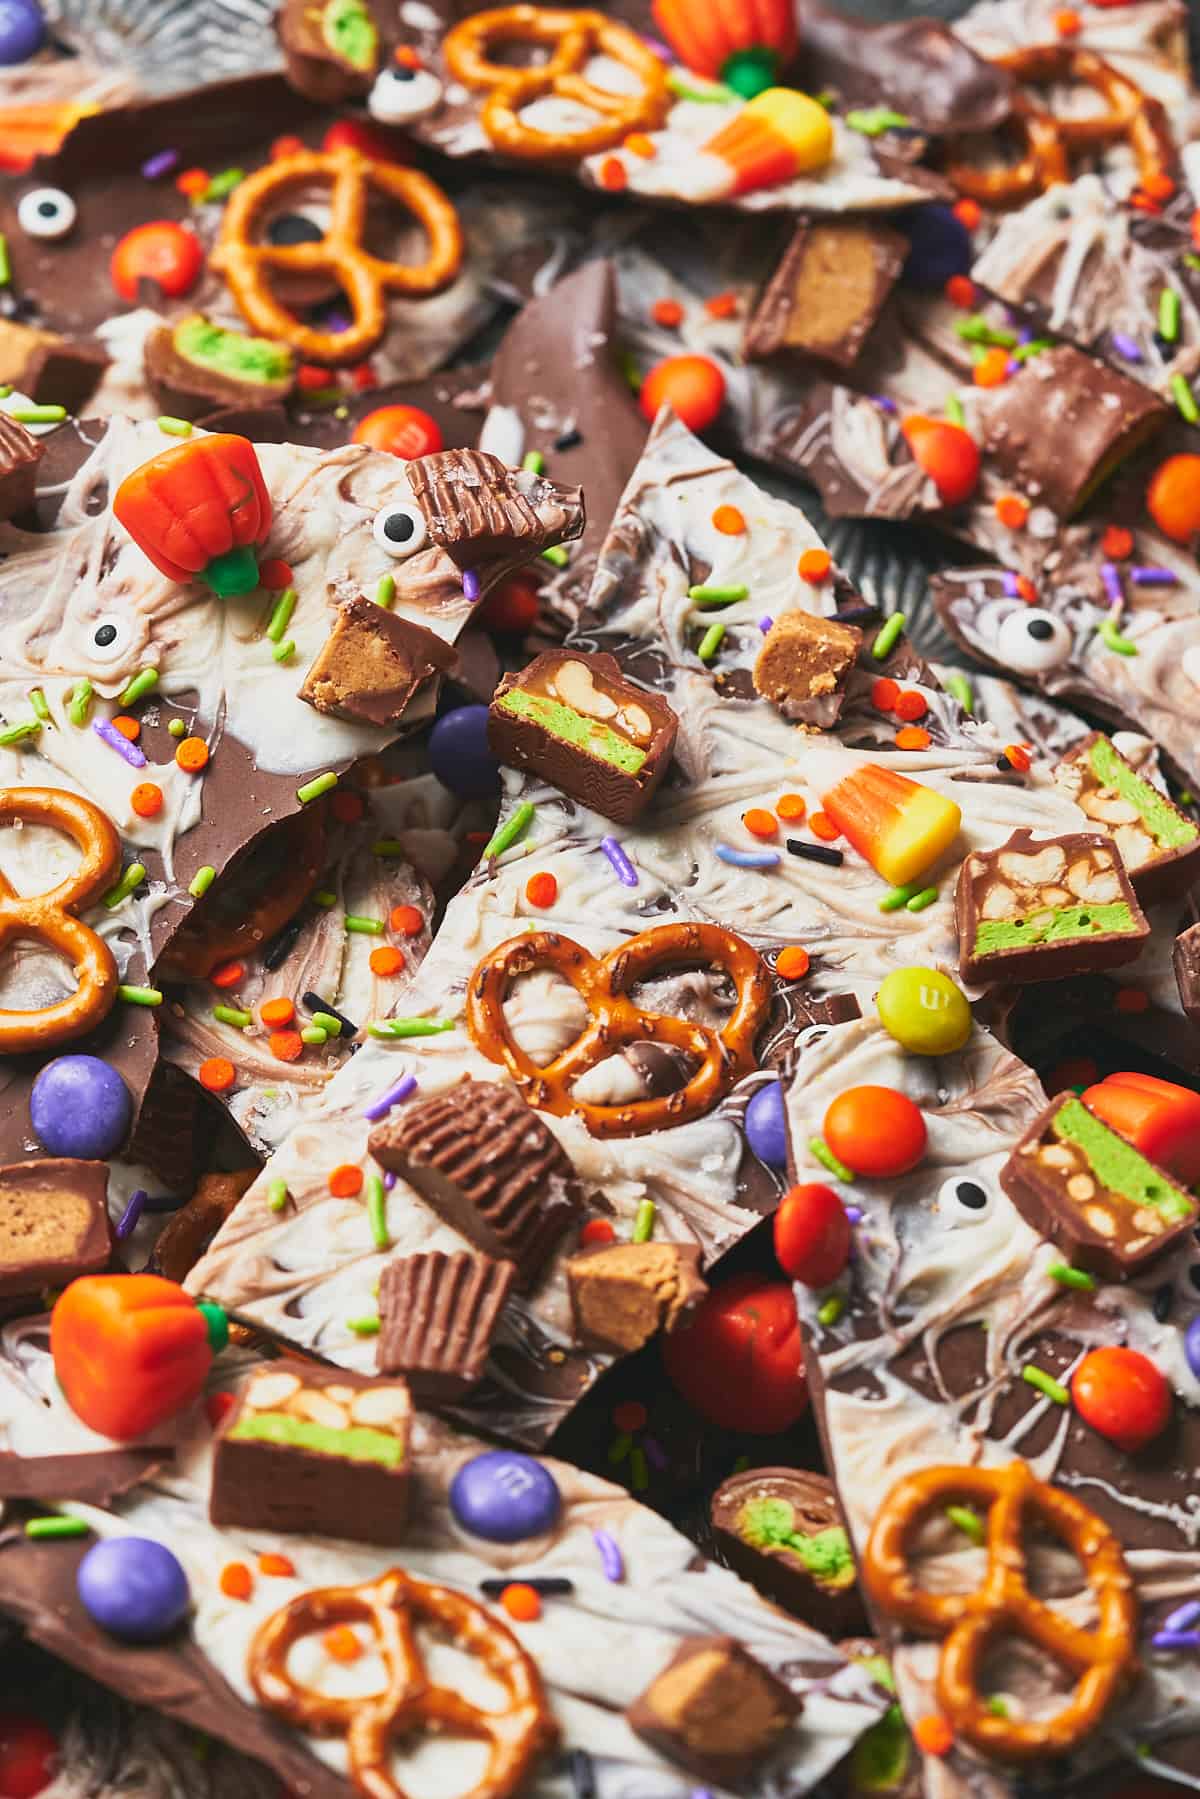
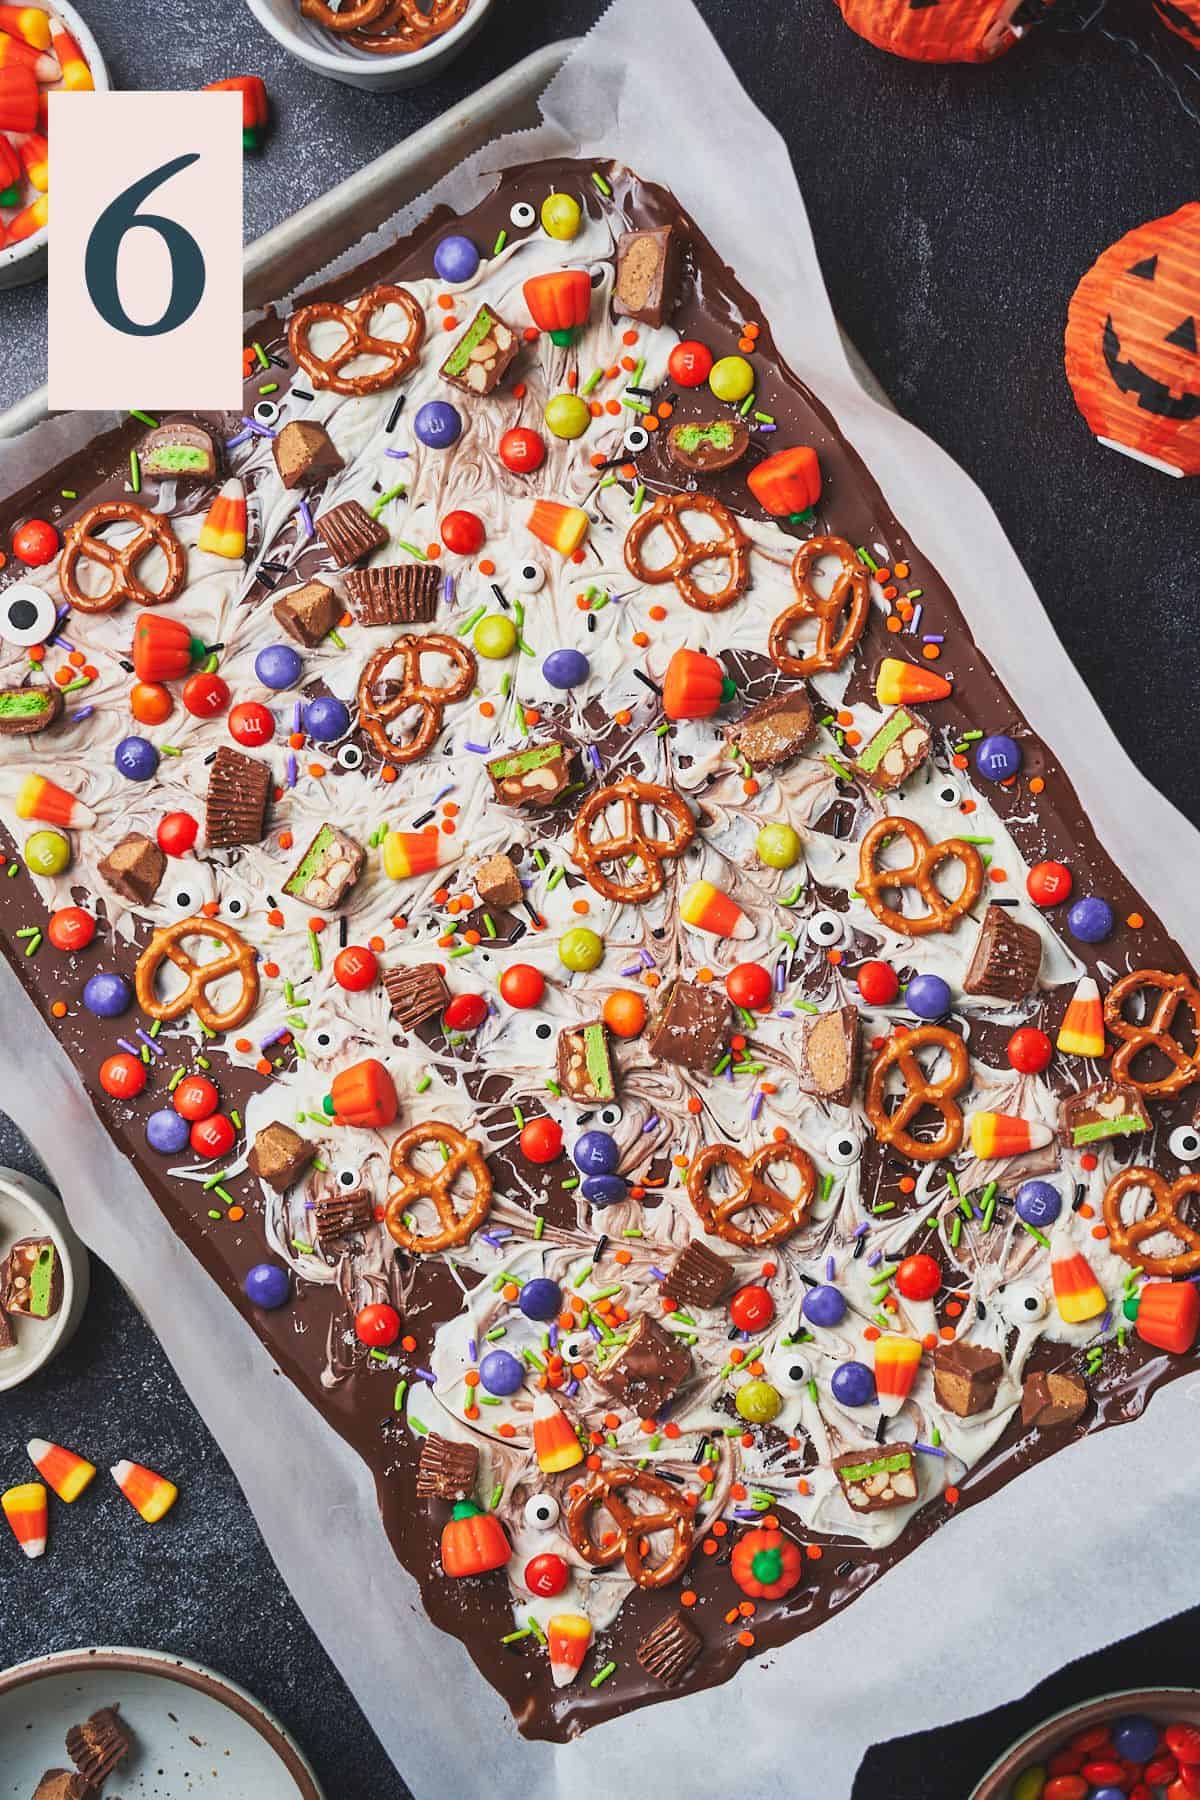
Sprinkle the candy corn, candy pumpkins, pretzels, Reese's, M&Ms, candy eyeballs, Twix pieces, Snickers pieces, and Halloween sprinkles, all over the chocolate. Press lightly to adhere. Top with optional flaky sea salt all over the top of the chocolate. (Image 6)
Place the sheet pan in the refrigerator for 1-2 hours or until the chocolate is completely hardened.
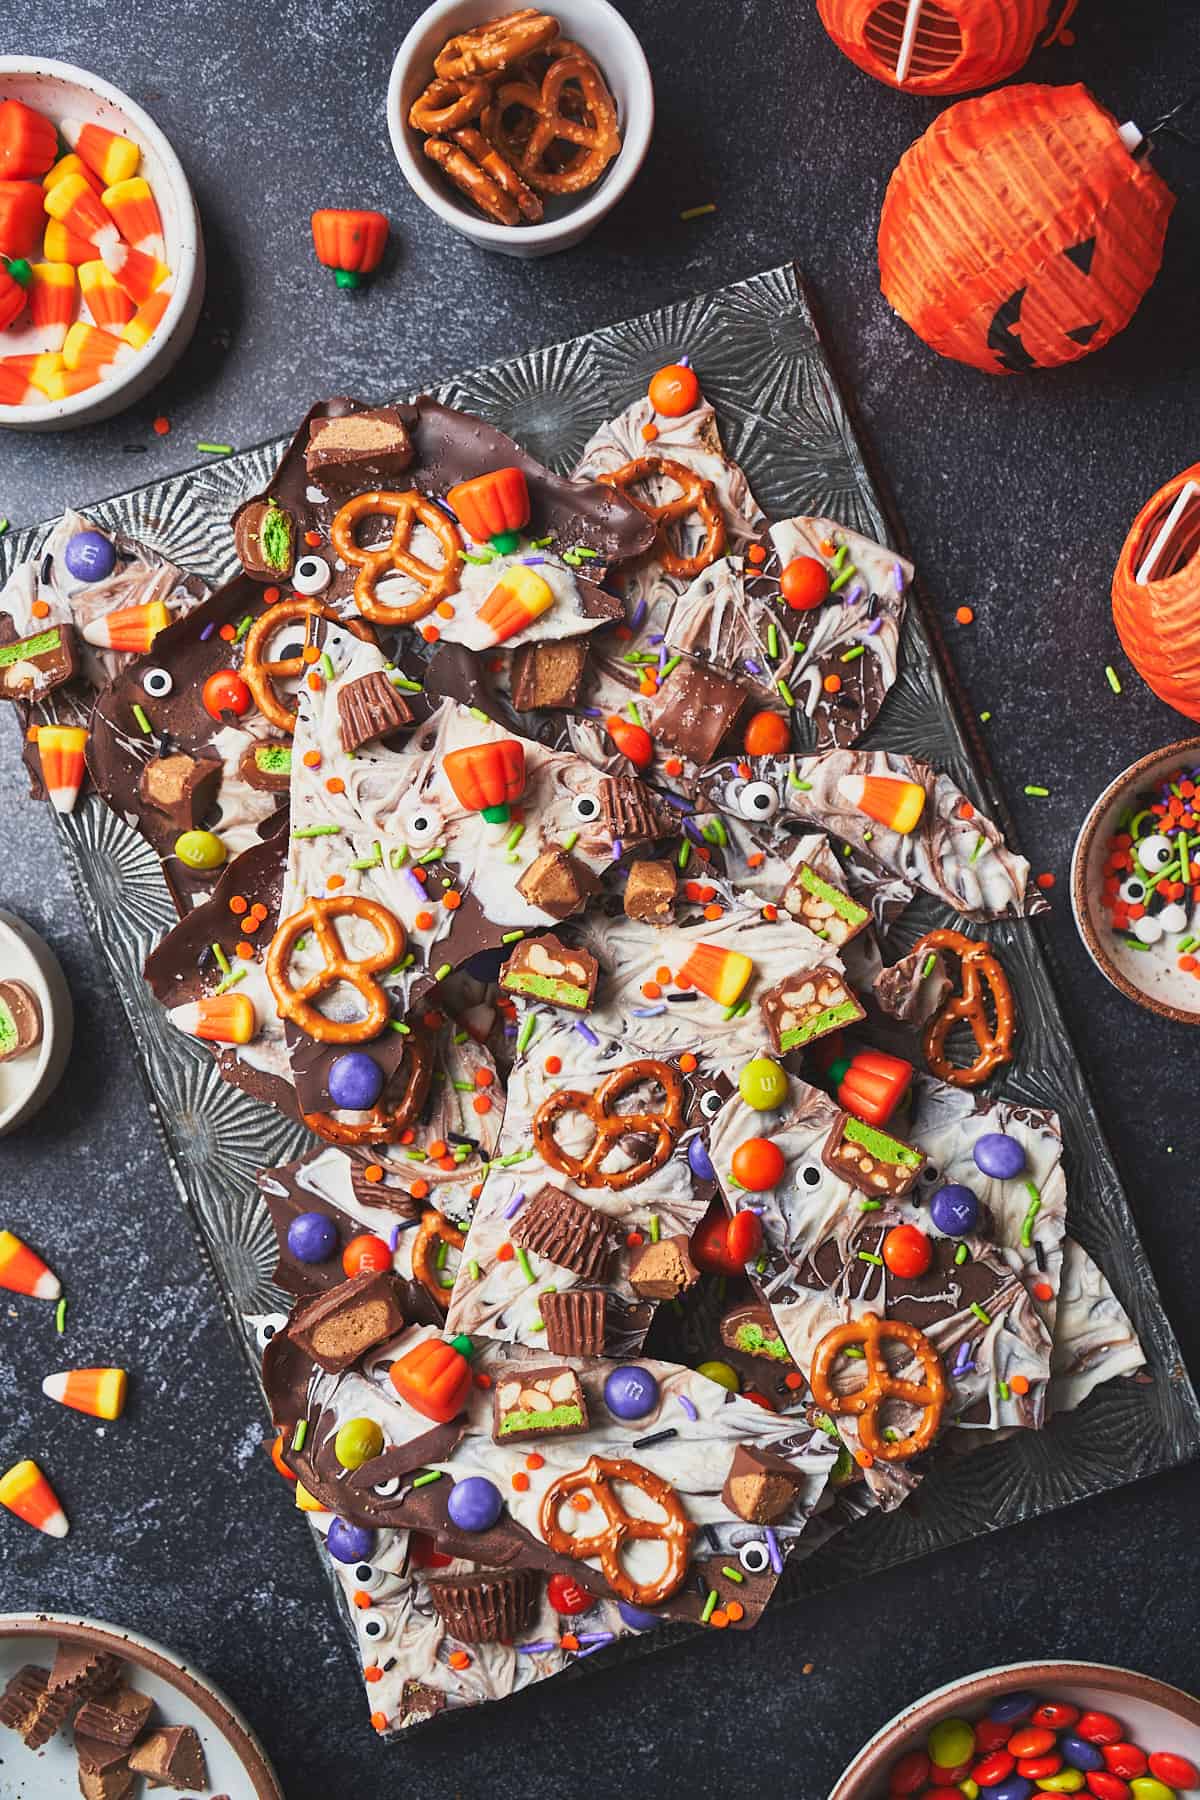
Remove the bark from the sheet pan by lifting the parchment paper out. You should be able to gently pull the parchment paper off of the back of the bark.
Cut the bark into irregular shapes and serve cold. Enjoy!
✨Tips & tricks
- Use candy melts (or melting wafers) for best results. Candy wafers are made with oil in addition to chocolate, and they melt better in the microwave. If you don't have candy melts, use chocolate bars cut into pieces with a sharp knife over chocolate chips. Chocolate chips are meant to retain their shape when baking whereas chocolate can be melted down easier.
- Melt the chocolate very gently. Melt chocolate on low heat and avoid direct high heat. Using a double boiler or microwaving in short intervals and stirring frequently can help. Set the microwave power to 50% or lower and melt in increments of 15-20 seconds, stirring for 5 to 10 seconds between each increment. When the chocolate is almost all the way melted, don't return it to the microwave, and instead keep stirring. The residual heat will continue to melt the chocolate.
- Use a double boiler method for even gentler melting. If possible, use a double boiler on the stovetop for even smoother, chocolate melting results. Place a small saucepan on the stove with an inch or two of water at the bottom. Placed a large heat-safe bowl over the top of the saucepan. Make sure that the water does not touch the bottom of the bowl. Bring the water to a gentle boil. Add the chocolate wafers and stir using a rubber spatula until melted. Be careful to ensure no steam escapes into the chocolate.
- Always ensure that the equipment (bowls, utensils, etc.) are completely dry when melting chocolate. Even a small amount of water can make the chocolate seize up.
- Work quickly. Once the chocolate is melted, spread it on the prepared baking sheet with an offset spatula and work quickly to melt the second batch of white chocolate to pour over top. The chocolate will begin to solidify quickly, so make your designs, and add toppings, pressing them in lightly to adhere.
- Allow the bark to chill completely. Place the chocolate bark in the fridge uncovered for 1 to 2 hours until it is completely solid. We don't recommend putting the chocolate bark in the microwave as it will create condensation over top of the bark.
Need supplies? Shop our Amazon store! Stock your pantry, and find all of our favorite kitchen tools! A Full Living LLC earns a small commission through purchases on our storefront to help support this site.
💭Frequently Asked Questions
Store leftovers in an airtight container in the fridge for up to 7-10 days. Allow to sit out at room temperature for 1-2 minutes before enjoying. We don't recommend freezing.
When chocolate seizes, it's often due to the introduction of a small amount of moisture. The sugar in the chocolate binds to the water, creating a gritty, thick consistency.
To attempt to fix seized chocolate:
- Add a spoonful of a neutral oil, such as a flavorless oil (like vegetable or avocado oil) or clarified butter, to the seized chocolate. Stir gently and consistently. Continue adding the liquid, one spoonful at a time, until the chocolate becomes smooth again. Note: This method may make the chocolate unsuitable for some original purposes, such as tempering, but it can still be used in recipes where the precise texture of the chocolate isn't critical.
- Warm it slowly. Remove the chocolate from the heat source. Place the bowl of seized chocolate over a pot of warm (not boiling) water. This creates a double boiler effect. Stir the chocolate gently, allowing it to melt slowly. Often, the gentle and consistent heat can help the fats and solids realign.
🎃👻More Halloween Recipes To Consider

Did you try this recipe? Make sure to leave a 5-star review below! 🌟 This helps other readers find our recipes and encourages them to try them. Also, be sure to leave a comment with your experience. Follow along, and tag @AFullLiving on Instagram with your photos!
📖 Recipe
Halloween Bark
Equipment
- rubber spatulas
- microwave safe mixing bowls
Ingredients
- 12 ounces dark chocolate melting wafers (or chocolate bars chopped into small pieces)
- 6 ounces white chocolate melting wafers (or chocolate bars chopped into small pieces)
- ⅓ cup M&MS
- ½ cup Reese's peanut butter cups, chopped (about 12 mini reese's peanut butter cups)
- ¼ cup candy corn
- ¼ cup candy pumpkins
- ½ cup mini pretzels
- ¼ cup Twix, cut into pieces
- ¼ cup mini Snickers, cut into pieces
- ½ tablespoon Halloween googly eyes (various sizes)
- 1 tablespoon Halloween sprinkles (optional)
- ½ teaspoon flaky salt
Instructions
- Line a large baking sheet with parchment paper, allowing enough to hang off the sides for easy removal. Set aside. Measure out the remaining ingredients and have everything ready to go. This chocolate bark is ready really quickly so it's important to have everything ready in advance.
- Melt the 12-ounces dark chocolate wafers. Use either a double boiler method or microwave in a microwave-safe bowl to melt the wafers in 15-20 second intervals at 50% power. Stir thoroughly. If not melted, continue for 15-second increments until melted, or until just about melted. Continue stirring, to melt the rest of the chocolate with the residual heat. Once the dark chocolate is completely melted, pour it onto the parchment-lined baking sheet and spread it evenly in a thin layer to the edges using an offset spatula.
- Melt the 6 ounces of white candy melts in a separate bowl, quickly and efficiently, in quick intervals in the microwave at 50% power, or using the double boiler method. Now, add dollops of the melted white chocolate over the top of the dark chocolate, about 1-2 inches apart. Create circular swirls using the back of a spoon, a toothpick, or wooden skewer. Have fun with the design!
- Sprinkle the candy corn, candy pumpkins, pretzels, Reese's, M&Ms, candy eyeballs, Twix pieces, Snickers pieces, and Halloween sprinkles, all over the chocolate. Press lightly to adhere. Top with optional flaky sea salt all over the top of the chocolate.
- Place the sheet pan in the refrigerator for 1-2 hours or until the chocolate is completely hardened. Remove the bark from the sheet pan by lifting the parchment paper out. You should be able to gently pull the parchment paper off of the back of the bark. Cut the bark into irregular shapes and serve cold. Enjoy!
- Store leftovers in an airtight container in the fridge for up to 7-10 days. Allow to sit out at room temperature for 1-2 minutes before enjoying. We don't recommend freezing.
Save This Recipe! 💌
Notes
- The candies used are just a suggestion, use whatever you like!
- Use candy melts (or melting wafers) for best results. Candy wafers are made with oil in addition to chocolate, and they melt better in the microwave. If you don't have candy melts, use chocolate bars cut into pieces with a sharp knife over chocolate chips. Chocolate chips are meant to retain their shape when baking whereas chocolate can be melted down easier.
- Melt the chocolate very gently. Melt chocolate on low heat and avoid direct high heat. Using a double boiler or microwaving in short intervals and stirring frequently can help. Set the microwave power to 50% or lower and melt in increments of 15-20 seconds, stirring for 5 to 10 seconds between each increment. When the chocolate is almost all the way melted, don't return it to the microwave, and instead keep stirring. The residual heat will continue to melt the chocolate.
- Use a double boiler method for even gentler melting. If possible, use a double boiler on the stovetop for even smoother, chocolate melting results. Place a small saucepan on the stove with an inch or two of water at the bottom. Placed a large heat-safe bowl over the top of the saucepan. Make sure that the water does not touch the bottom of the bowl. Bring the water to a gentle boil. Add the chocolate wafers and stir using a rubber spatula until melted. Be careful to ensure no steam escapes into the chocolate.
- Always ensure that the equipment (bowls, utensils, etc.) are completely dry when melting chocolate. Even a small amount of water can make the chocolate seize up.
- Work quickly. Once the chocolate is melted, spread it on the prepared baking sheet with an offset spatula and work quickly to melt the second batch of white chocolate to pour over top. The chocolate will begin to solidify quickly, so make your designs, and add toppings, pressing them in lightly to adhere.
- Allow the bark to chill completely. Place the chocolate bark in the fridge uncovered for 1 to 2 hours until it is completely solid. We don't recommend putting the chocolate bark in the microwave as it will create condensation over top of the bark.


brenda Bagwell says
Can u freeze it
Briana says
Hmm.. we haven't tried this ourselves, but we imagine it would work just fine for a shorter period of time! Wrap it tightly in cling-wrap or parchment paper, and then place it inside of a freezer safe bag. It can keep for up to 6 months, but we'd recommend enjoying it sooner than that, as the texture of the pretzels, etc. may change overtime!
brenda Bagwell says
Thank you