
Making Homemade Butter is so much easier than you think. You only need one ingredient - heavy cream - and a few minutes to make it! Add in some salt to taste if you'd like, and spread it on a piece of toast. It's so tasty and rewarding to make it yourself, and it comes together in 10 minutes!

Save This Recipe! 💌
Does anyone else remember making butter in elementary school? It's one of my favorite childhood memories! I remember placing cream in a jar in shaking it up until the butter separated from the buttermilk.
It was truly fascinating to me as a child, and is almost equally so to me today! While you may never NEED to make your own butter, it's a fun skill to have in your back pocket. Plus, it's just so easy!
Making butter at home is a fun activity to do with your kids or just yourself. It's a great way to control the salt level, and it's just so fresh!
Serve your fresh butter with some good bread and you're in for a simple treat. For a truly decadent brunch, spread it on this sourdough French toast or these sweet cream pancakes!
Jump to:
❤️Why We Love This Recipe
- Fascinating science! It's so much fun to watch cream transform from whipped cream to butter. No matter how old you are, we always find making butter to be very fun!
- Only 1 ingredient needed. If you have heavy cream, than you can make butter. Truly anyone can do it!
- Ready in 10 minutes or less. You truly only need about 10 minutes to make your own butter. It doesn't get easier than that.
- Impress guests. Although making butter is simple to do, making some for your guests will really impress them and elevate your entire spread!
🥛Ingredients
Here are the ingredients we used for this recipe.

- Heavy whipping cream. You really only need 1 ingredient to make butter, and that's heavy cream. For the best-tasting butter, use the highest-quality cream you can find. We chose a grass-fed, organic cream and it gave our butter this lovely yellow hue. If you can't find organic cream near you, don't worry, any heavy cream will do! Just note, that the color of the butter will probably be a little more pale. This is totally normal.
- Salt. We like to use a mixture of kosher salt for folding into the butter, and flaky sea salt for finishing the butter. Use as much or as little as you want, or leave it out entirely!
Visit the recipe card for the full quantities and nutritional information.
🔪Prep work
- Measure out cream and salt.
- Prepare a stand mixer with a whisk attachment.
📋Instructions
Note: We like to make this in a stand mixer for ease, but if you don't have a stand mixer, you can use an electric hand mixer, a blender, a food processor, or even a jar and shake until everything separates.
Place heavy cream in the bowl of a stand mixer. (Image 1)
Begin whisking on low to medium speed until the mixture begins to thicken passed the point of whipped cream. This will take about 3 minutes. (Image 2)
Increase the speed to high, and continue mixing until the butter clumps up and separates from the buttermilk. (Image 3)


⭑Pro Tip: Drape the bowl with a large kitchen towel to prevent buttermilk from splashing everywhere.
Now, strain the excess buttermilk away from the butter. We like to use a fine mesh sieve to do this. (Image 4) Save the buttermilk for another use!
Next, wash the butter in cold water to get rid of any excess buttermilk. (Image 5)


⭑Pro Tip: Get off as much excess buttermilk as possible to help the butter last longer. Buttermilk will make the butter go rancid.
Dry the off butter really well, then place it in a bowl and season to taste with salt. (Image 6)
Use a rubber spatula to mix it together.

⭑Pro Tip: To make your butter about as salty as store-bought salted butter, you will want. touse about ¼-1/3 of a teaspoon of kosher salt per every 1 cup of cream! If you prefer unsalted butter, feel free to leave it out.
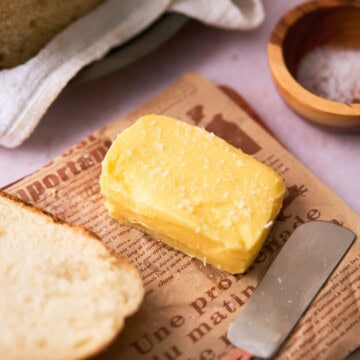
Shape the butter into your desired shape using parchment paper, sprinkle with flaky salt, and serve!

✨Tips & tricks
- Use the highest quality ingredients you can. While this isn't necessary to make the butter, it will definitely result in the best flavor!
- Drape the mixing bowl with a towel. When making the butter, this will help prevent messes from happening. No one wants to be splashed with buttermilk!
- Season to taste. Add as much or as little salt as you'd like. You can also leave it out.
- Rinse off the excess buttermilk. Excess liquid will make the butter go rancid, so make sure to get rid of as much of it as you can if you plan to store the butter for an extended period.
- Use cold water to rinse the butter. Cold water will help the butter retain its shape and not melt!
Need supplies? Shop our Amazon store! Stock your pantry, and find all of our favorite kitchen tools! A Full Living LLC earns a small commission through purchases on our storefront to help support this site.
💭Frequently Asked Questions
Store the leftover butter in the fridge in an airtight container for 10-14 days.
Yes! For easy spreading, just be sure to take the butter out of the fridge for about 30 minutes to 1 hour before serving so it's easy to spread.
Yes, you can. Wrap the butter tightly in parchment paper or plastic wrap, and store in a freezer-safe bag or container for up to 1 year. Defrost overnight in the fridge!
🧈More Butter Recipes To Consider
Looking for ways to jazz up your homemade butter? Try transforming it into these tasty recipes!


You may also enjoy this guide on how to brown butter, or this roasted garlic butter recipe!
Did you try this recipe? Make sure to leave a 5-star review below! 🌟 This helps other readers find our recipes and encourages them to try them. Also, be sure to leave a comment with your experience. Follow along, and tag @AFullLiving on Instagram with your photos!
📖 Recipe
How to Make Homemade Butter
Equipment
- stand mixer with a whisk attachment can also use a hand mixer, food processor, blender, or even a jar with a lid.
- Rubber Spatula
Ingredients
- 2 cups heavy whipping cream (grass-fed, organic is best if possible!)
- ½ teaspoon kosher salt (use more or less to taste!)
- flaky salt for serving (optional and to taste)
Instructions
- Place heavy cream in the bowl of a stand mixer. Begin whisking on low to medium speed until the mixture begins to thicken passed the point of whipped cream. This will take about 3 minutes.2 cups heavy whipping cream
- Increase the speed to high, and continue mixing until the butter clumps up and separates from the buttermilk. Pro tip: Drape the bowl with a large kitchen towel to prevent buttermilk from splashing everywhere.
- Now, strain the excess buttermilk away from the butter. We like to use a fine mesh sieve to do this. Save the buttermilk for another use! Wash the butter in cold water to get rid of any excess buttermilk. Excess buttermilk will make the butter go rancid faster when storing, so get rid of as much of it as you can.
- Dry the off butter really well, then place it in a bowl and season to taste with salt. Use a rubber spatula to mix it together. Pro tip: To make your butter about as salty as store-bought salted butter, you will want. touse about ¼-1/3 of a teaspoon of kosher salt per every 1 cup of cream!½ teaspoon kosher salt
- Shape the butter into your desired shape using parchment paper, sprinkle with flaky salt, and serve!flaky salt for serving
- Store the leftover butter in the fridge in an airtight container for 10-14 days. To freeze, wrap the butter tightly in parchment paper or plastic wrap, and store in a freezer-safe bag or container for up to 1 year. Defrost overnight in the fridge!
Save This Recipe! 💌
Notes
- Use the highest quality ingredients you can. While this isn't necessary to make the butter, it will definitely result in the best flavor!
- Drape the mixing bowl with a towel. When making the butter, this will help prevent messes from happening. No one wants to be splashed with buttermilk!
- Season to taste. Add as much or as little salt as you'd like. You can also leave it out.
- Rinse off the excess buttermilk. Excess liquid will make the butter go rancid, so make sure to get rid of as much of it as you can if you plan to store the butter for an extended period.
- Use cold water to rinse the butter. Cold water will help the butter retain its shape and not melt!


Comments
No Comments