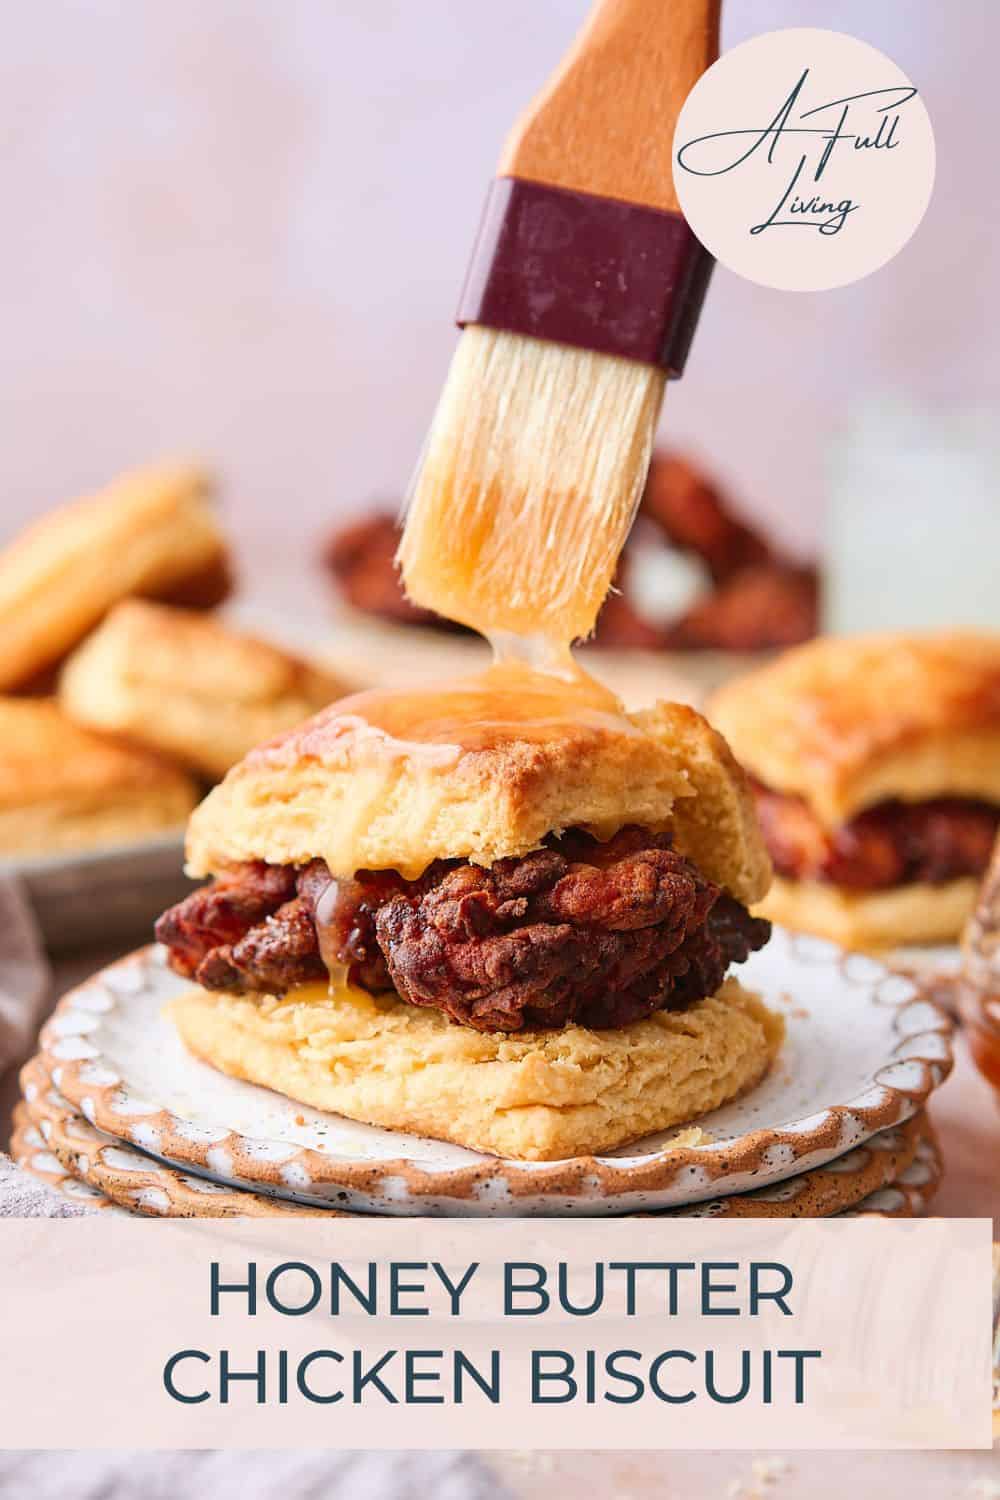
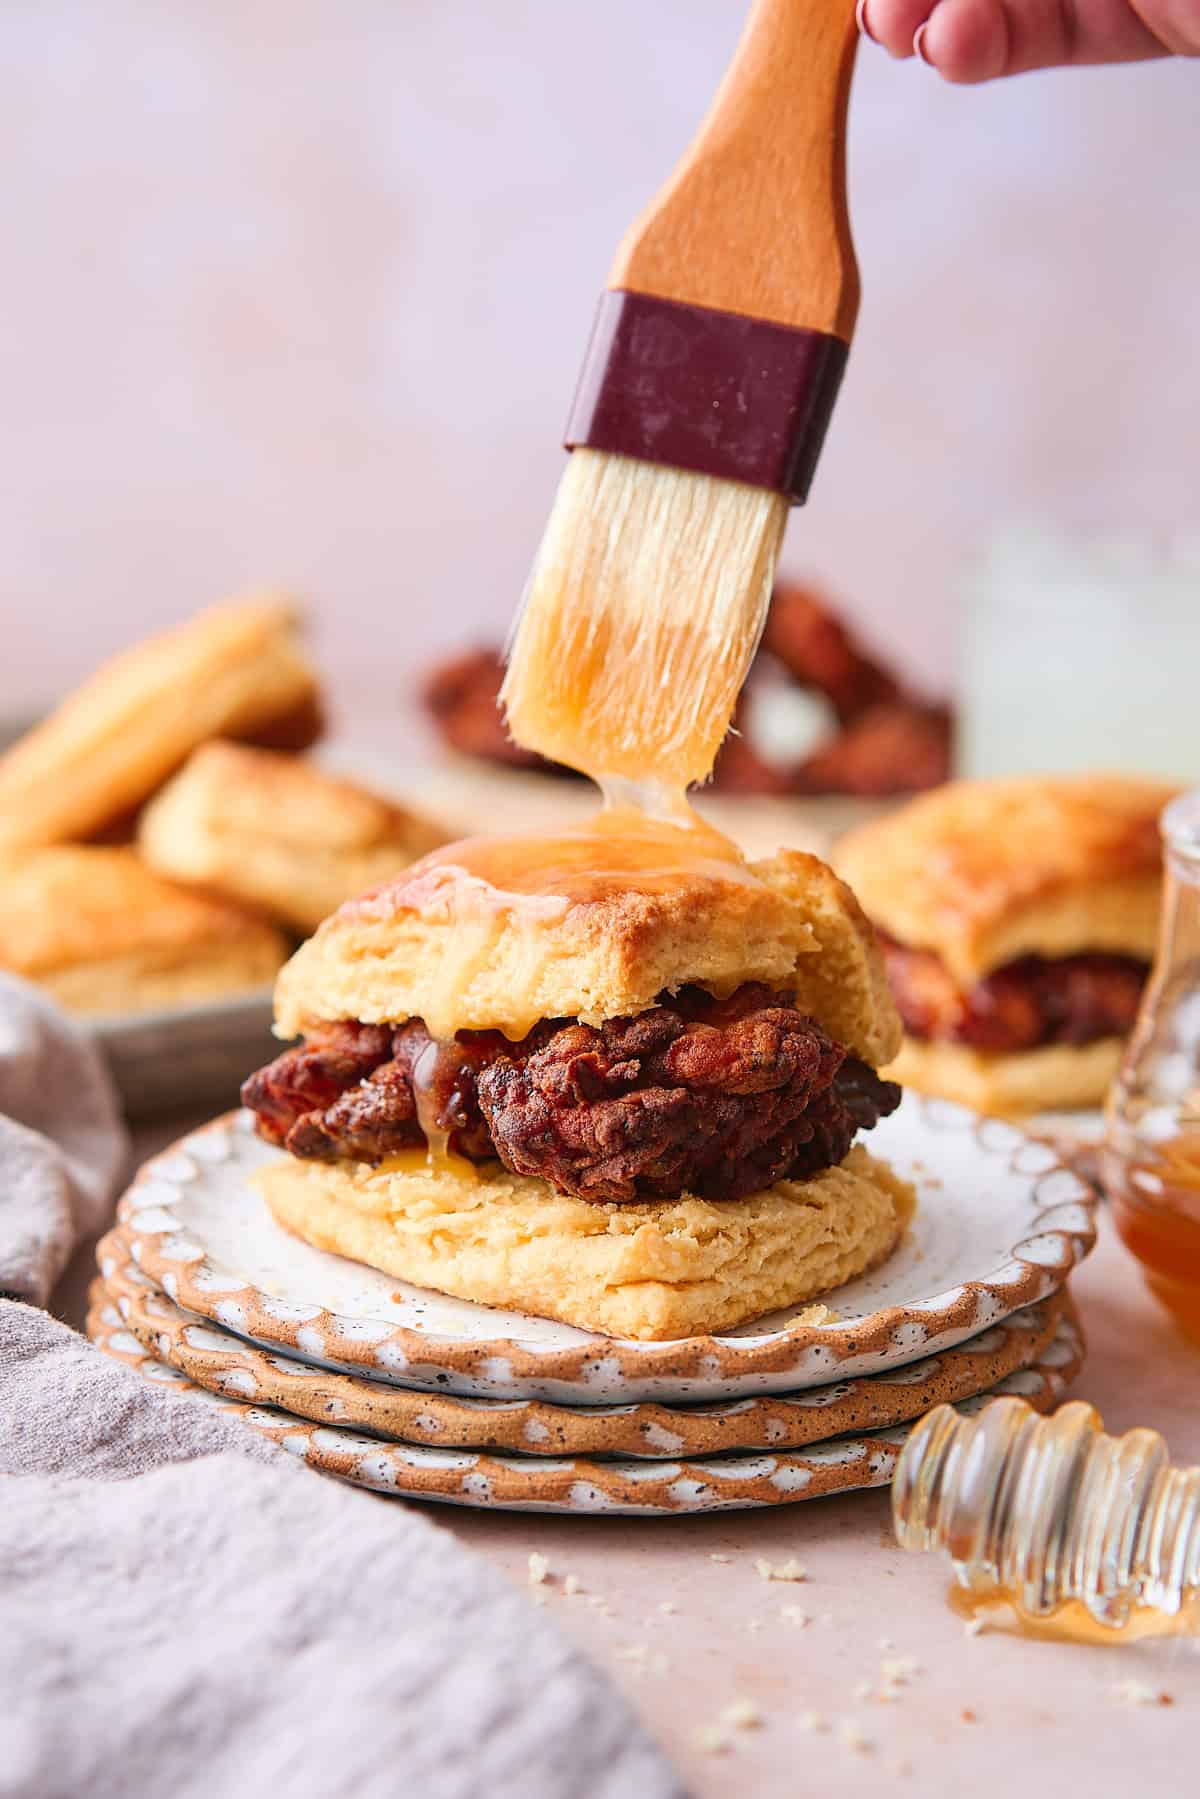
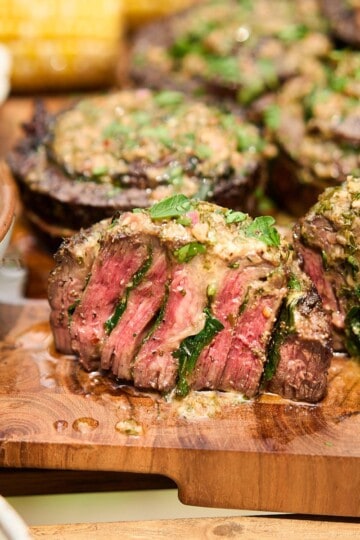
This Honey Butter Chicken Biscuit Recipe is the ultimate comfort food! Perfectly seasoned, ultra-crispy fried chicken thighs get nestled between fluffy homemade buttermilk biscuits and slathered in a delicious honey butter for the perfect bite.
Save This Recipe! 💌
If you haven't had a honey butter chicken biscuit before, now is the time! Thanks to Wendy's and Whataburger, they've become somewhat of a sweet and savory breakfast staple, and they're incredible.
In our opinion, these aren't just great for breakfast and brunch, but really any time of day. They're especially delightful when they're made with love at home.
If you're looking for something else delicious and unique for brunch, be sure to check out our breakfast burger or these delicious ham and cheese bread rolls.
You may also like these honey cornbread muffins and these hot honey chicken wings.
Jump to:
❤️Why We Love This Recipe
- Absolutely delicious. We promise that if you make a batch of these, they'll be gobbled up instantly! Fluffy, flaky buttermilk biscuits get brushed with honey butter before going into the oven, and chicken thighs get marinated and juicy, then fried to crispy perfection. Finish everything off with plenty of honey butter and prepare to be delighted!
- Made with simple ingredients. All you need is a well-stocked spice rack and a few ingredients that can be found at any grocery store if you don't already have them on hand!
- Approachable recipe. If you've never made fried chicken or buttermilk biscuits from scratch before, you're in luck, because our step-by-step instructions and expert tips will help you make them perfectly, every time!
- Make-ahead. There are a few steps involved when making these delicious chicken biscuits, but you can also prep parts in advance, making it simple to tie everything up in one warm bite on the day of frying.
🍗Ingredients
Fried chicken thighs
Here are the ingredients we used for this recipe. You can find more information for substitutions below.
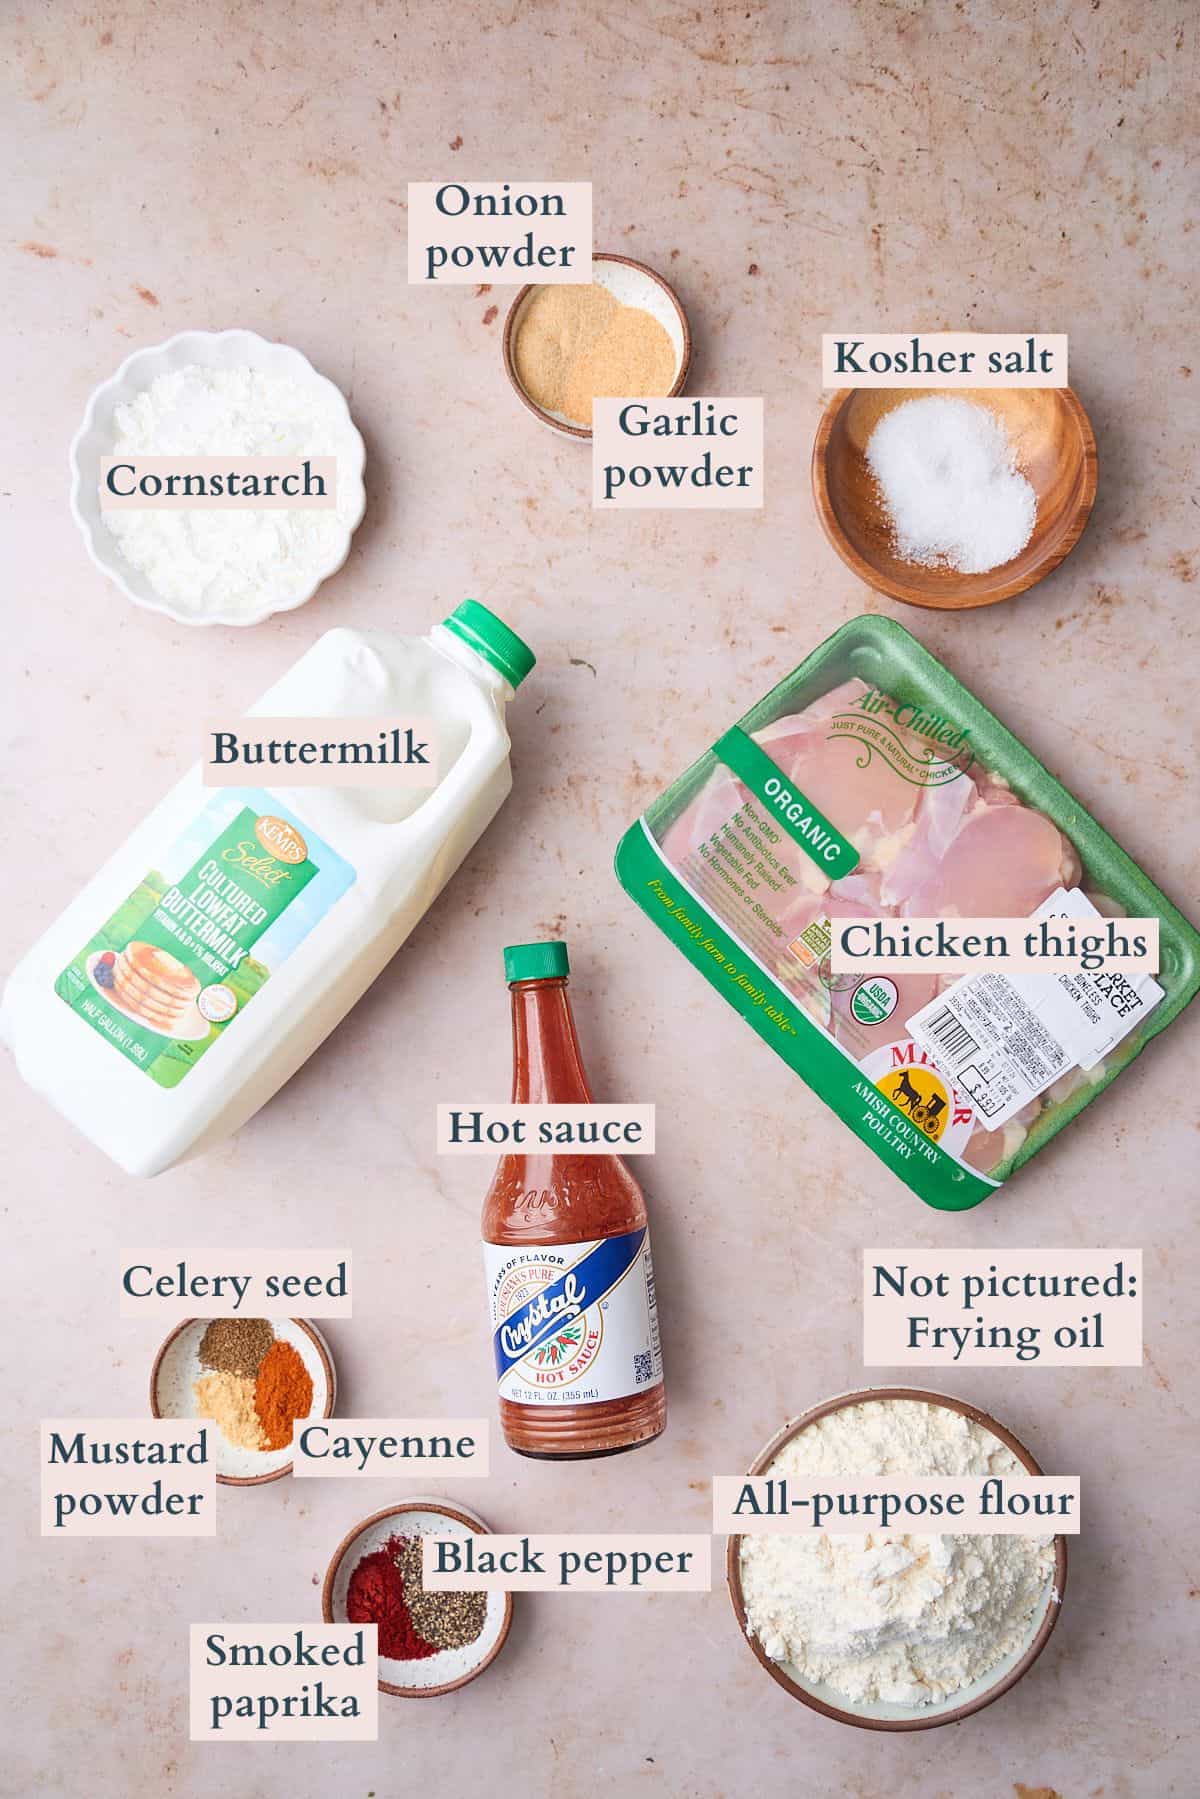
- Buttermilk. This is non-negotiable for this marinade to keep the chicken nice and tender!
- Chicken thighs. Thighs are preferred because they are more juicy, flavorful, and much more difficult to overcook than breasts. You can use boneless, skinless chicken thighs for this recipe as we did, or you can use thighs with the skin on for extra crispy and delicious chicken! Just make sure there's no bone left in the chicken, because it wouldn't work well for this application.
- Seasonings. We think our blend of seasonings is the perfect blend of savory, smoky, and spicy. You can add or subtract items as you'd like. Keep in mind that dry seasonings are 100% necessary for this recipe because fresh seasonings will burn in the hot oil.
Buttermilk biscuits & honey butter
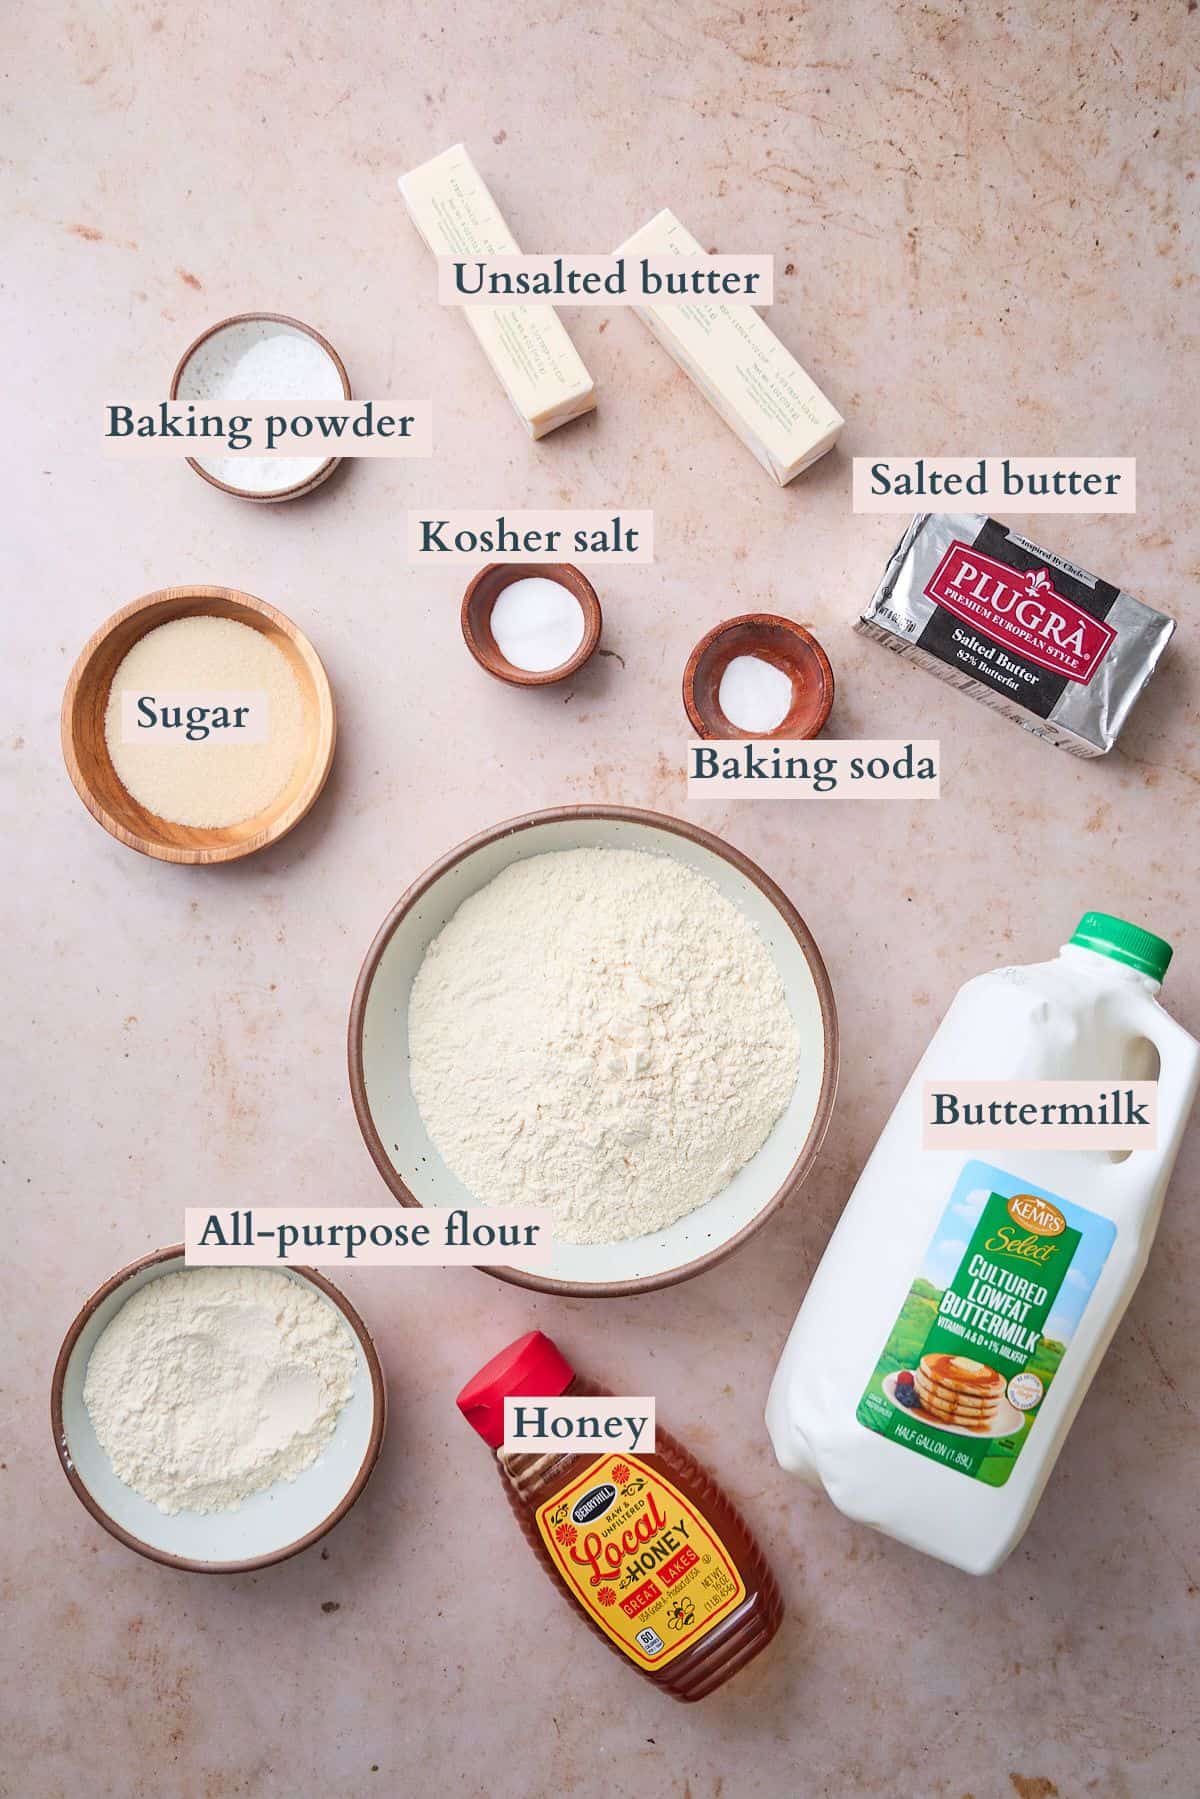
- Unsalted butter. One stick of unsalted butter should be frozen for the biscuits! The rest is fine at room temperature since it will be used to make the honey butter sauce. COLD butter is ABSOLUTELY CRUCIAL for fluffy, delicious biscuits!
- Salted butter. You could use all unsalted butter if you'd like, but we like the salted butter for the honey butter sauce that goes on the sandwich. You can also serve this chicken biscuit with our whipped honey butter in addition to melted for even more delicious flavor!
- Buttermilk. Like the butter, this should be kept VERY cold until it's time to add it to the mixture. Heat is not your friend in this recipe if you want tall, fluffy biscuits. If you run out of buttermilk, you can use heavy cream and about 1 tablespoon of vinegar instead.
- Sugar. A little sugar makes these biscuits a touch sweet, and it's perfect for this sweet and savory chicken biscuit sandwich.
Visit the recipe card for the full quantities and nutritional information.
✨Substitutions & Variations
Here are a few suggestions on additional flavors to try, or simple variations to this recipe.
- Use chicken breasts. If you prefer a leaner sandwich, use chicken breasts instead of thighs. It will still taste good, though not quite as tasty as thighs! You may want to slice the chicken breasts in half so they aren't so thick, as a regular-sized breast will be way too thick for a sandwich.
- Spicier. Add extra cayenne pepper and hot sauce to the dredge and chicken marinade. Cajun seasoning and red pepper flakes would also make a great choice to add to the seasoning mixture. You can also serve these biscuits with hot honey for even more spicy goodness!
- Herbed. Savory herbs like thyme, oregano, and rosemary would complement the chicken very well.
- Add extra toppings. You can add anything you love to a chicken biscuit to make it your own. We'd suggest bacon, cheese, or pickles.
This recipe hasn't been tested with any other substitutions or variations, so we can't guarantee any results. If you make a change, let us know how it goes in the comments below!
🔪Prep Work
- Freeze butter overnight, or for at least 30 minutes. Once frozen, cut the butter into chunks. Place it back in the freezer while you prepare the other ingredients.
- Pat the chicken thighs dry with paper towels.
- Place two cooling racks over baking sheets to prepare for dredging and frying the chicken.
- Measure out all of the ingredients.
📋Instructions
Marinate the chicken
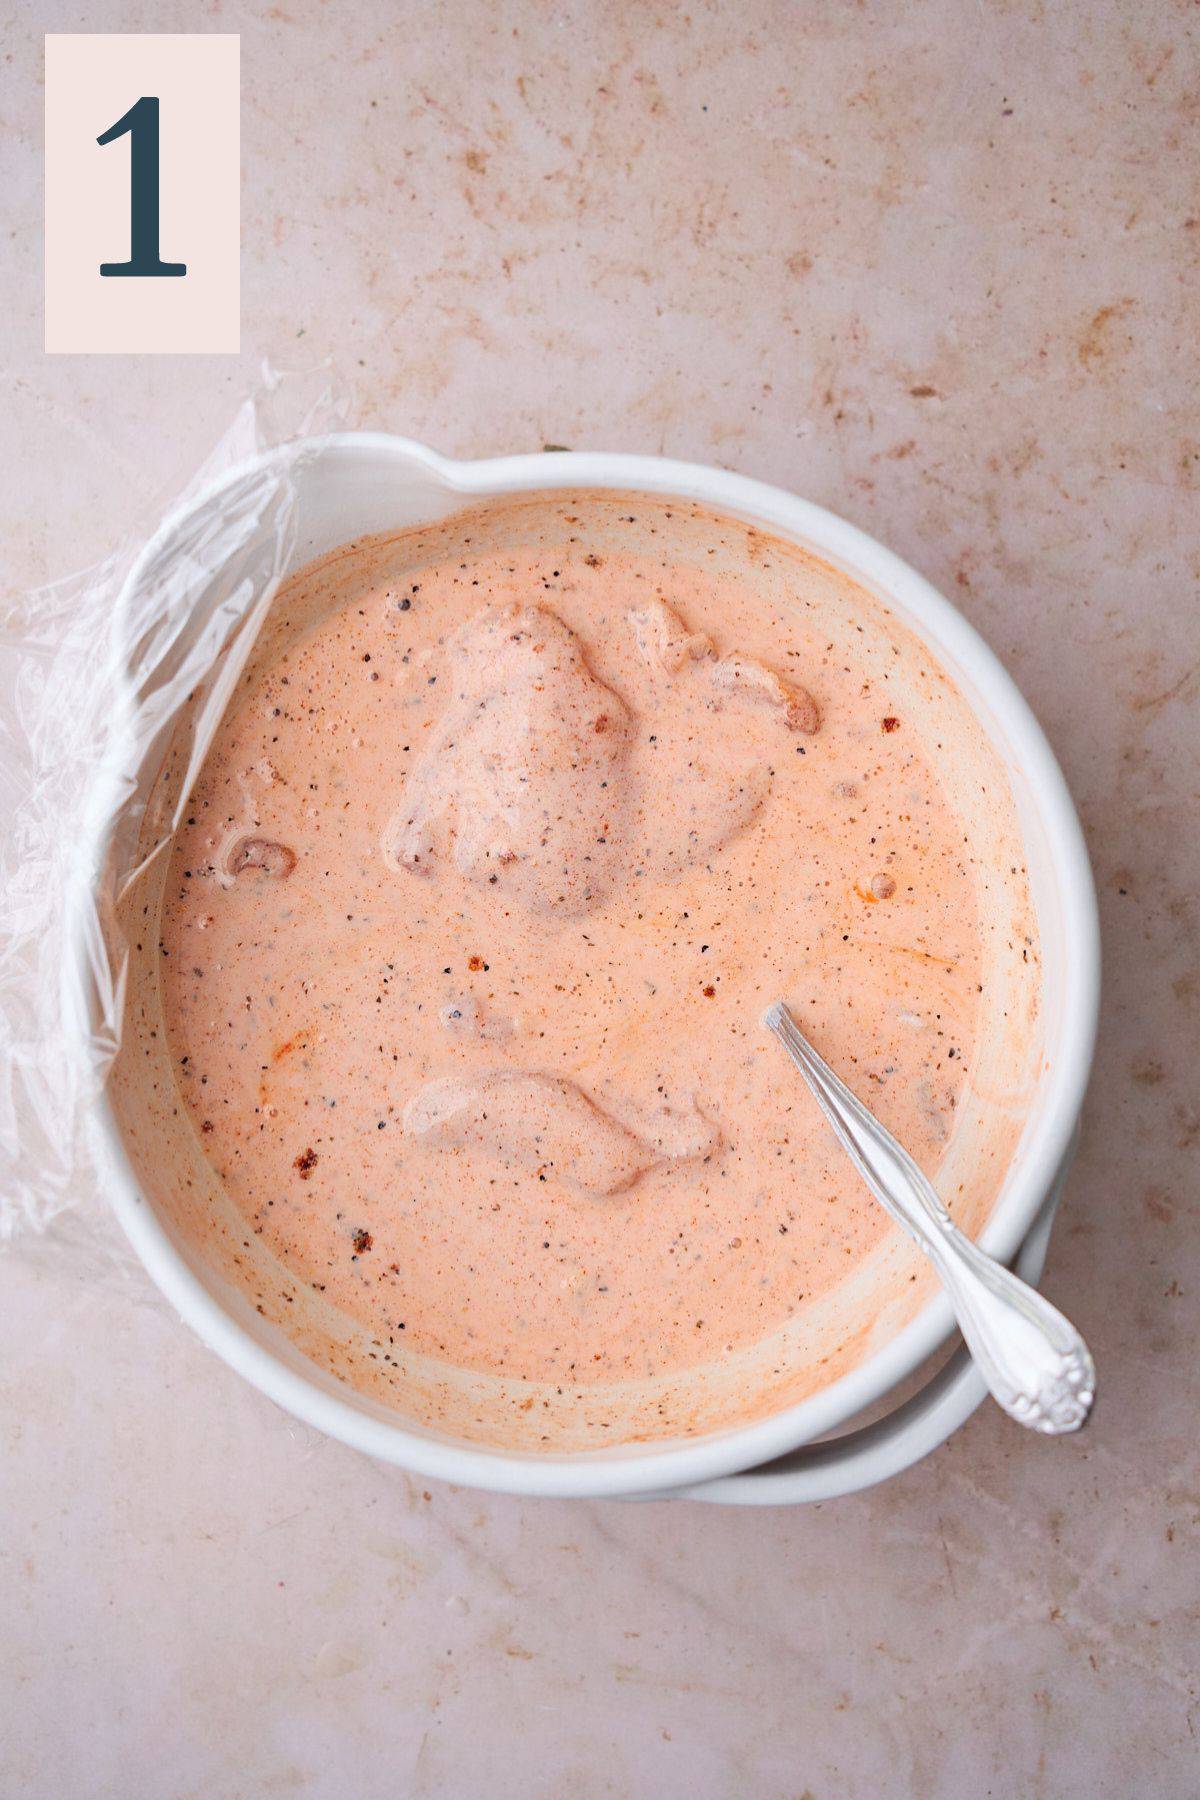
Place the chicken thighs in a bowl, then cover with the dry seasonings, followed by the buttermilk and hot sauce. Mix to coat thoroughly. (Image 1)
Cover with plastic wrap and transfer to the fridge, allowing the mixture to marinate for at least 30 minutes, preferably 4-8 hours.
Make the biscuits
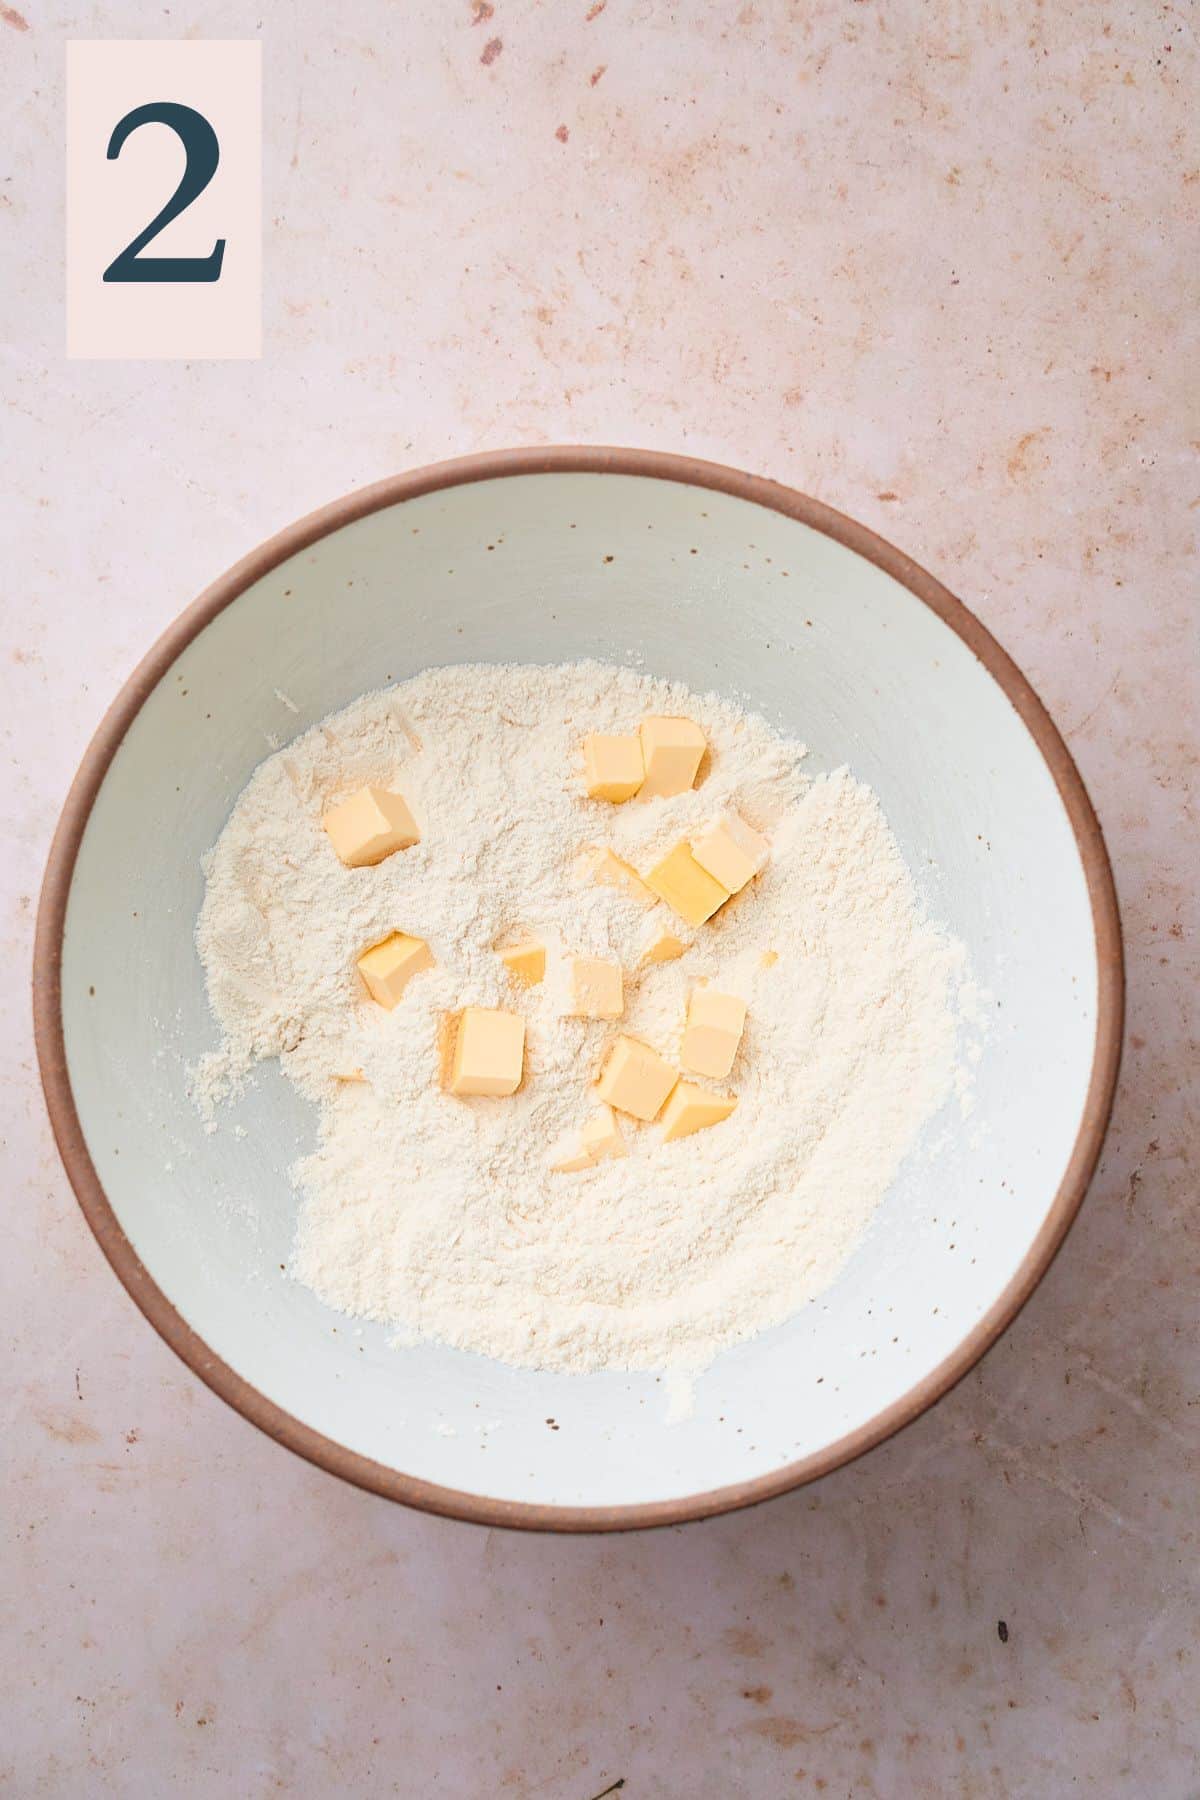
In a mixing bowl, add the flour, sugar, salt, baking powder, and baking soda. Whisk to combine, then scatter around chunks of butter into the flour mixture. (Image 2)
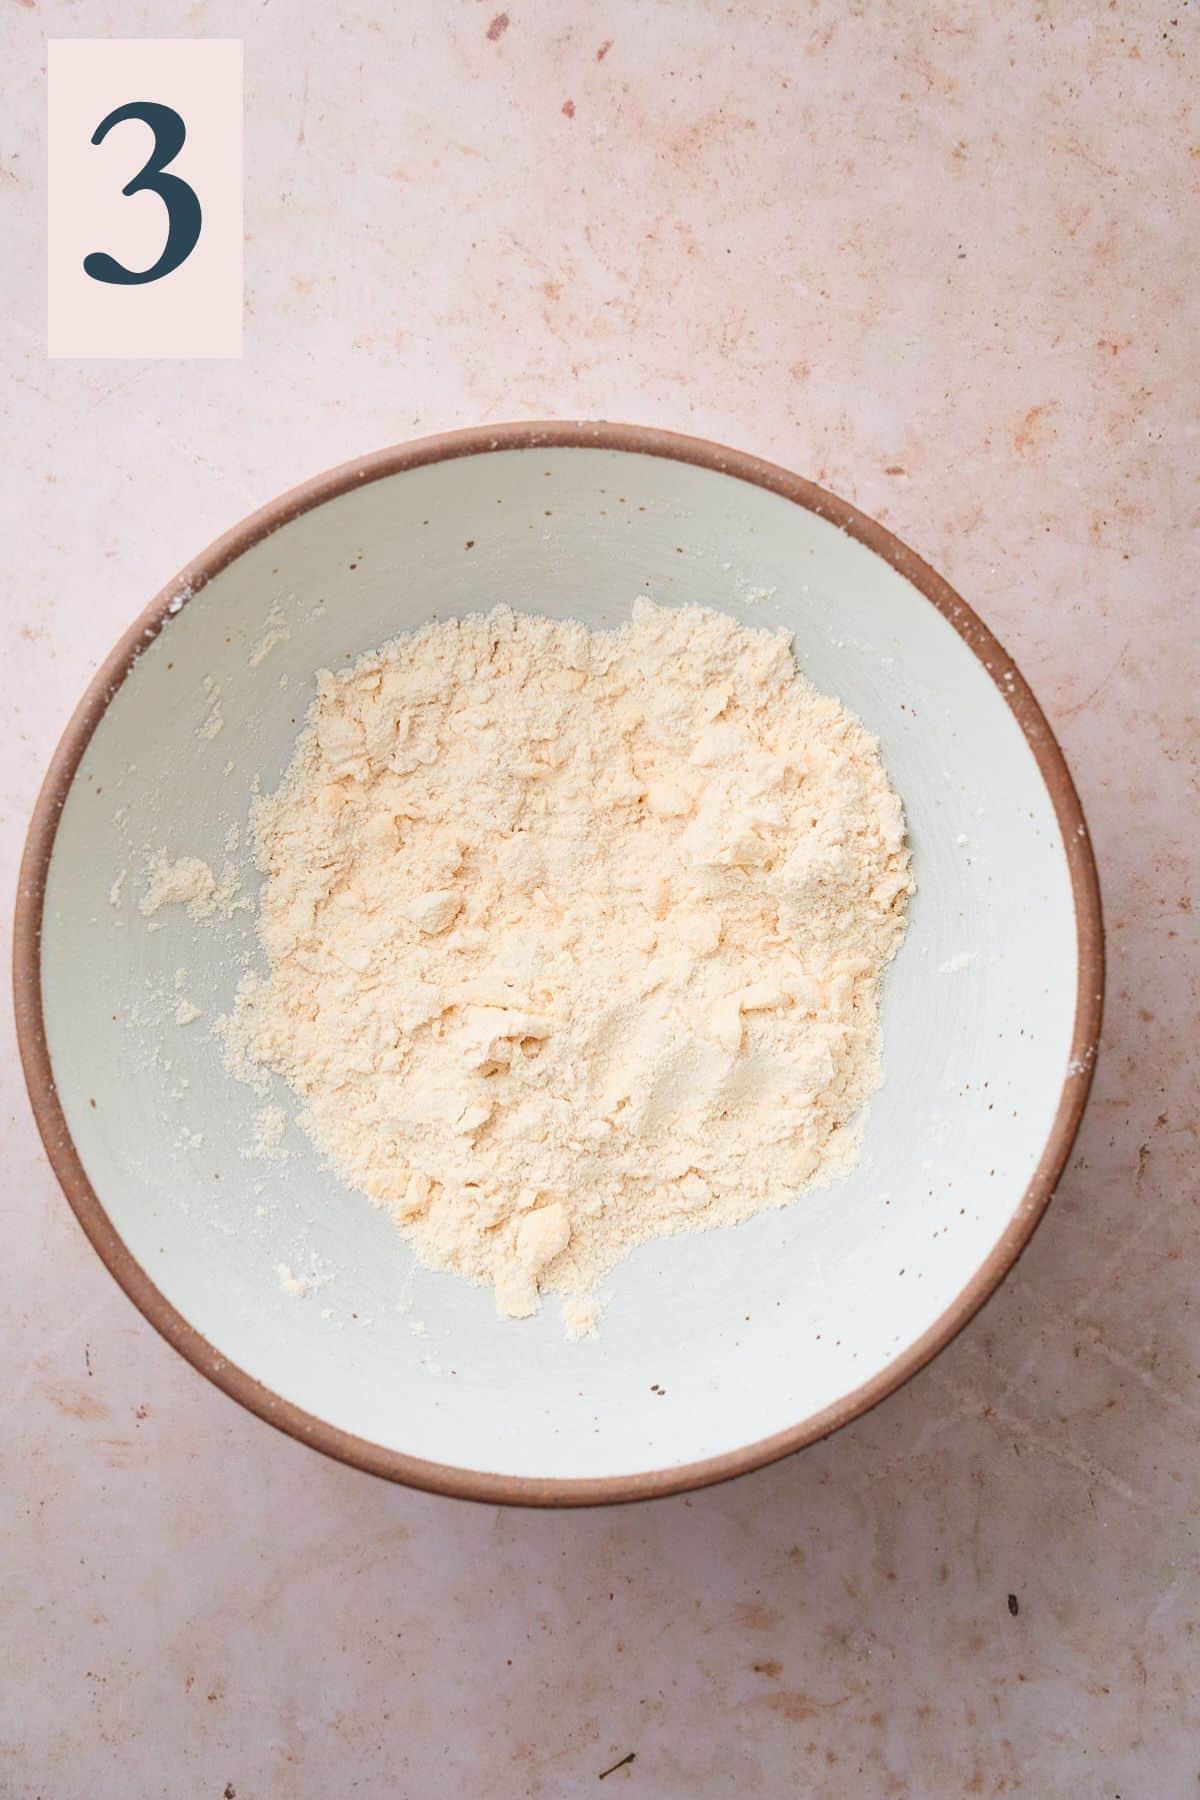
Using a pastry butter or your fingers, work the butter into the flour mixture, until all of the butter is roughly the size of a pea or almond and the mixture looks a little sand-like.
Don't overwork the mixture! Chunks of butter are good, and they will help the biscuits rise in the oven and become fluffy. (Image 3)
Pour in the buttermilk, and using a rubber spatula, stir until a shaggy mixture is achieved. It will be quite sticky. It won't come together all the way on its own yet -- that's okay, trust the process! (Image 4)
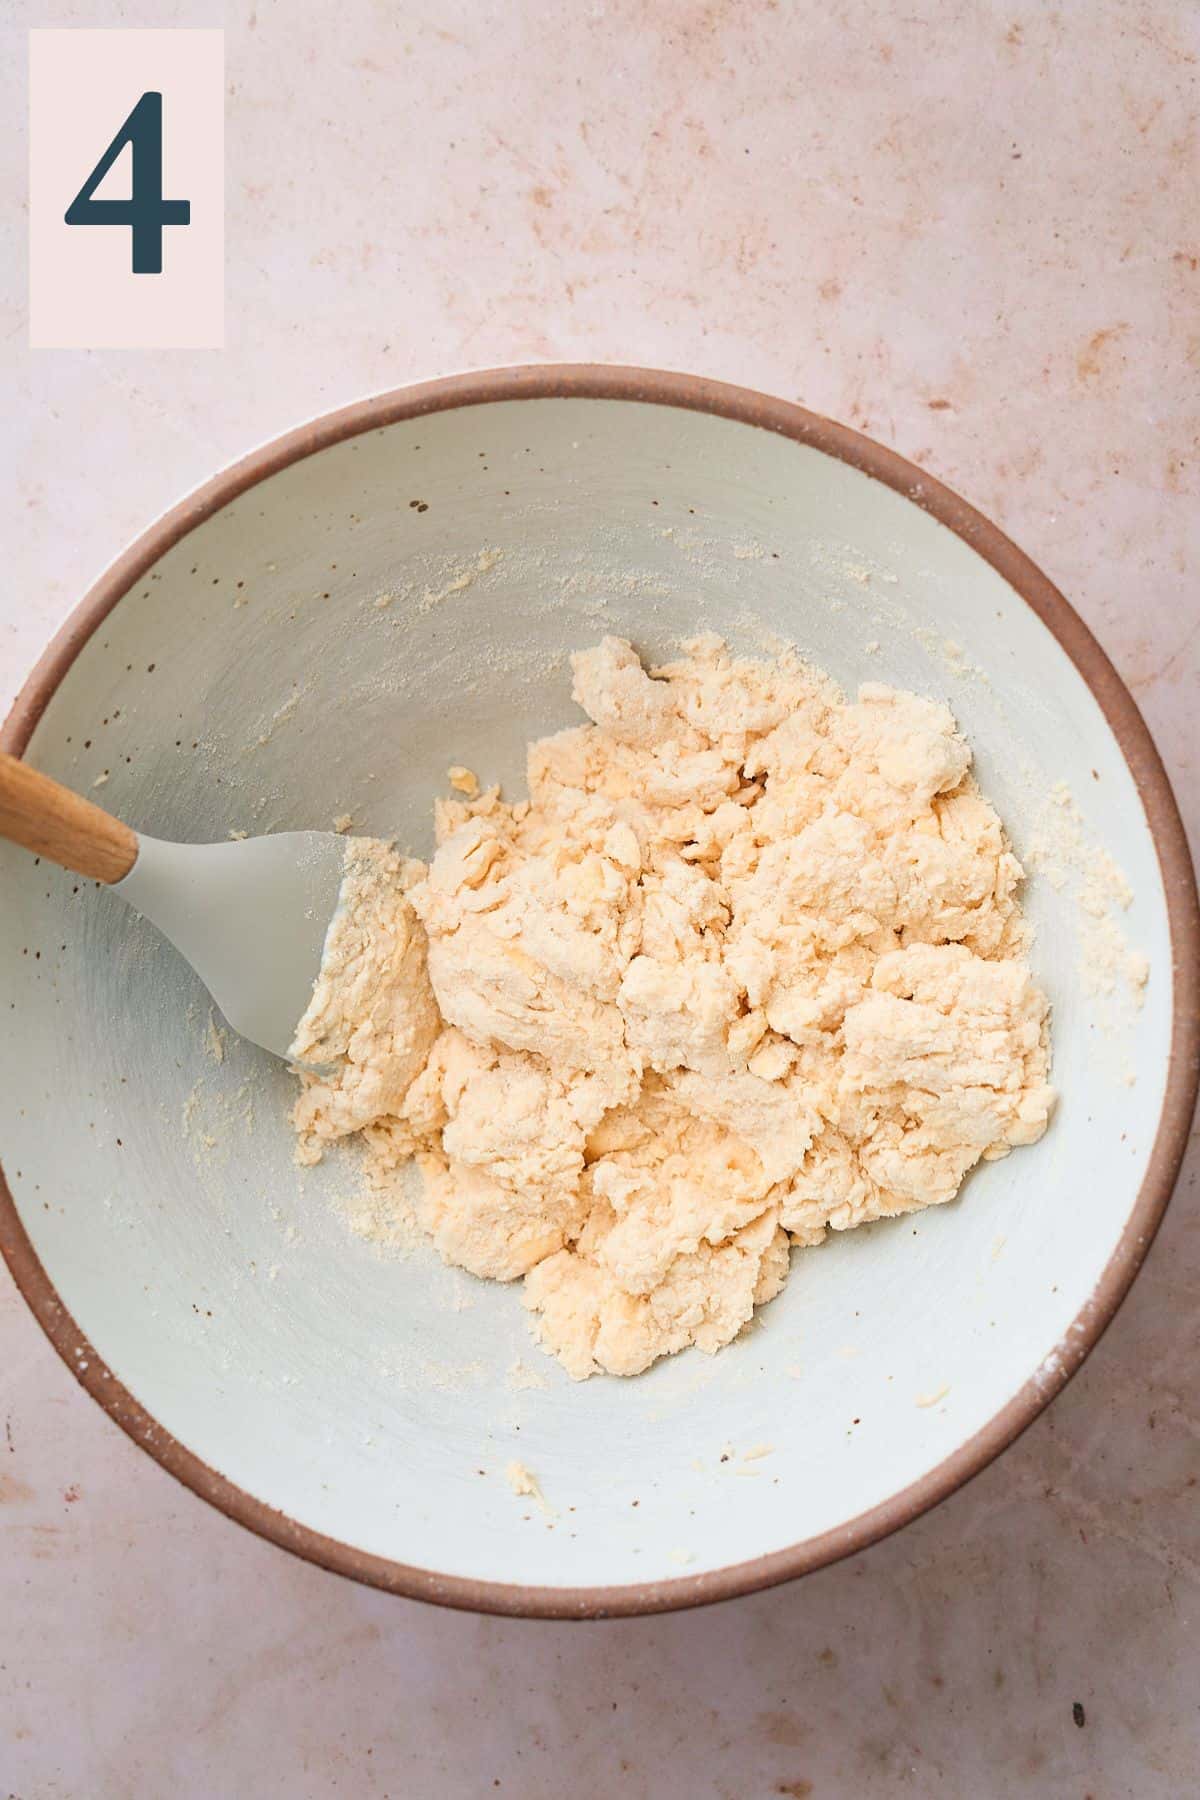
⭑Pro tip: It's crucial to use very cold butter and cold buttermilk! Keeping the biscuit mixture cold will ensure the fluffiest biscuits!
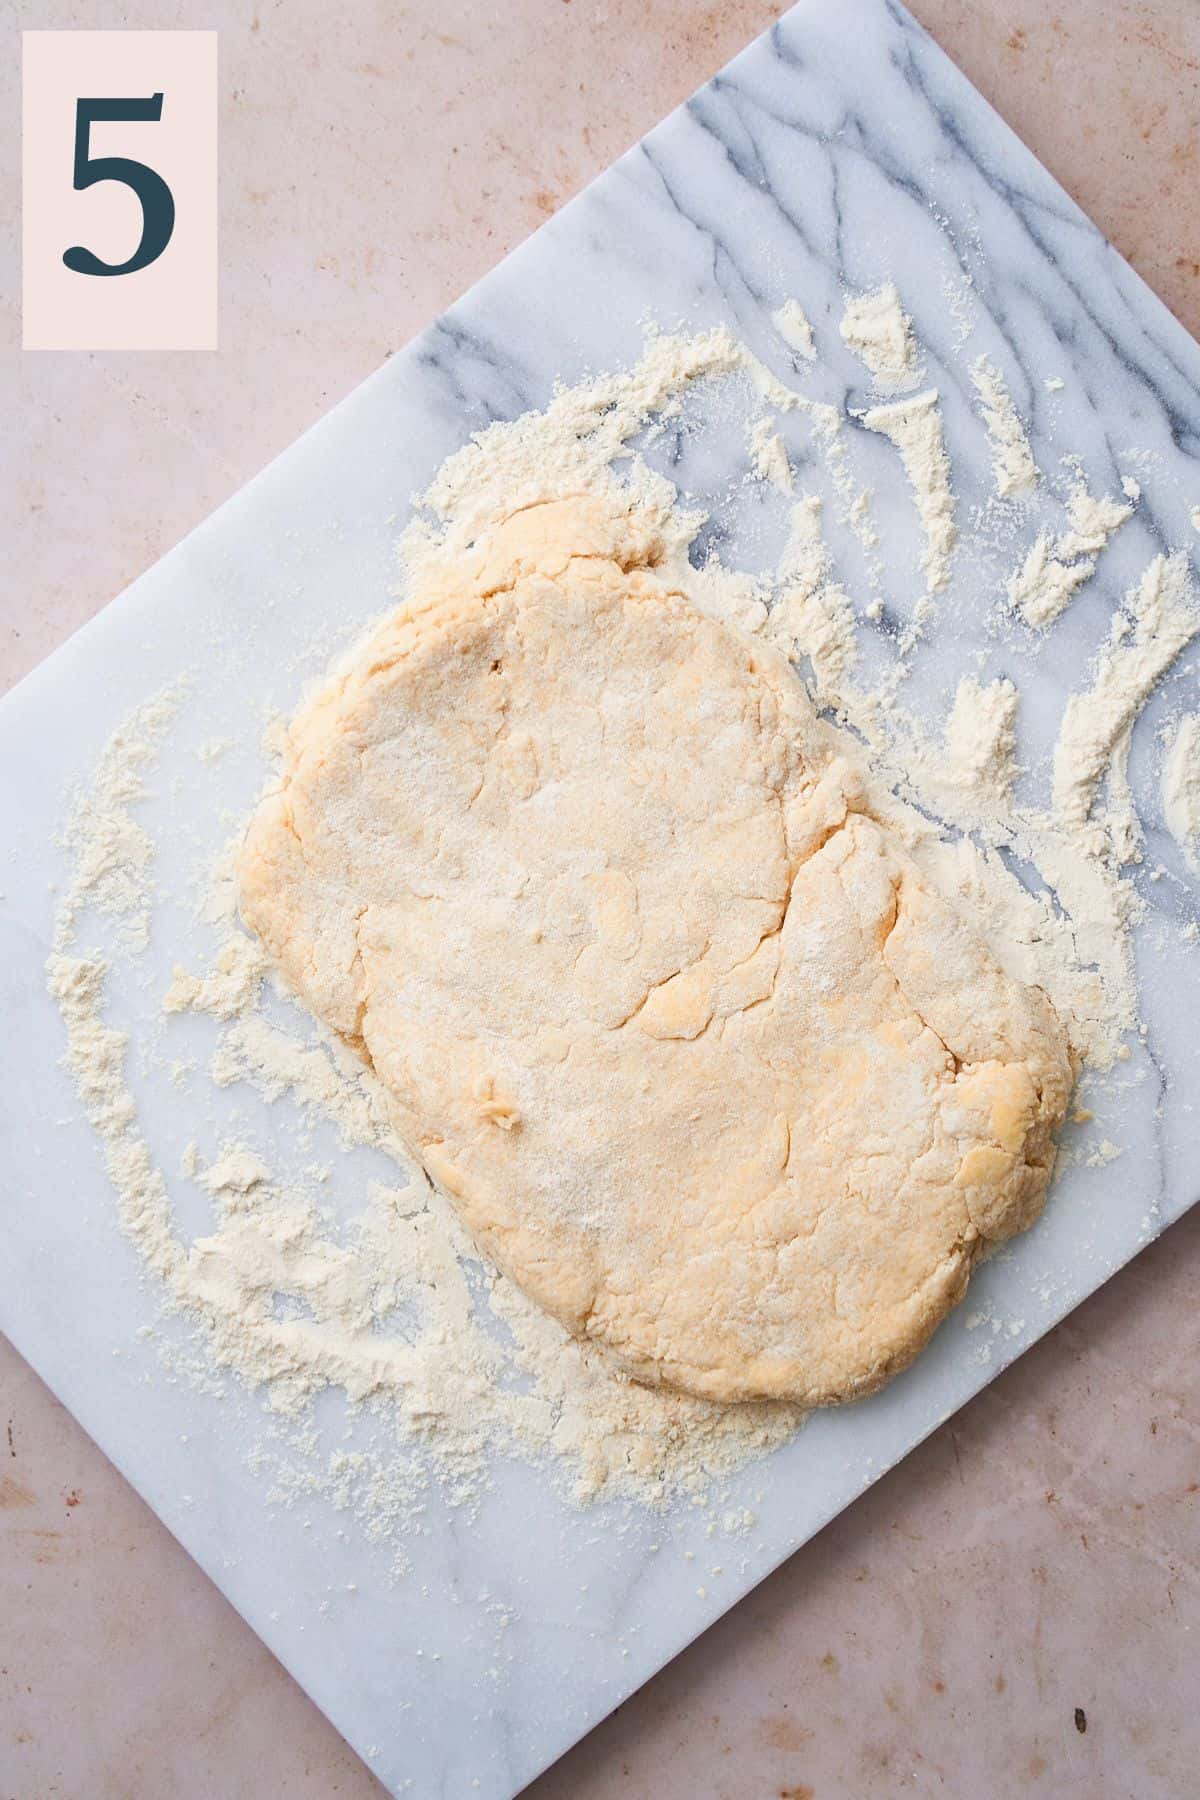
Cover a work surface with more flour, then scoop the dough out of the bowl and onto the work surface. Press and pat the dough together gently until it is a rectangular shape. (Image 5)
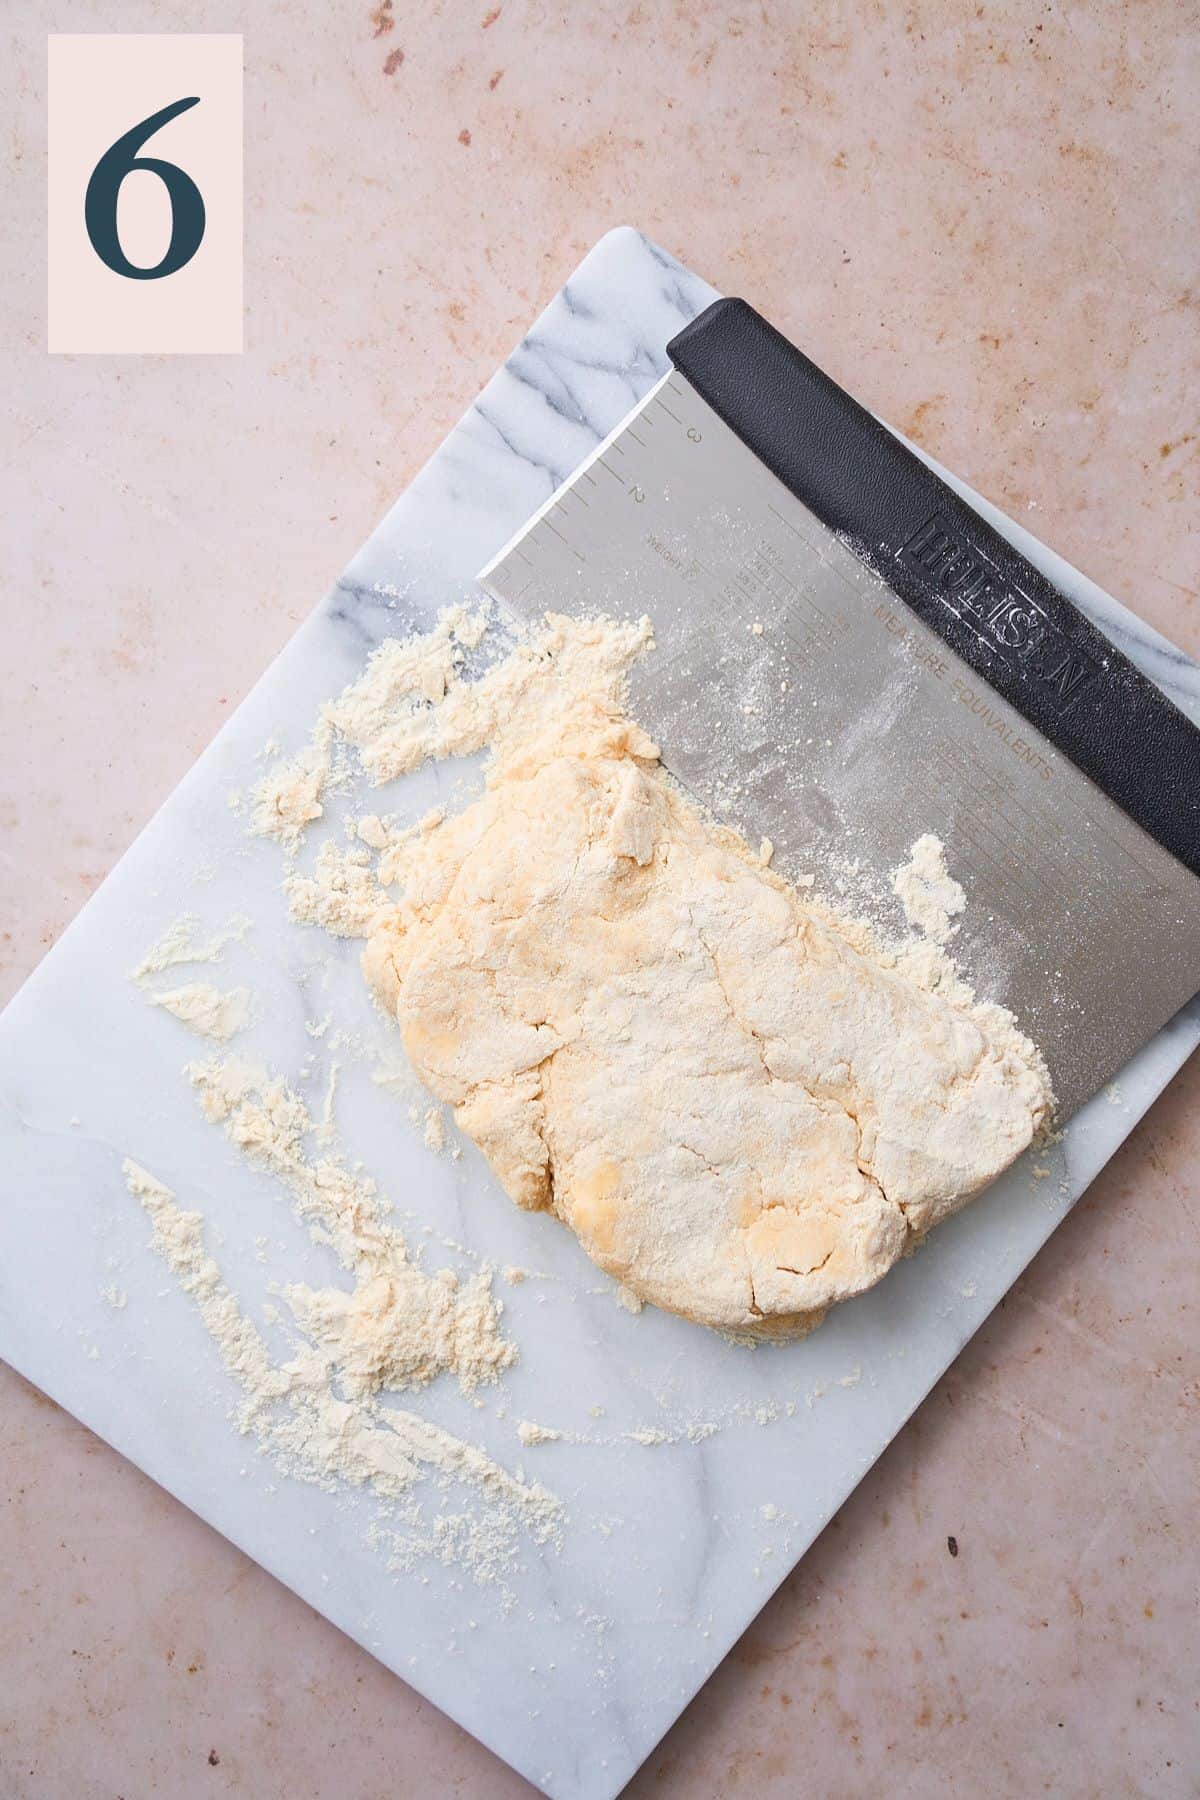
Fold the right side of the rectangle over the left side using your hands or a bench scraper. Press gently together, it will be shaggy and messy still. (Image 6)
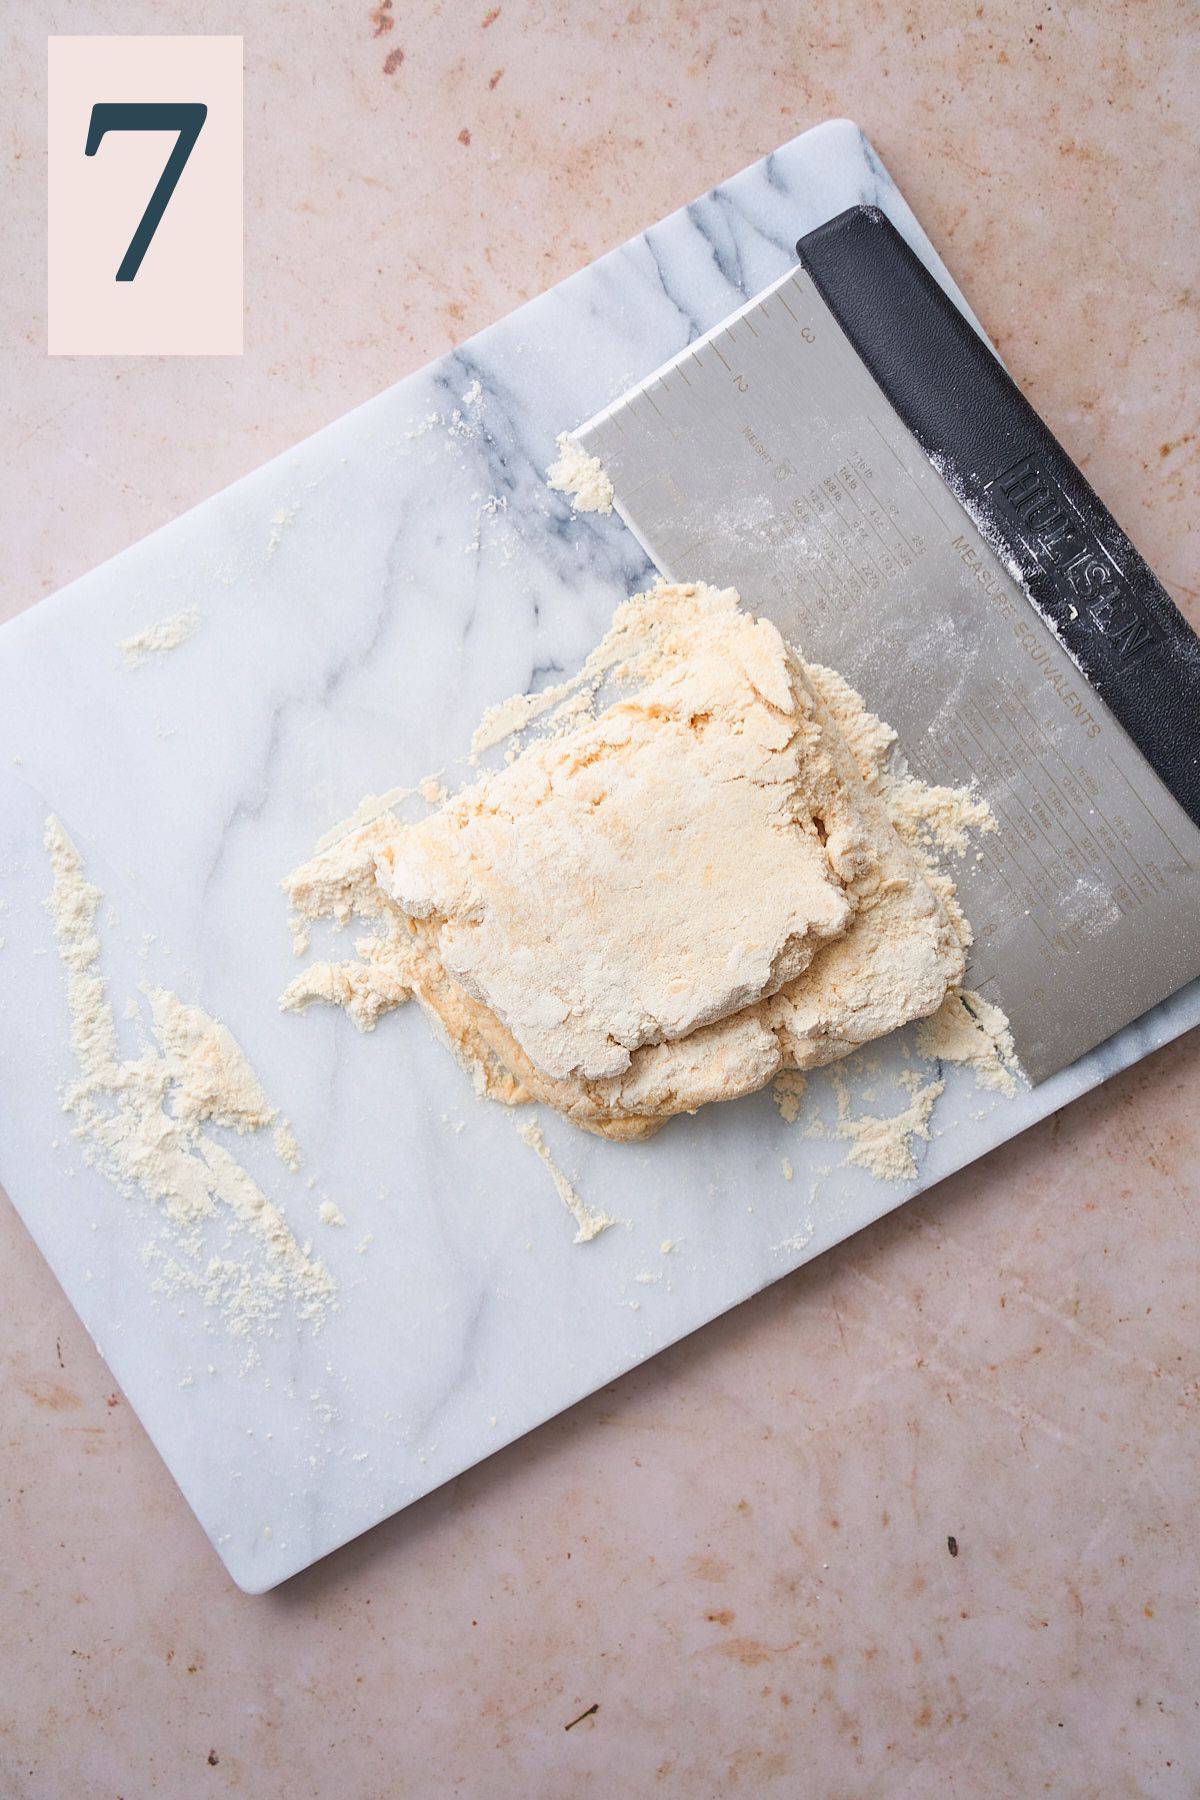
Pat into a rectangle again, and turn the dough 90° before pressing it out into a rectangle shape again, and folding it in half once again. Fold the top half down to the bottom and press it out into a horizontal rectangle again. (Image 7)
Repeat the steps above 2 more times for a total of 6 folds. Work carefully and don't overwork the dough. Creating folds is what makes layers in the biscuits.
⭑Pro tip: Sprinkle a little flour on the layers as needed if the dough starts getting sticky, but just pat gently and handle the dough lightly. You can use up to ½ cup of flour while working the dough to make the biscuits as needed. Any more than that, and they may become dry.
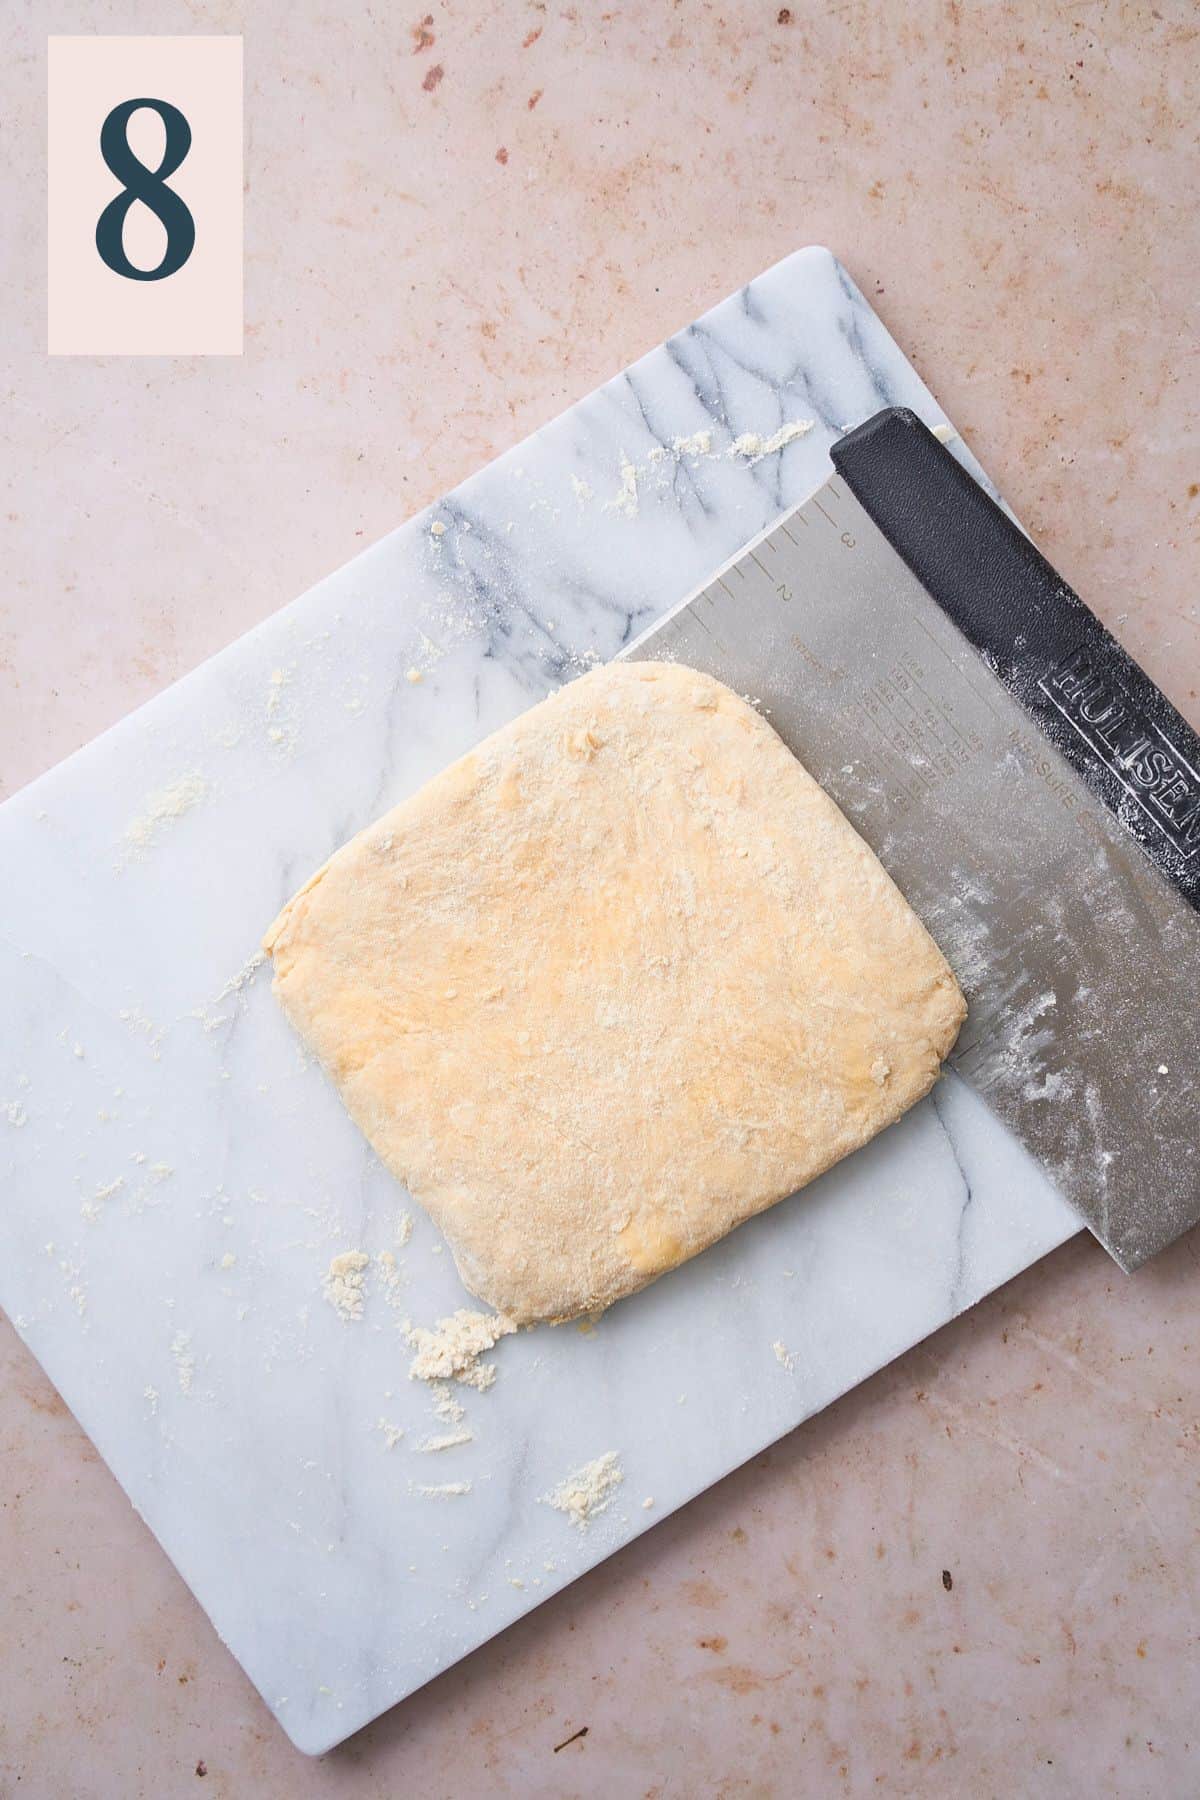
After 6 folds, gently pat the dough into a rectangle/square-shape that is about ¾-inch thick. (Image 8)
Use a sharp circle biscuit cutter, or a bench scraper or sharp knife to create rectangular-shape biscuits like we did.
Press down through the dough quickly, then lift up. Don't twist the biscuit cutter or move it around, or you will seal the edges of the biscuits, and this will prevent it from rising properly. Just push down, then pull straight up. You will have 6-large biscuits.
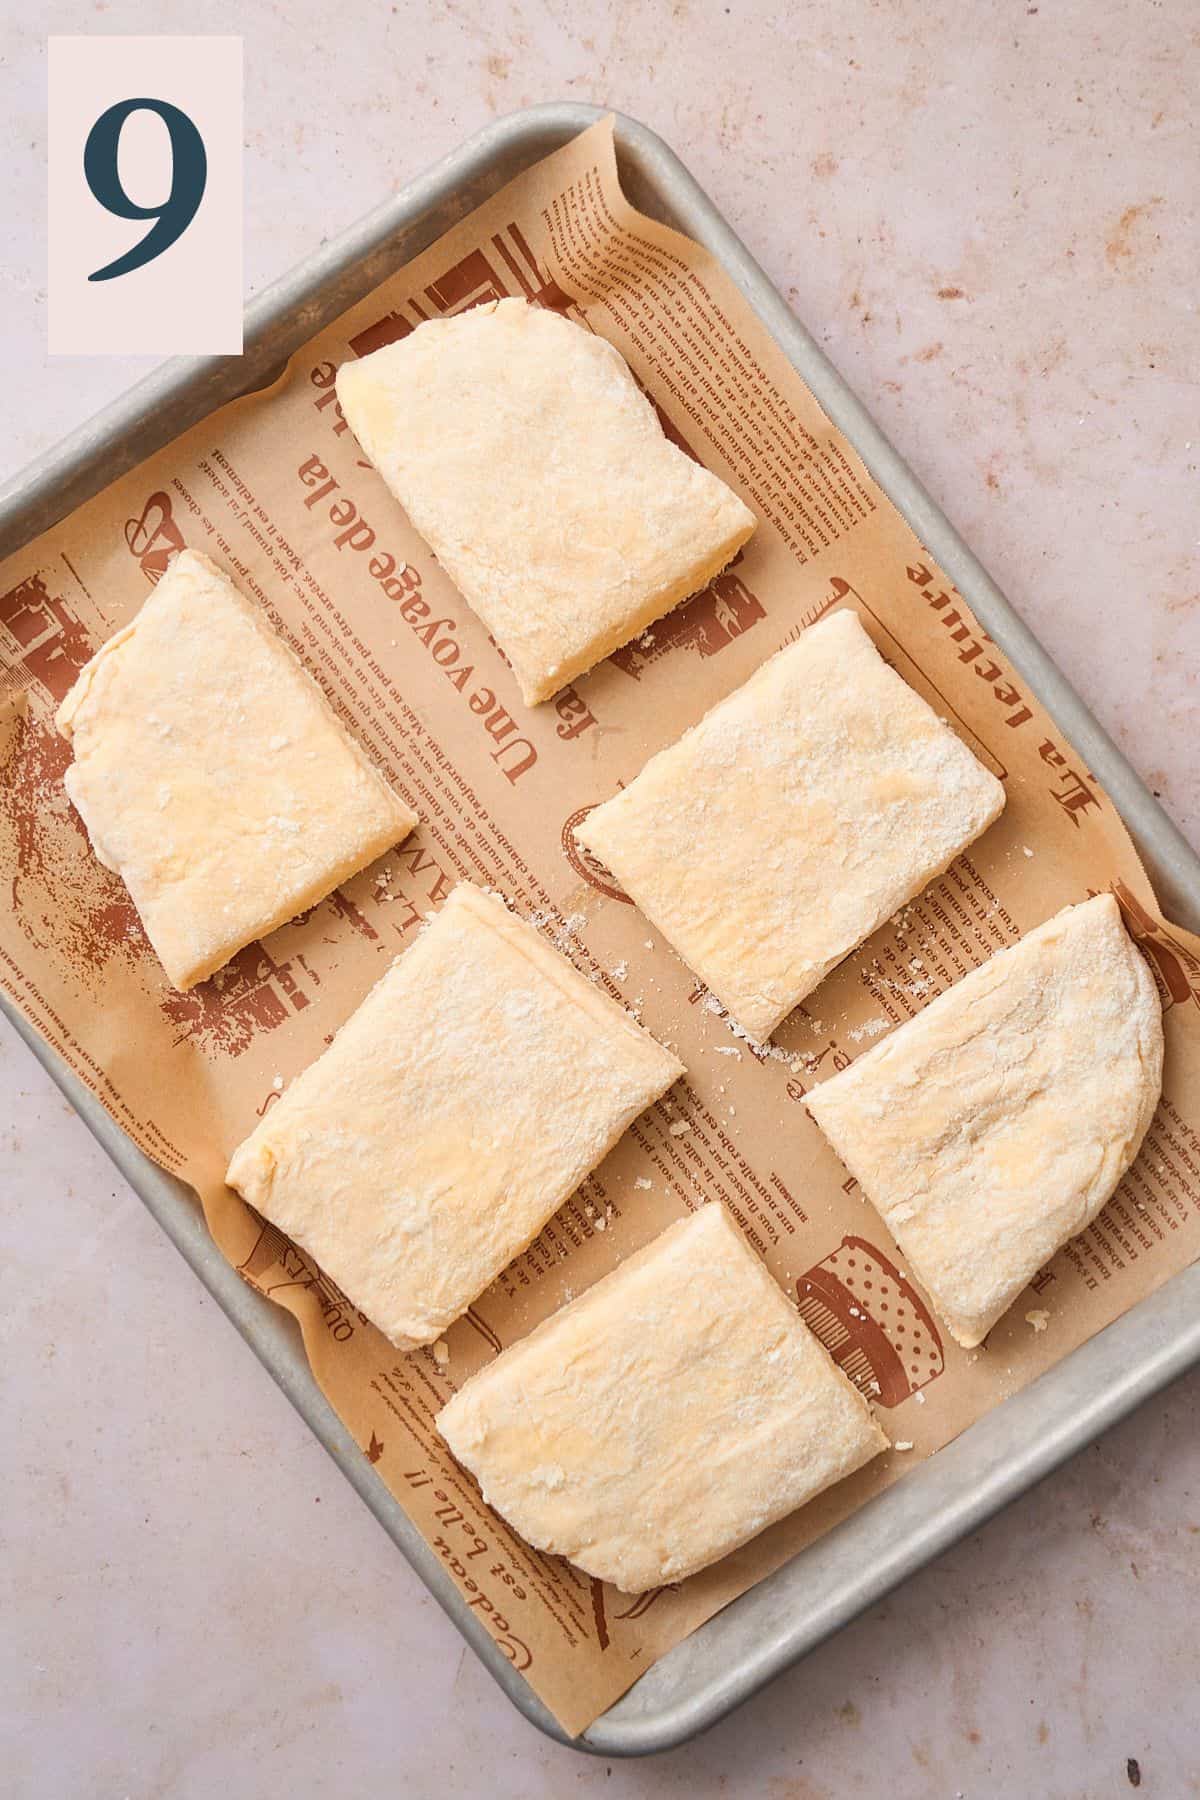
Place the biscuits on a parchment lined baking sheet, giving them a bit of space to rise. (Image 9)
Transfer them to the freezer for at least 30-minutes while you work on the chicken. Cold is your friend here, and will help the biscuits rise tall!
The biscuits can be kept in the freezer in an airtight container for up to 3 months if you'd like to make them in advance and bake them on the day of.
Want to really take these biscuits to the next level? Make a batch of these buttermilk cornbread biscuits for TONS of flavor!
Dredge the chicken
Meanwhile, on a shallow plate or baking sheet, combine flour, cornstarch, salt, and seasonings to make a dredge for the chicken. (Image 10)
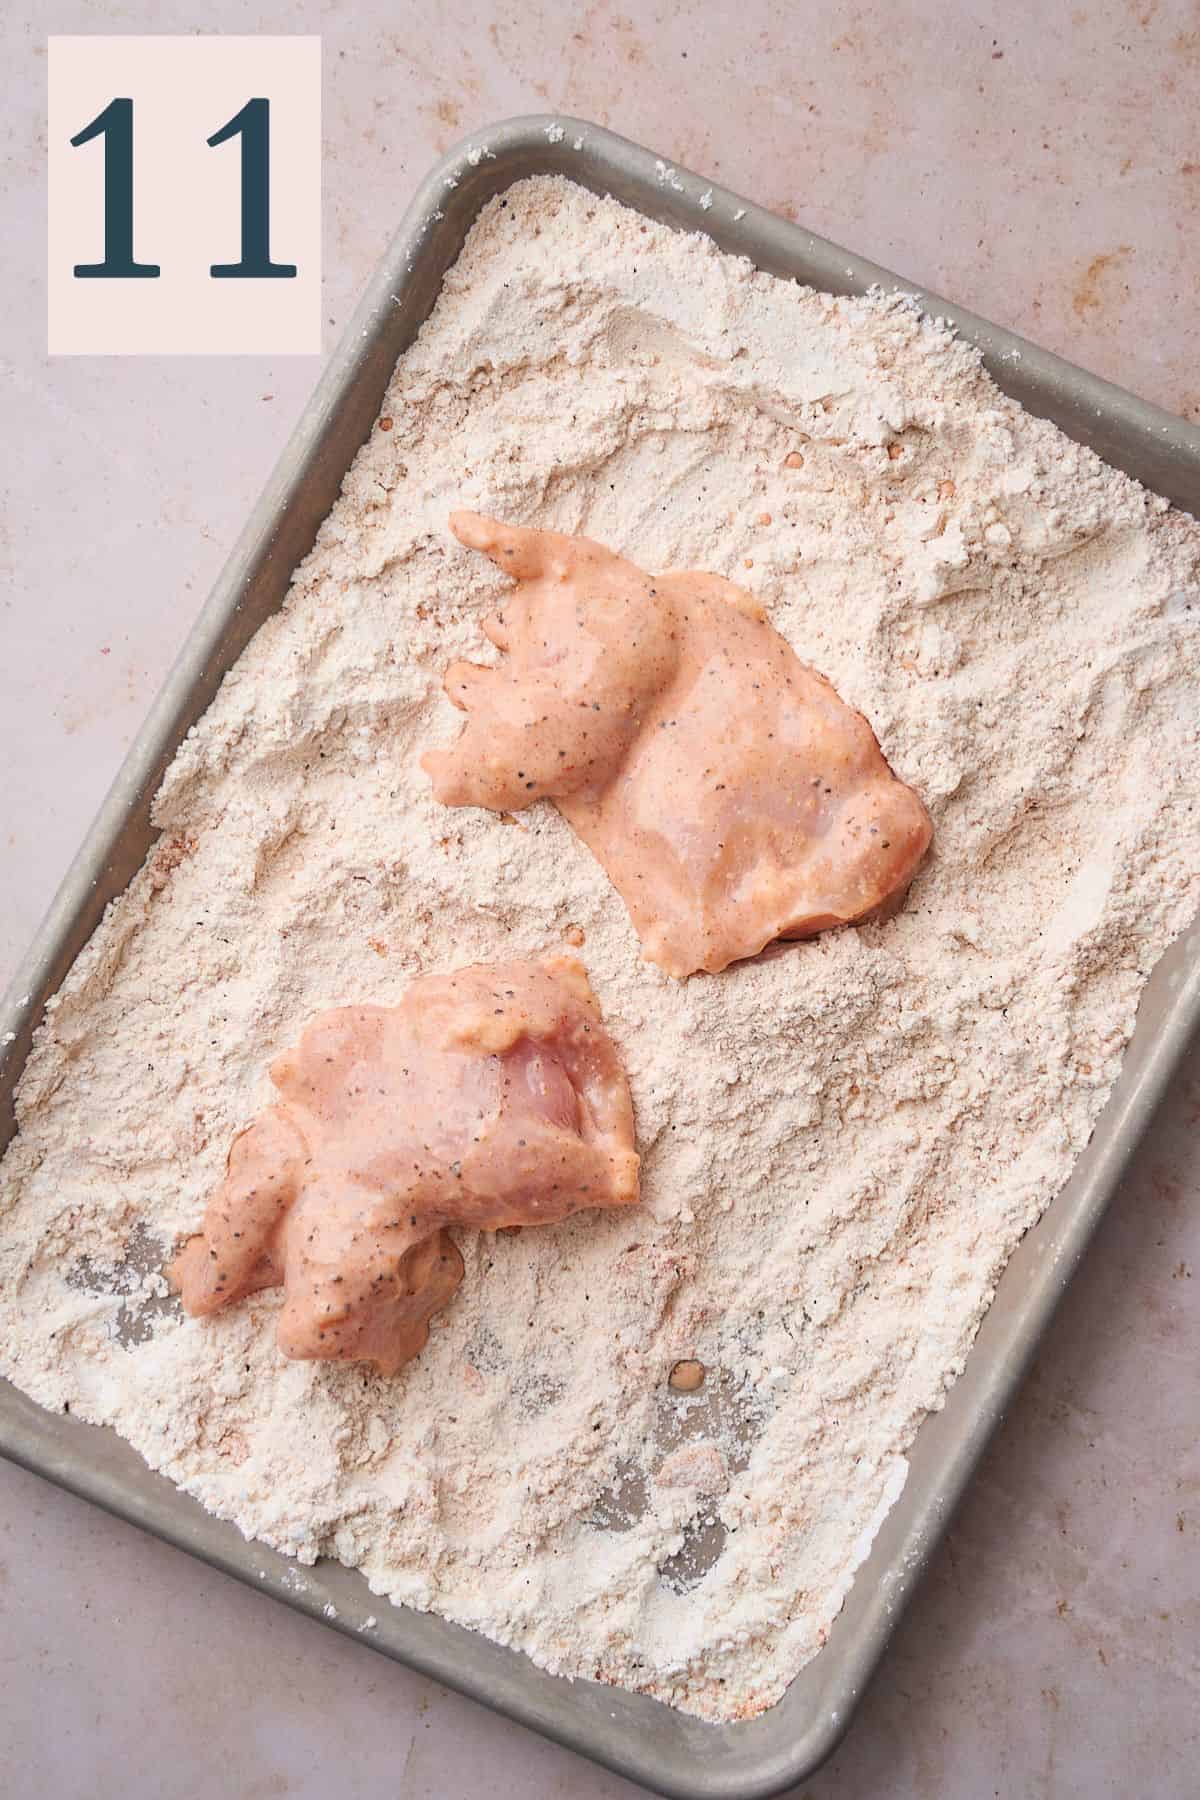
Remove the chicken from the marinade, and shake off the excess marinade. You can shake some of the marinade into the dredge, as those will create delicious, craggly, crunchy fried bits on the chicken. (Image 11)
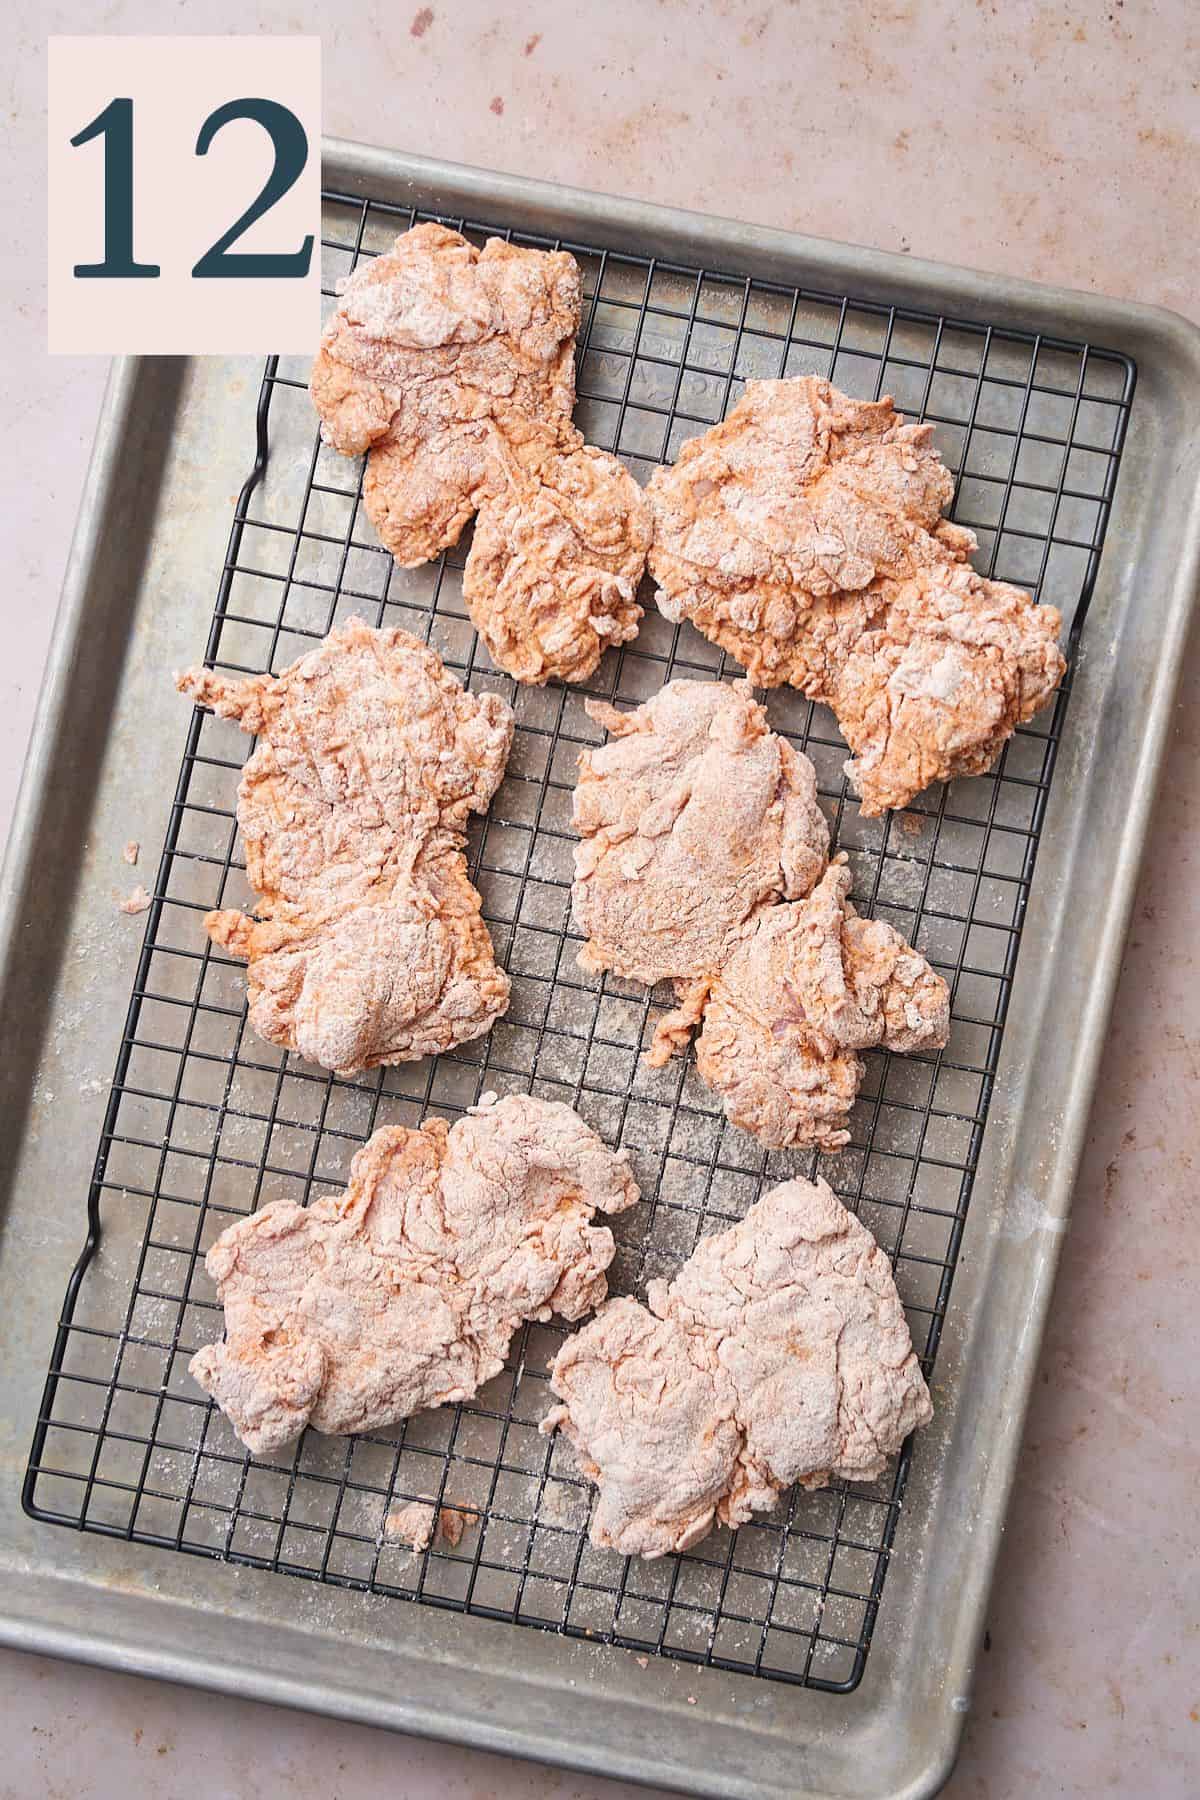
Coat the chicken very well, in every nook and cranny, then shake the thighs off very hard to get rid of excess flour. Transfer them to a cooling rack on top of a baking sheet to rest for about 20 minutes. (You can rest them in the fridge, uncovered for up to 24 hours if you'd like to do this ahead!) (Image 12)
Meanwhile, while the chicken is resting, heat oil in a skillet or Dutch oven over medium-heat and use a thermometer to monitor the temperature of the oil. You're aiming for 350-360°F.
Preheat the oven to 400°F for the biscuits.

⭑Pro tip: Don't skip resting the chicken, this is what makes the breading stick to the chicken, so it doesn't separate or fall off when frying.
Fry the chicken
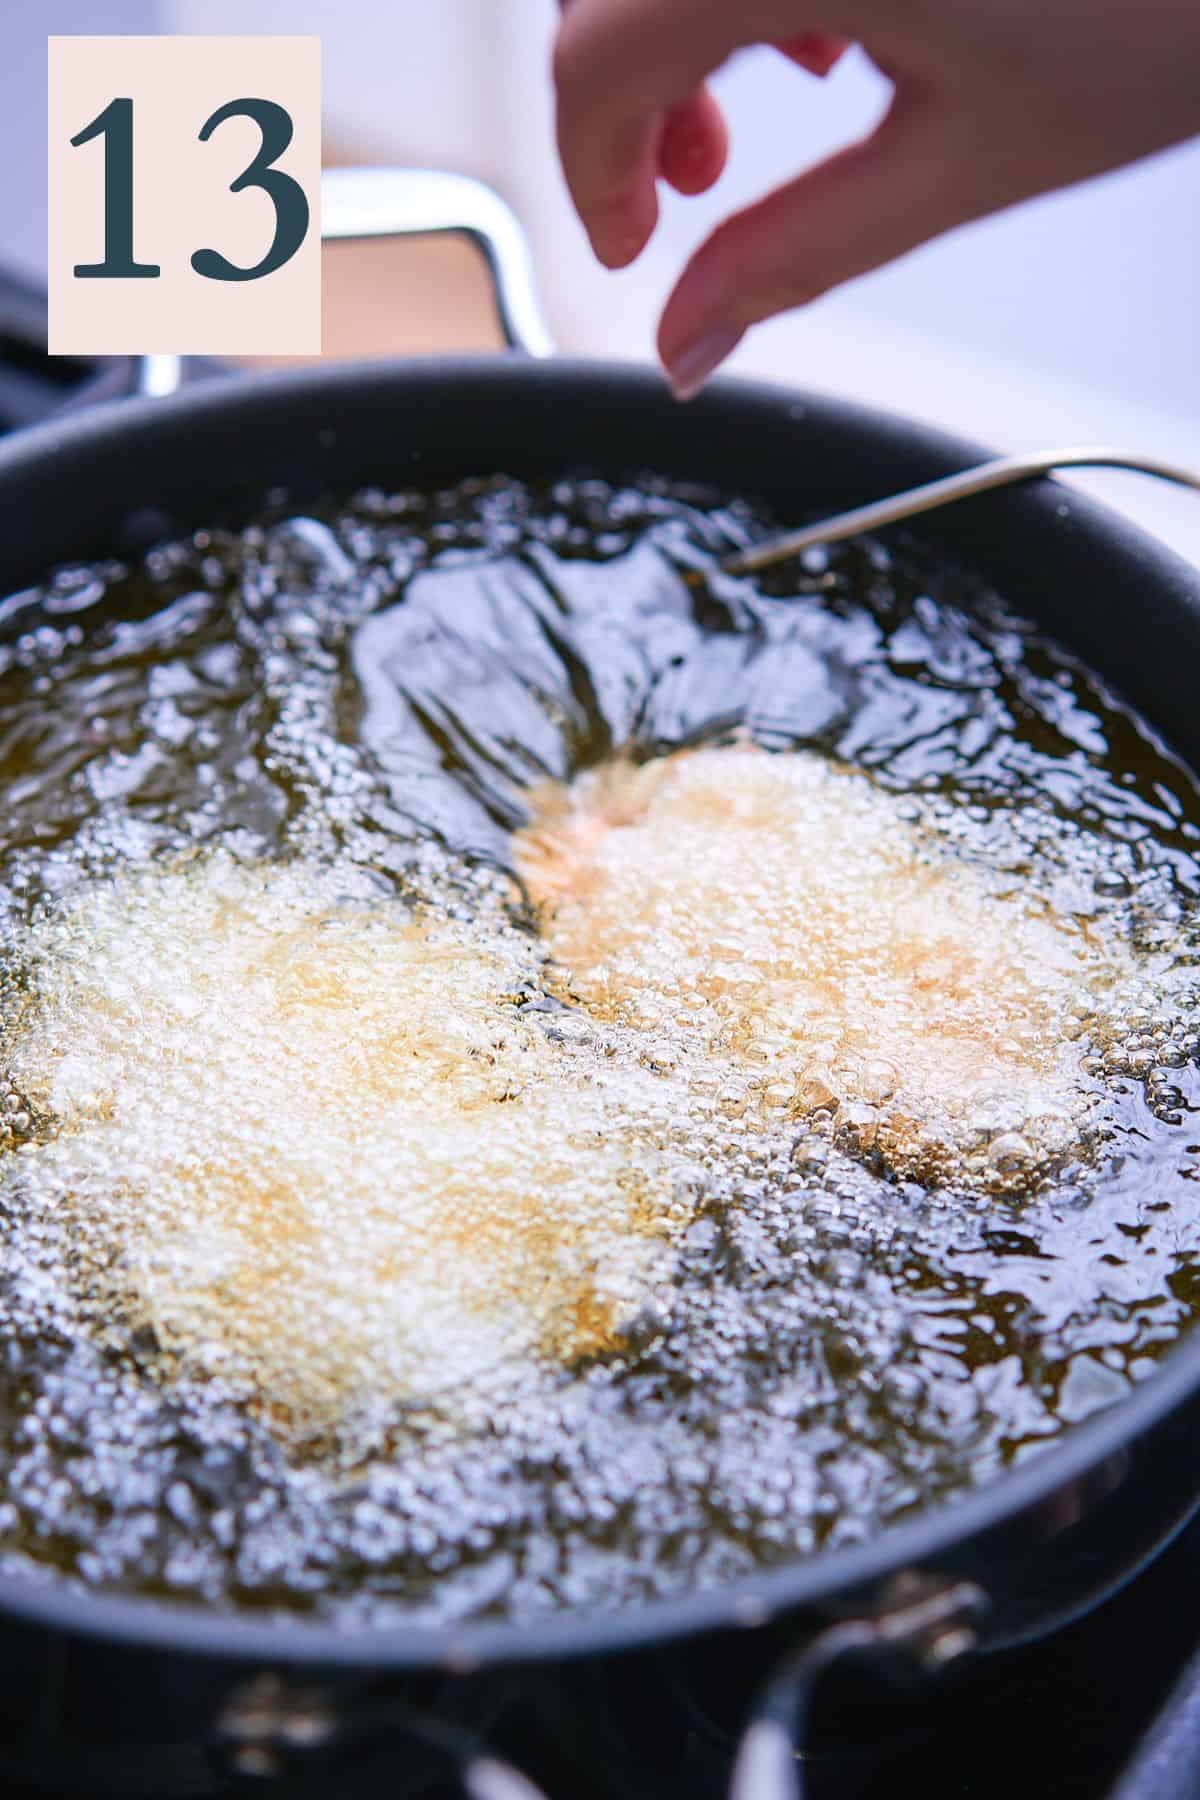
After the chicken has rested and the oil has reached between 350-360°F, place two thighs at a time in the hot oil. (Image 13)
Don't overcrowd the pan! Overcrowding the pan will make the temperature of the oil drop too much, which makes the chicken greasy.
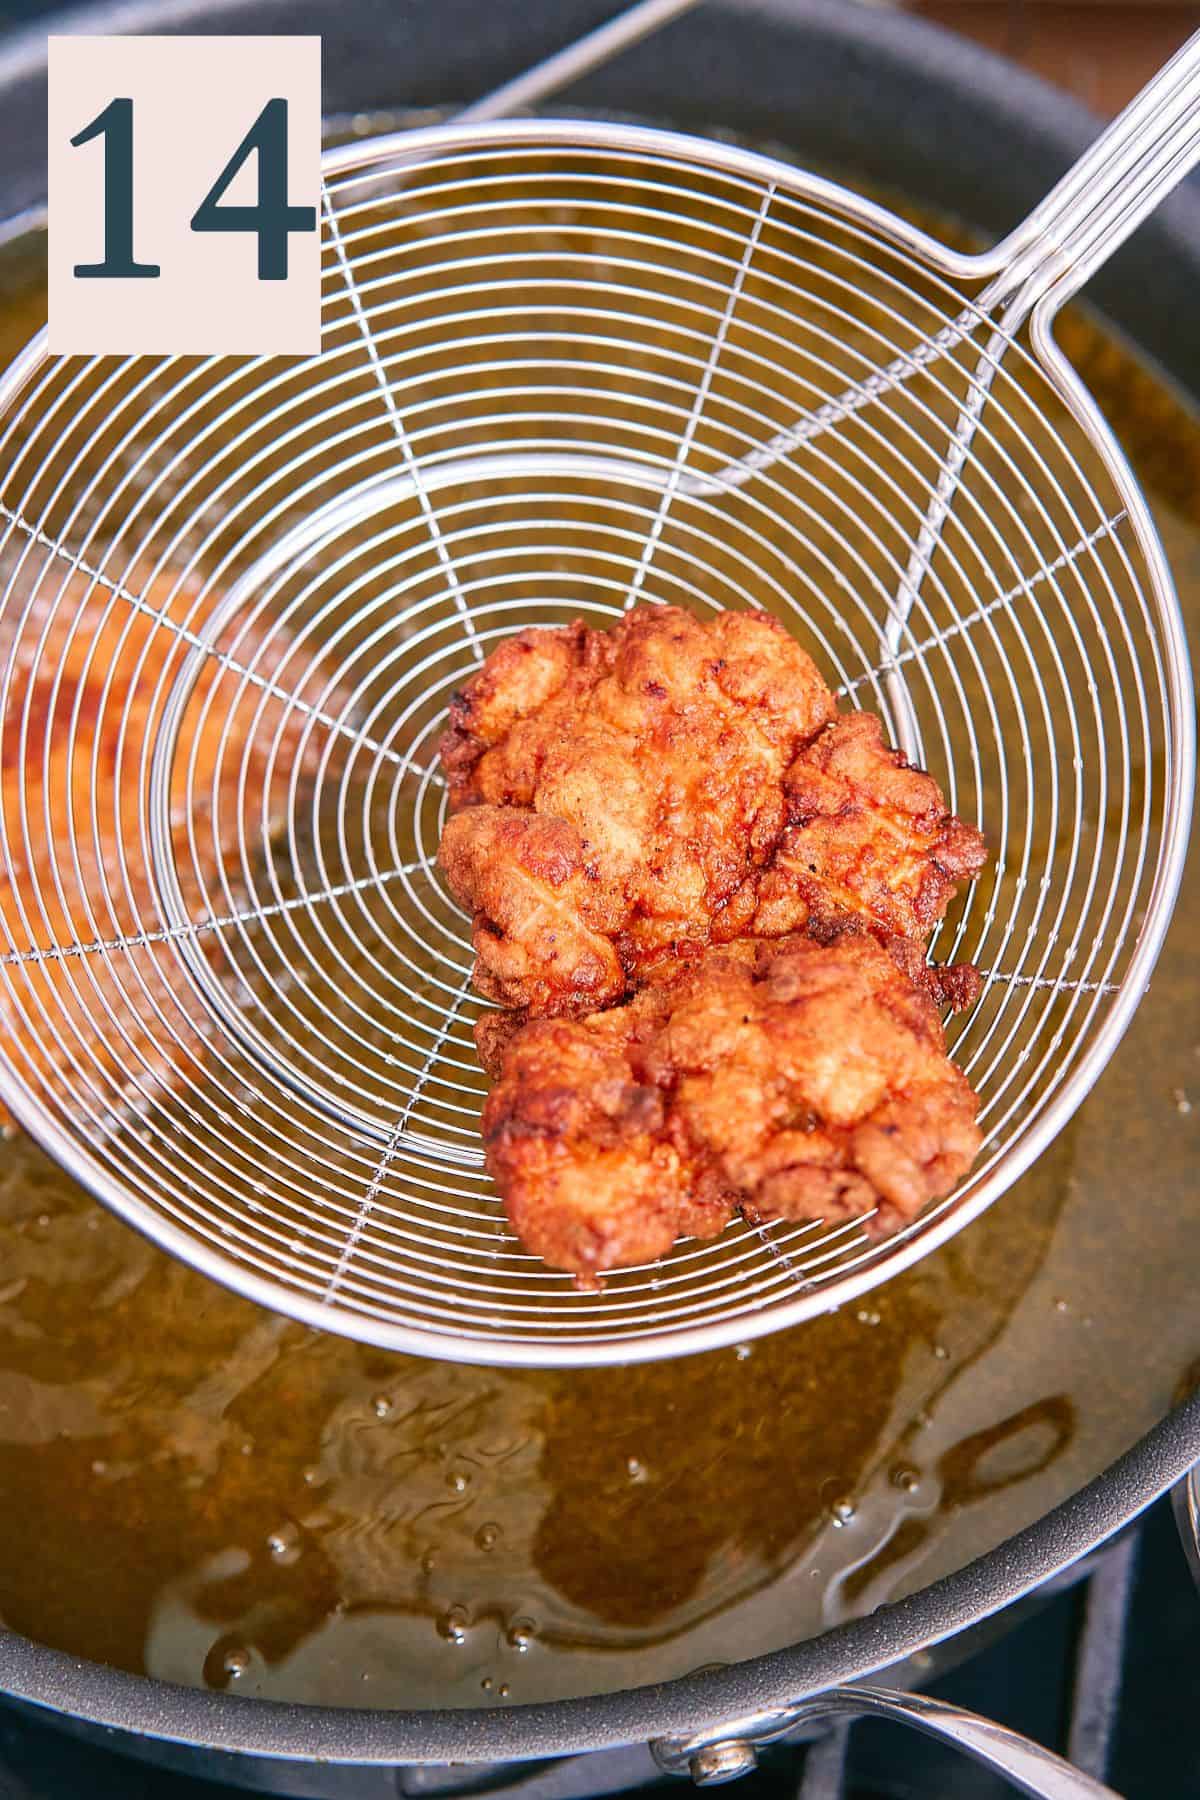
Fry until crispy and golden brown, about 7-10 minutes or when the internal tempeature of the chicken reaches at least 165°F internally, preferably 195°F for chicken thighs! (Image 14)
*Chicken thighs should be cooked to a higher temperature to break down the extra collagen in them, which will result in a juicier piece of meat!
Continue frying the chicken until all pieces are cooked through, making sure to allow a consistent temperature to the oil while working.
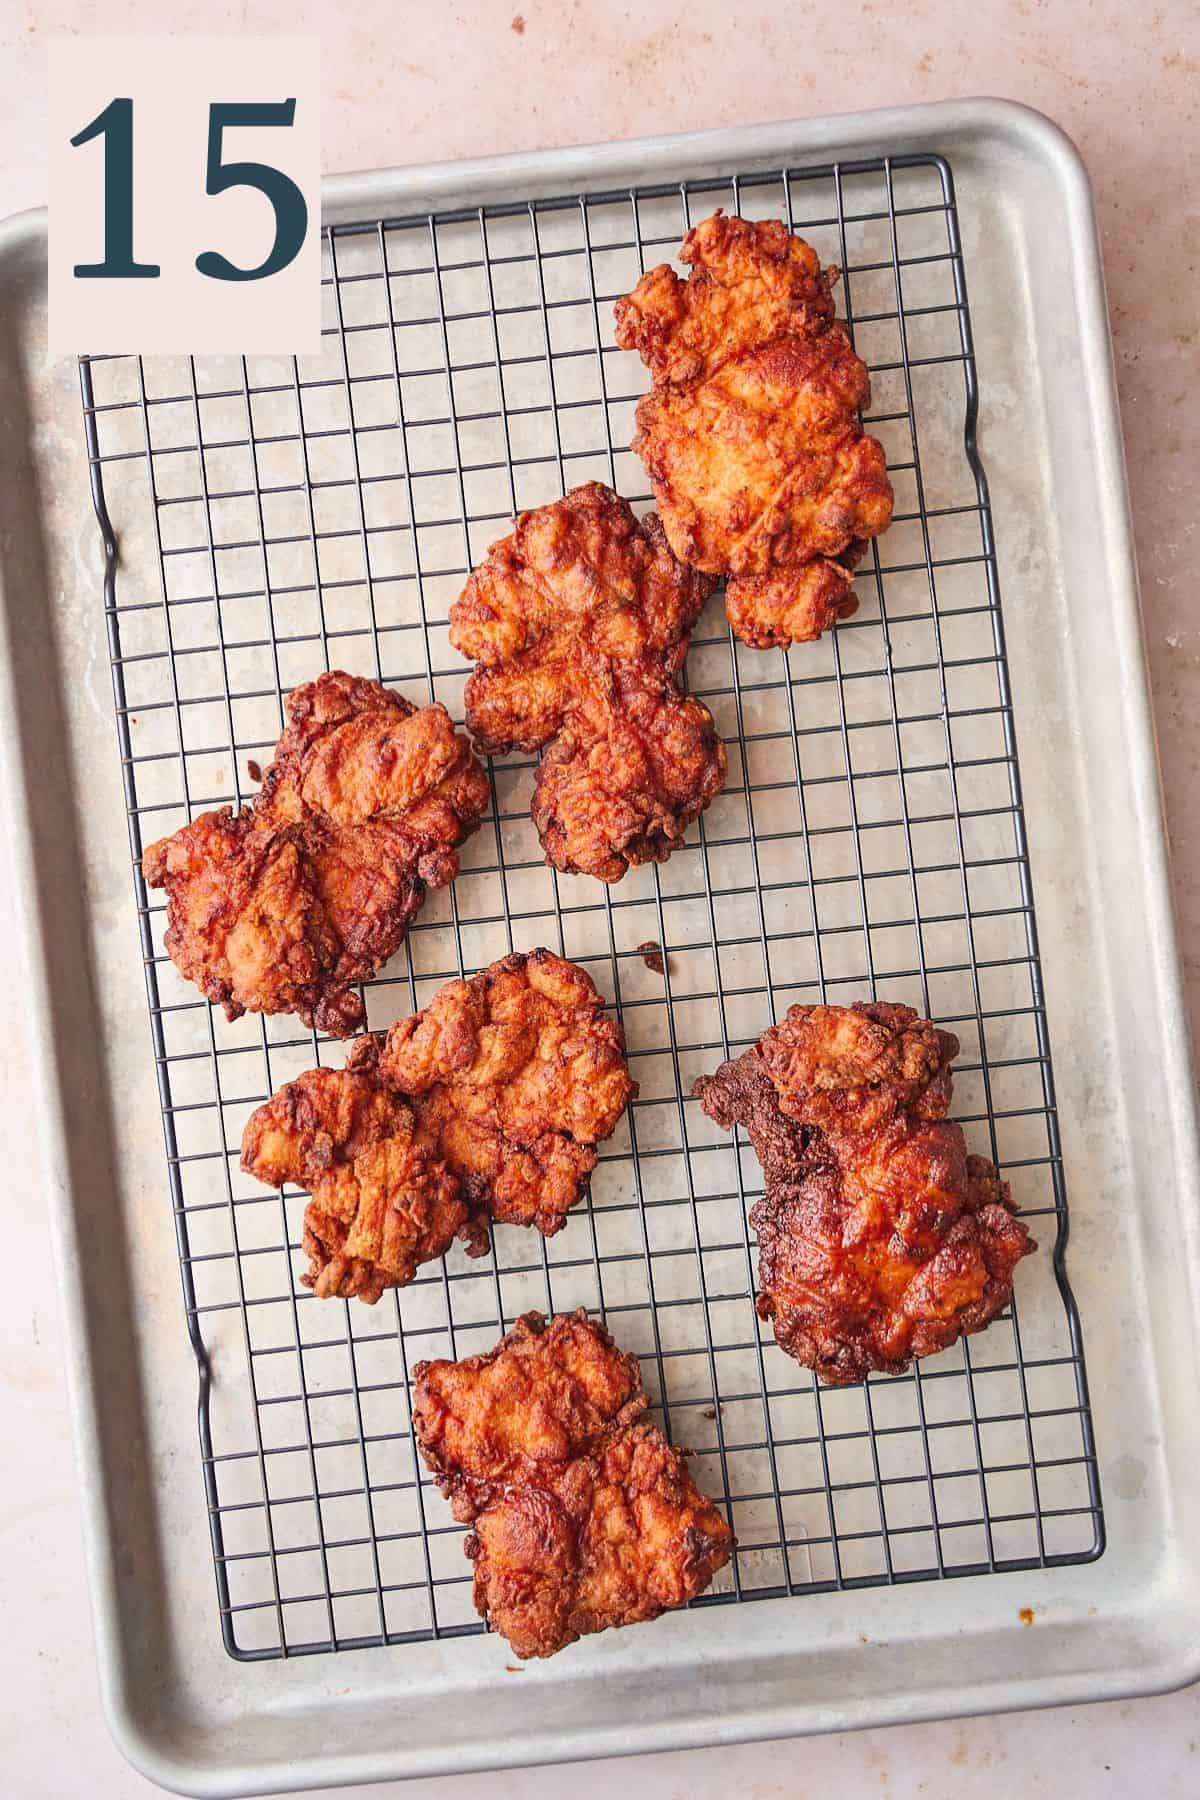
When the chicken is done frying, transfer it directly to a clean baking sheet with a cooling rack on top to allow the extra grease to drip off the chicken. (Image 15)
⭑Pro tip: Don't overcrowd the skillet or pan, and maintain a steady temperature by using a thermometer to monitor the oil temperature for best results!
Make the honey butter
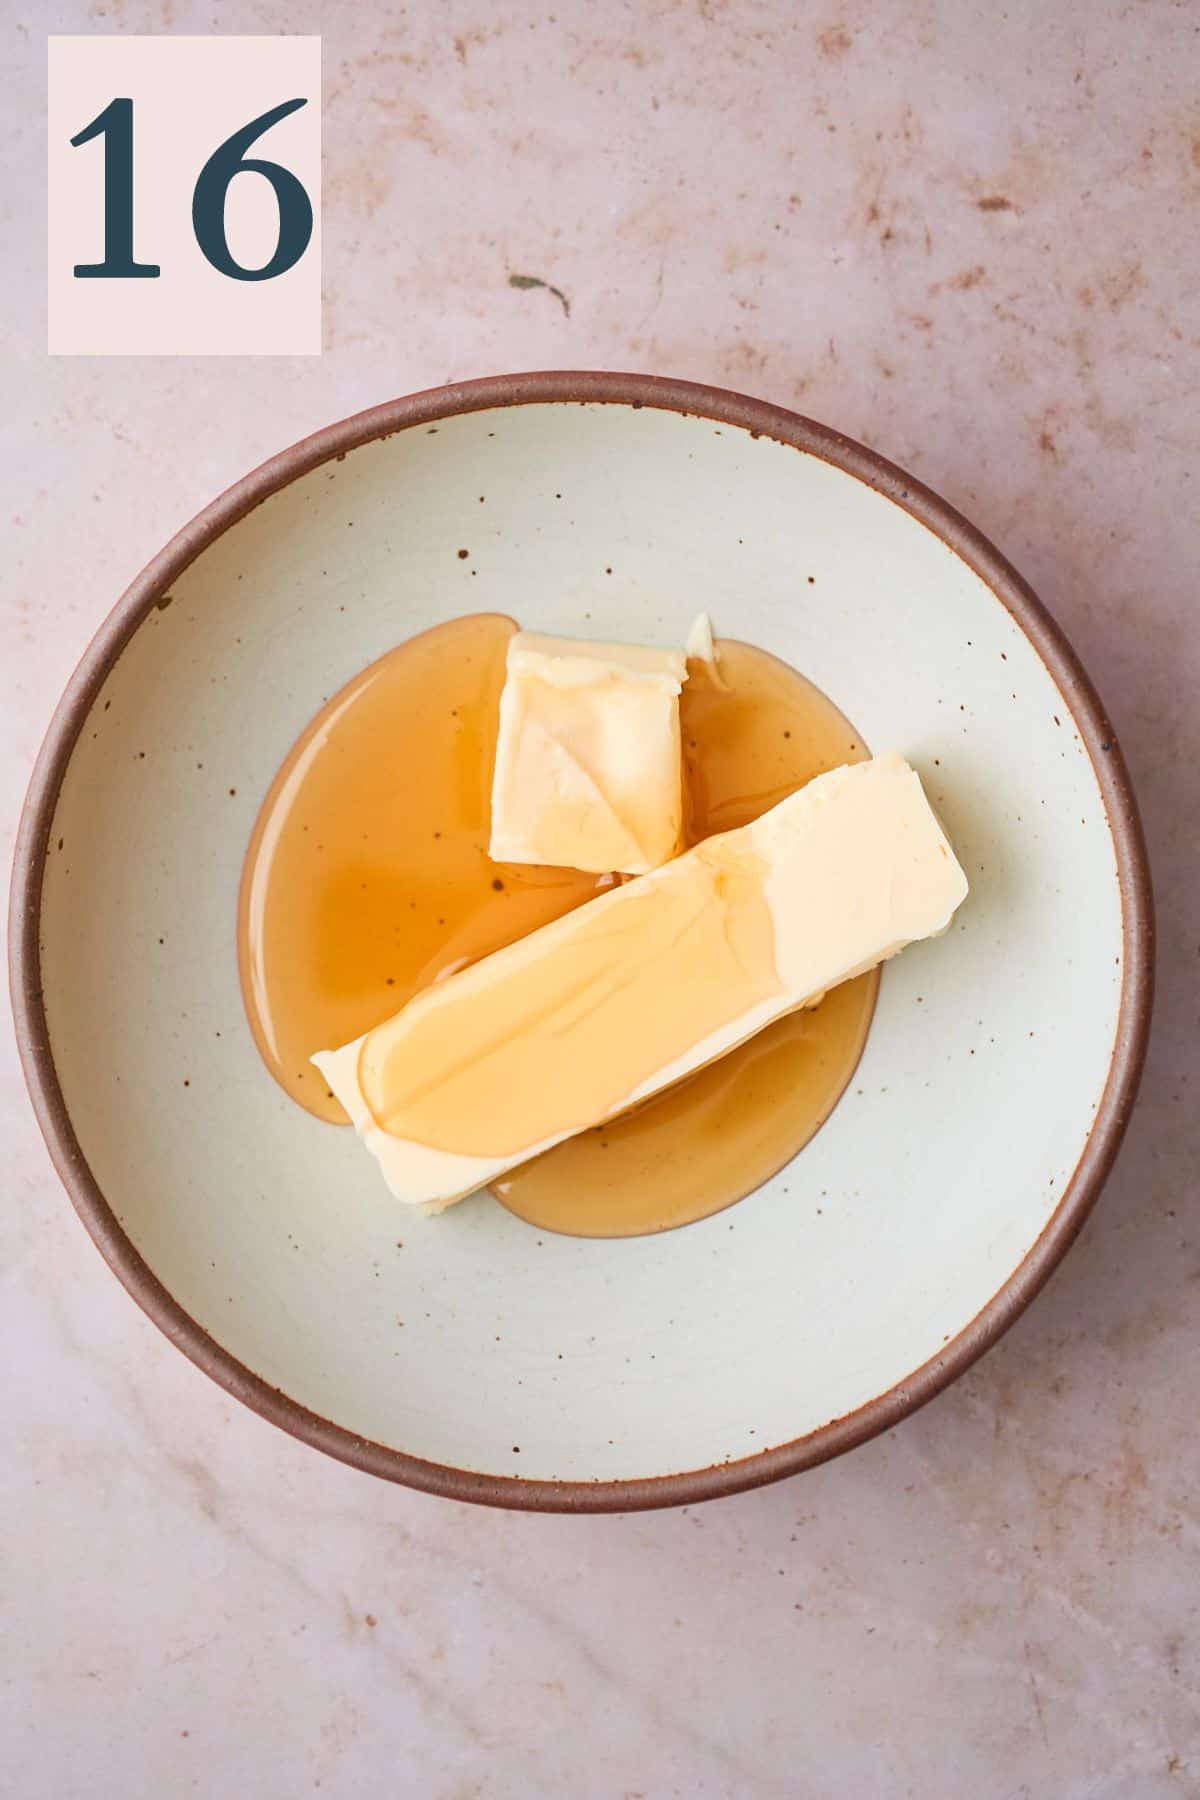
Meanwhile, while the chicken is frying, place butter and honey in a bowl. (Image 16)
Melt, and then whisk to combine until smooth. (Image 17)

Bake the biscuits
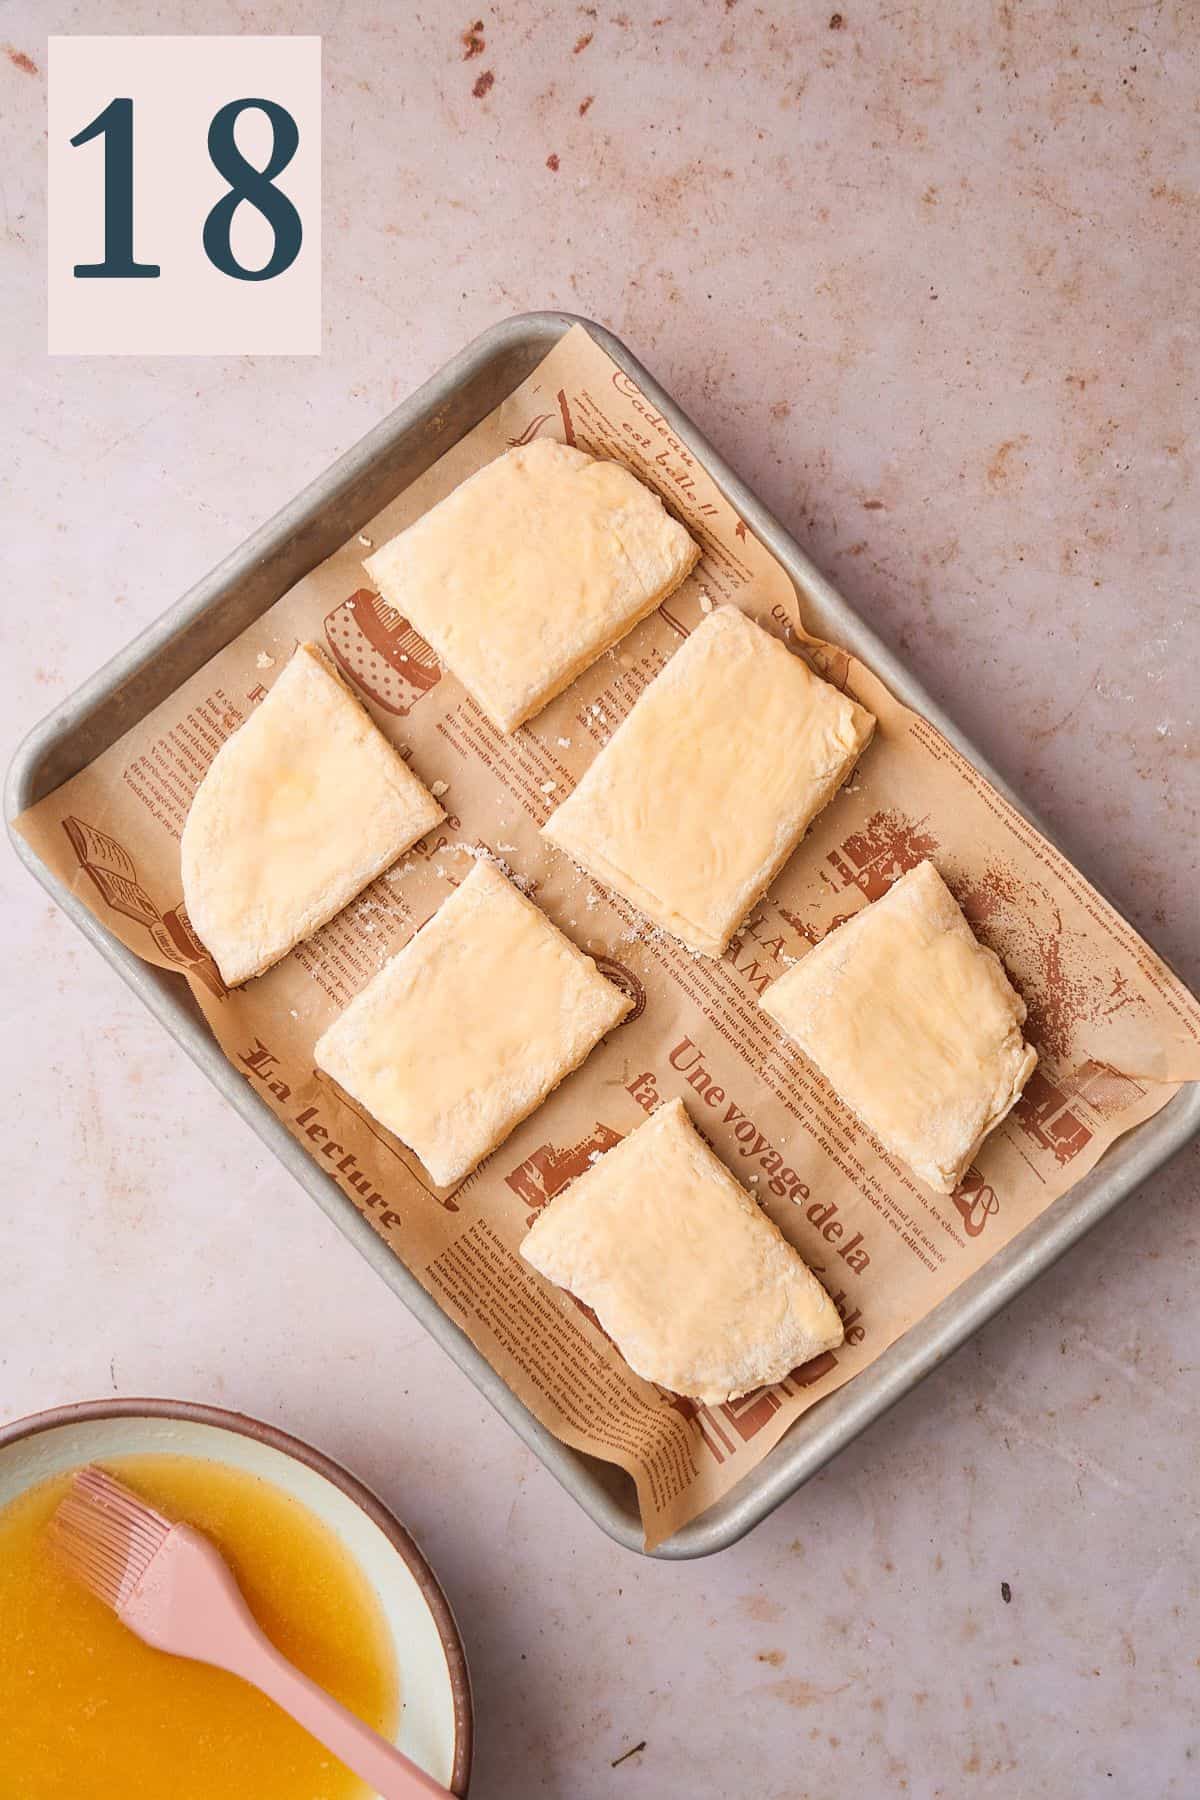
Brush the tops of the biscuits with some of the honey butter, reserving some for serving later. (Image 18)
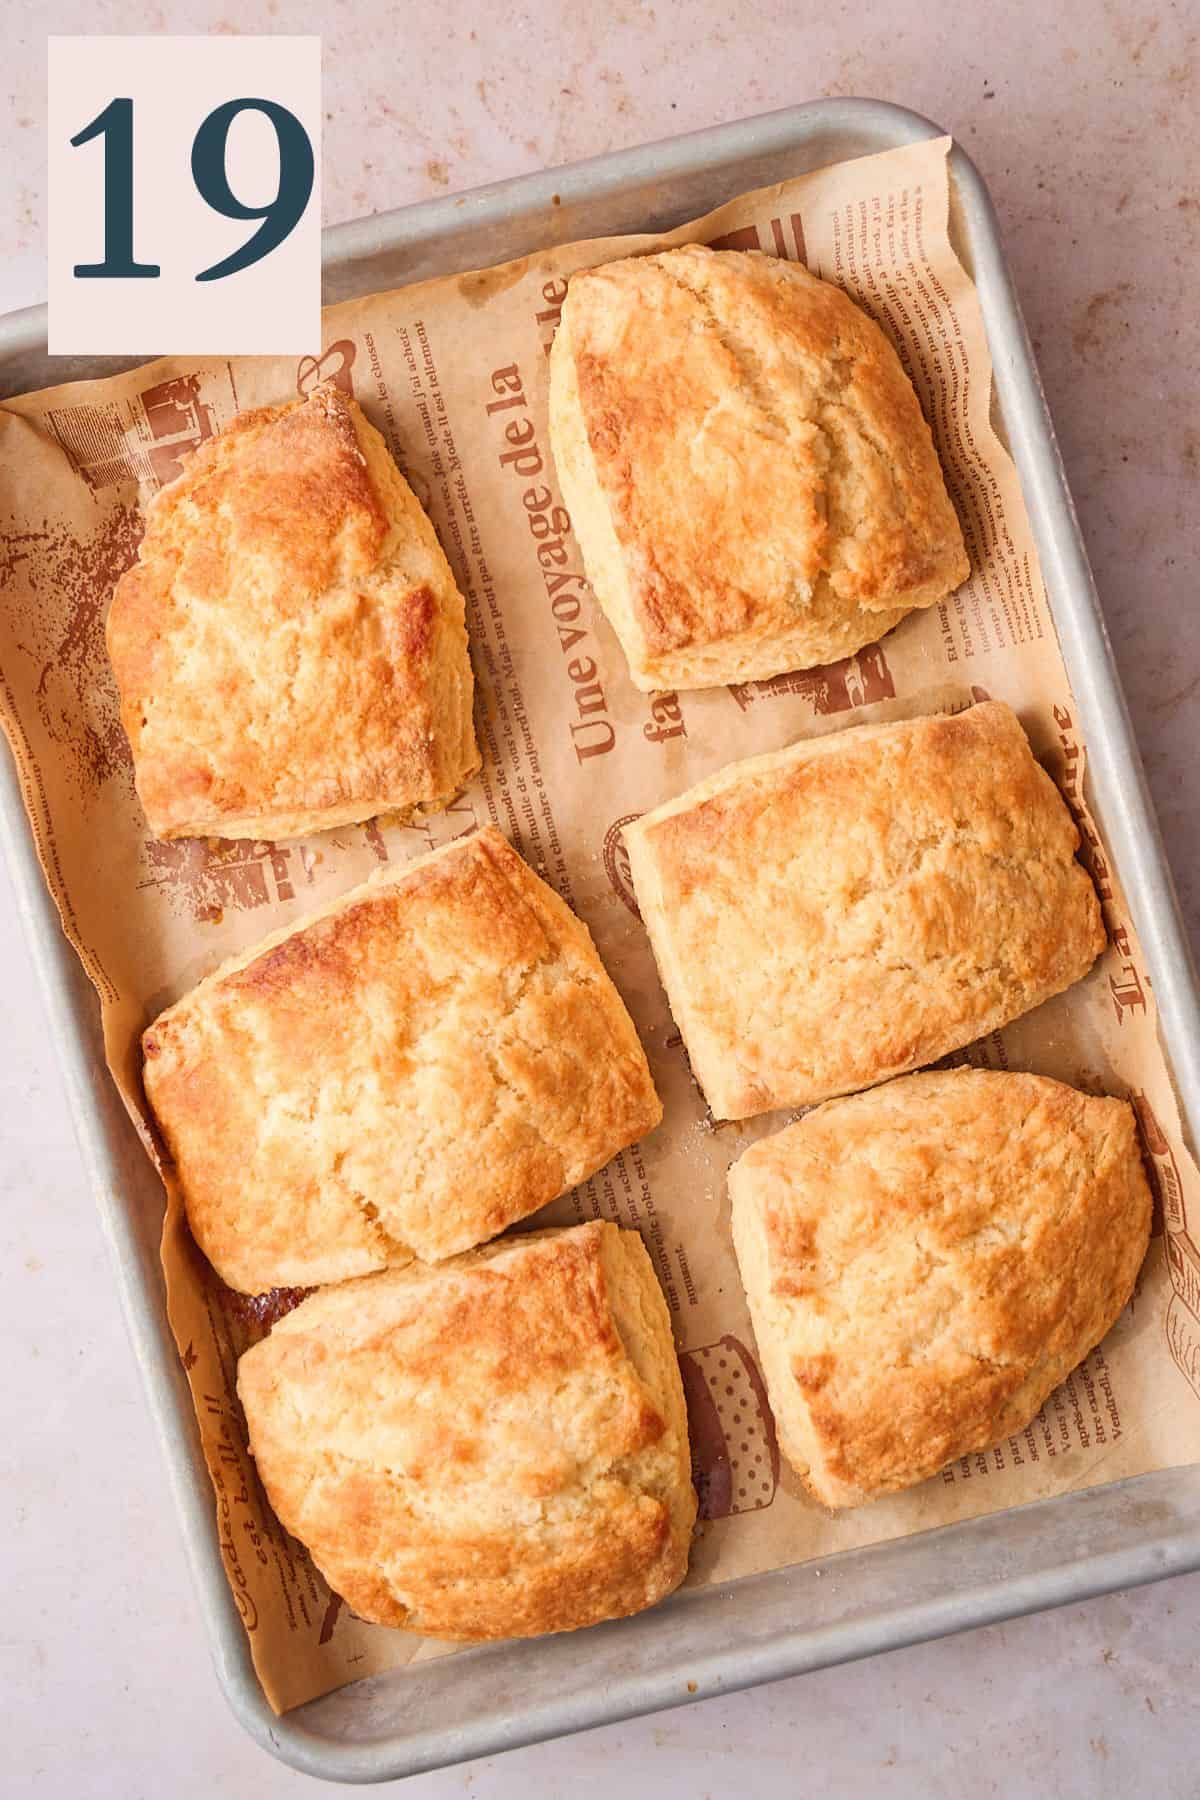
Place in a 400°F oven and bake for 15-20 minutes, until the biscuits are tall, fluffy, and golden brown. (Image 19)
Be sure to calibrate your oven to double-check that it is the right temperature. All ovens are different, so having an oven thermometer can really help ensure your oven is at the proper temperature.
⭑Pro tip: Take extra care to only brush the TOPS of the biscuits with honey butter before baking, and make sure it doesn't drip down the sides. If the honey butter drips down the sides before baking, it can prevent the biscuits from rising properly.
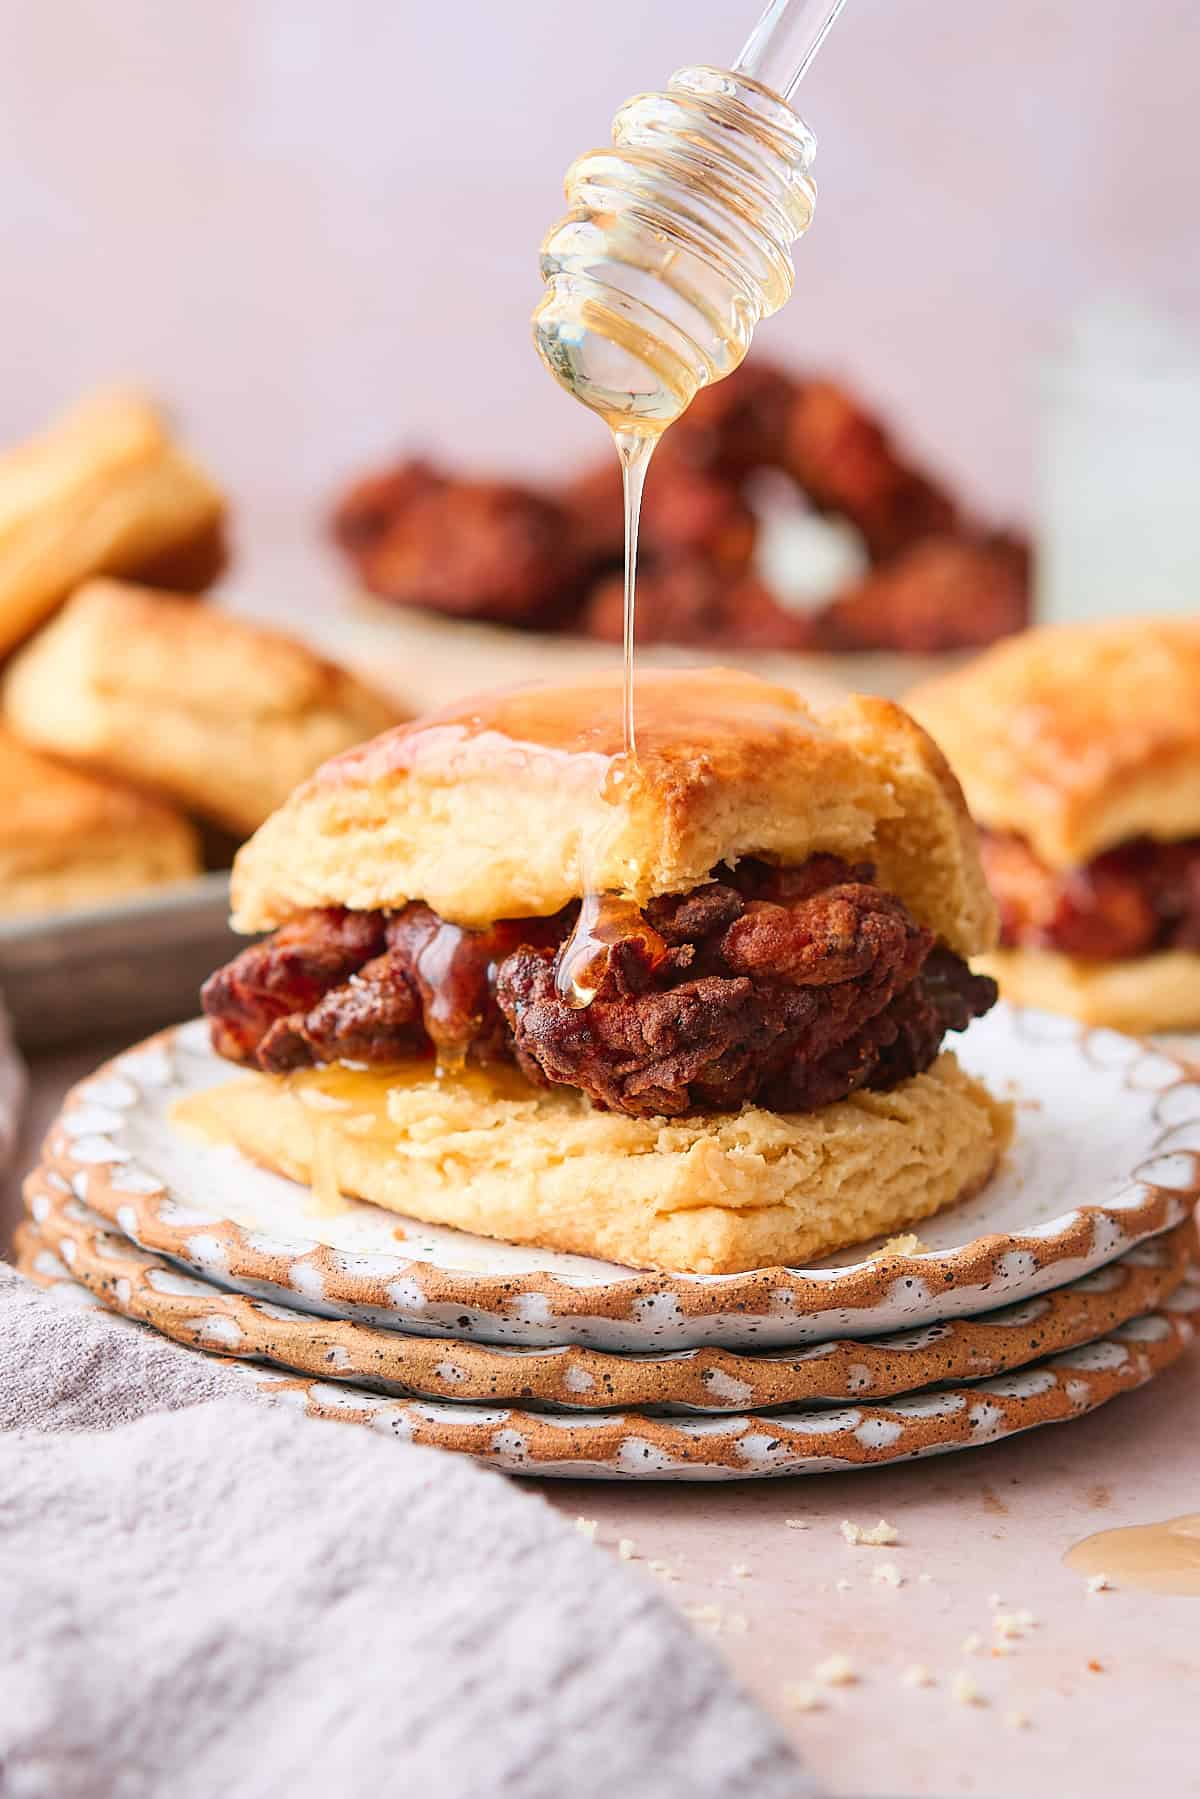
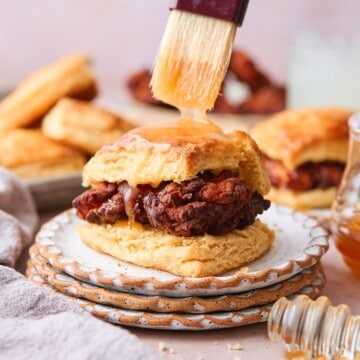
To serve, cut the biscuits in half, and brush the insides and the top of the biscuits with warm honey butter. Serve with more honey if you'd like! Enjoy!
If you want to mix it up, make these with our delicious buttermilk cornbread biscuits instead!
✨Top Tips
- Keep the butter and buttermilk COLD for the biscuits. This is probably our top tip, every time! Room temperature ingredients will not work for this recipe, and it's very important that they are kept super cold. The cold butter helps expand the biscuits in the oven, when the water escapes from the butter, which makes the biscuits fluffy and tall.
- Marinate the chicken for as long as possible. You can marinate the chicken for up to 48 hours before frying! (Don't go longer than 48 hours, though or the chicken will become mushy). The longer it sits in the marinade, the better, as the marinade makes the chicken juicy and the seasonings help it become super flavorful.
- Don't overwork the biscuits. You want to be very gentle when working the biscuit dough to ensure you end up with fluffy, tender biscuits instead of tough, dense ones!
- Chill the biscuits before baking. Again, the colder the butter, the better, for tall, fluffy biscuits with pretty layers! We like to keep ours in the freezer just up until it's time to bake.
- Shake off the excess dredge from the chicken. After ensuring the dredge gets in every nook and cranny of the chicken, shake it off very well to ensure there is no extra before resting the chicken. Extra flour will just fall off in the oil. It can also prevent the breading from sticking to the meat.
- Let the chicken rest after dredging. This is another important tip to keep the breading sticking to the meat. Allow the breading to rest on the chicken for at least 20 minutes, but up to 24 hours before frying the chicken. Keep it in the fridge, uncovered, while it rests.
- Don't overcrowd the frying skillet. For an even fry on your chicken, fry it in batches, about 2 thighs at a time. If you add too much chicken to the oil at once, it will drop the temperature too much, which will make your chicken greasy.
- Monitor the frying temperature. Keep a consistent temperature to the oil to make sure the chicken doesn't burn or get too greasy. Using a thermometer really helps!
Need supplies? Shop our Amazon store! Stock your pantry, and find all of our favorite kitchen tools! A Full Living LLC earns a small commission through purchases on our storefront to help support this site.
💭Frequently Asked Questions
Store leftovers in an airtight container in the fridge for up to 4-5 days. Reheat in the air fryer or oven at 300°F until warmed through.
We don't recommend freezing once the biscuit has been fully prepared, but you can freeze the chicken before frying, and the biscuits before baking if stored separately for up to 3 months if stored in an airtight container.
You probably overcrowded the pan or didn't monitor the frying oil temperature.
If the oil temperature is too low (often caused by trying to fry too much chicken at once) the temperature drops too quickly, and makes the chicken greasy by absorbing excess oil.
If the chicken is burnt, you probably fried it for too long or at too high of a temperature. Using a thermometer to monitor the oil temperature will help you achieve better results.
There are a few things that could have happened. Here are the things you should look out for.
Your butter and buttermilk may have been too warm. Keep them as cold as possible for the best rise!
You could have overworked the biscuit dough. Be very gentle, and pat and fold the dough carefully.
Also be sure not to seal the edges of the biscuits by wiggling your biscuit cutter or putting honey butter down the sides of the biscuits before it bakes. These things will all prevent a tall rise.
Lastly, use an oven thermometer to ensure that your oven is at the correct. All ovens are different, and if the oven isn't hot enough, the biscuits won't rise as tall.
More Recipes To Consider


Did you try this recipe? Make sure to leave a 5-star review below! 🌟 This helps other readers find our recipes and encourages them to try them. Also, be sure to leave a comment with your experience. Follow along, and tag @AFullLiving on Instagram with your photos!
📖 Recipe
Honey Butter Chicken Biscuit
Equipment
- oven thermometer to monitor the oven temperature
- instant read thermometer to ensure the chicken is cooked through
- oven safe thermometer or candy thermometer, to monitor the frying oil temperature
- metal skimmers for transferring the chicken from the oil to cooling racks
Ingredients
Chicken Marinade
- 1.5 cups buttermilk
- 2 tablespoons hot sauce of choice
- 2.5 teaspoons kosher salt
- ½ tablespoon onion powder
- ½ tablespoon garlic powder
- 1 teaspoon smoked paprika
- 1 teaspoon black pepper
- ½ teaspoon cayenne pepper
- ½ teaspoon mustard powder optional
- ½ teaspoon celery seed optional
- 6 chicken thighs about 1 -1.5 pounds of chicken
Chicken dredge
- 2 cups all purpose flour 240g
- ½ cup cornstarch
- 2 tablespoons kosher salt
- 1 tablespoon onion powder
- 1 tablespoon garlic powder
- 2 teaspoons smoked paprika
- 2 teaspoons black pepper
- 1 teaspoon cayenne pepper
- 1 teaspoon ground mustard optional
- ½ teaspoon celery seed optional
- vegetable oil for frying enough oil for it to be about 1.5-inches-2-inches deep, will depend on the pot you're using to fry
Buttermilk Biscuits
- 2 ¼ cups all-purpose flour 270g
- 2 tablespoons sugar 25g
- 1 tablespoon baking powder
- 1.5 teaspoons kosher salt
- ½ teaspoon baking soda
- 8 tablespoons unsalted butter VERY cold and cubed
- ¾ cup buttermilk very cold
- ¼-1/2 cup all purpose flour as needed for the working surface
Honey butter (divided)
- 10 tablespoons salted butter
- 5 tablespoons honey
Instructions
Chicken marinade
- Pat the chicken thighs dry with paper towels. Place the chicken thighs in a bowl, then cover with the dry seasonings, followed by the buttermilk and hot sauce. Mix to coat thoroughly. Cover with plastic wrap and transfer to the fridge, allowing the mixture to marinate for at least 30 minutes, preferably 4-8 hours.1.5 cups buttermilk, 2 tablespoons hot sauce of choice, 2.5 teaspoons kosher salt, ½ tablespoon onion powder, ½ tablespoon garlic powder, 1 teaspoon smoked paprika, 1 teaspoon black pepper, ½ teaspoon cayenne pepper, ½ teaspoon mustard powder, 6 chicken thighs, ½ teaspoon celery seed
Chicken dredge
- On a shallow plate or baking sheet, combine flour, cornstarch, salt, and seasonings to make a dredge for the chicken.2 cups all purpose flour , ½ cup cornstarch, 2 tablespoons kosher salt, 1 tablespoon onion powder, 1 tablespoon garlic powder, 2 teaspoons smoked paprika, 2 teaspoons black pepper, 1 teaspoon cayenne pepper, 1 teaspoon ground mustard, ½ teaspoon celery seed
- Remove the chicken from the marinade, and shake off the excess marinade. You can shake some of the marinade into the dredge, as those will create delicious, craggly, crunchy fried bits on the chicken. Coat the chicken very well, in every nook and cranny, then shake the thighs off very hard to get rid of excess flour.
- Transfer them to a cooling rack on top of a baking sheet to rest for about 20 minutes. (You can rest them in the fridge, uncovered for up to 24 hours if you'd like to do this ahead!)
- Meanwhile, while the chicken is resting, heat oil in a skillet or Dutch oven over medium-heat and use a thermometer to monitor the temperature of the oil. You're aiming for 350-360°F.vegetable oil for frying
Frying the chicken
- After the chicken has rested and the oil has reached between 350-360°F, place two thighs at a time in the hot oil. Don't overcrowd the pan! Fry until crispy and golden brown, about 7-10 minutes or when the internal temperature of the chicken reaches at least 165°F internally, preferably 195°F for chicken thighs! (Chicken thighs should be cooked to a higher temperature to break down the extra collagen in them, which will result in a juicier piece of meat!)
- Continue frying the chicken until all pieces are cooked through, making sure to allow a consistent temperature to the oil while working. When the chicken is done frying, transfer it directly to a clean baking sheet with a cooling rack on top to allow the extra grease to drip off the chicken.
Make the buttermilk biscuits
- Simultaneously, while working on marinating, dredging, and frying the chicken, make the biscuits. In a mixing bowl, add the flour, sugar, salt, baking powder, and baking soda. Whisk to combine, then scatter around chunks of butter into the flour mixture.2 ¼ cups all-purpose flour , 2 tablespoons sugar, 1 tablespoon baking powder, 1.5 teaspoons kosher salt, ½ teaspoon baking soda, 8 tablespoons unsalted butter
- Using a pastry butter or your fingers, work the butter into the flour mixture, until all of the butter is roughly the size of a pea or almond and the mixture looks a little sand-like. Don't overwork the mixture! Chunks of butter are good, and they will help the biscuits rise in the oven and become fluffy.
- Pour in the buttermilk, and using a rubber spatula, stir until a shaggy mixture is achieved. It will be quite sticky. It won't come together all the way on its own yet -- that's okay, trust the process!¾ cup buttermilk
- Cover a work surface with more flour, then scoop the dough out of the bowl and onto the work surface. Press and pat the dough together gently until it is a rectangular shape.¼-1/2 cup all purpose flour
- Fold the right side of the rectangle over the left side using your hands or a bench scraper. Press gently together, it will be shaggy and messy still. Pat into a rectangle again, and turn the dough 90° before pressing it out into a rectangle shape again, and folding it in half once again. Fold the top half down to the bottom and press it out into a horizontal rectangle again.
- Repeat the steps above 2 more times for a total of 6 folds. Work carefully and don't overwork the dough. Creating folds is what makes layers in the biscuits.
- After 6 folds, gently pat the dough into a rectangle/square-shape that is about ¾-inch thick. Use a sharp circle biscuit cutter, or a bench scraper or sharp knife to create rectangular-shape biscuits. Press down through the dough quickly, then lift up. Don't twist the biscuit cutter or move it around, or you will seal the edges of the biscuits, and this will prevent it from rising properly. Just push down, then pull straight up. You will have 6-large biscuits.
- Place the biscuits on a parchment lined baking sheet, giving them a bit of space to rise. Transfer them to the freezer for at least 30-minutes before baking, and preheat the oven to 400°F. The biscuits can be kept in the freezer in an airtight container for up to 3 months if you'd like to make them in advance and bake them on the day of.
Honey butter
- Place butter and honey in a bowl. Melt, and then whisk to combine until smooth.10 tablespoons salted butter, 5 tablespoons honey
Bake the biscuits
- Brush the tops of the biscuits with some of the honey butter, reserving most of it for serving later. Take extra care to only brush the TOPS of the biscuits with honey butter before baking, and make sure it doesn't drip down the sides. If the honey butter drips down the sides before baking, it can prevent the biscuits from rising properly. Place in a 400°F oven and bake for 15-20 minutes, until the biscuits are tall, fluffy, and golden brown.
Assemble and serve
- To serve, cut the biscuits in half, and brush the insides and the top of the biscuits with warm honey butter. Serve with more honey if you'd like! Enjoy!
- Store leftovers in an airtight container in the fridge for up to 4-5 days. Reheat in the air fryer or oven at 300°F until warmed through.
Save This Recipe! 💌
Video
Notes
-
- Keep the butter and buttermilk COLD for the biscuits. This is probably our top tip, every time! Room temperature ingredients will not work for this recipe, and it's very important that they are kept super cold. The cold butter helps expand the biscuits in the oven, when the water escapes from the butter, which makes the biscuits fluffy and tall.
-
- Marinate the chicken for as long as possible. You can marinate the chicken for up to 48 hours before frying! (Don't go longer than 48 hours, though or the chicken will become mushy). The longer it sits in the marinade, the better, as the marinade makes the chicken juicy and the seasonings help it become super flavorful.
-
- Don't overwork the biscuits. You want to be very gentle when working the biscuit dough to ensure you end up with fluffy, tender biscuits instead of tough, dense ones!
-
- Chill the biscuits before baking. Again, the colder the butter, the better, for tall, fluffy biscuits with pretty layers! We like to keep ours in the freezer just up until it's time to bake.
-
- Shake off the excess dredge from the chicken. After ensuring the dredge gets in every nook and cranny of the chicken, shake it off very well to ensure there is no extra before resting the chicken. Extra flour will just fall off in the oil. It can also prevent the breading from sticking to the meat.
-
- Let the chicken rest after dredging. This is another important tip to keep the breading sticking to the meat. Allow the breading to rest on the chicken for at least 20 minutes, but up to 24 hours before frying the chicken. Keep it in the fridge, uncovered, while it rests.
-
- Don't overcrowd the frying skillet. For an even fry on your chicken, fry it in batches, about 2 thighs at a time. If you add too much chicken to the oil at once, it will drop the temperature too much, which will make your chicken greasy.
-
- Monitor the frying temperature. Keep a consistent temperature to the oil to make sure the chicken doesn't burn or get too greasy. Using a thermometer really helps!


Comments
No Comments