Save This Recipe! 💌
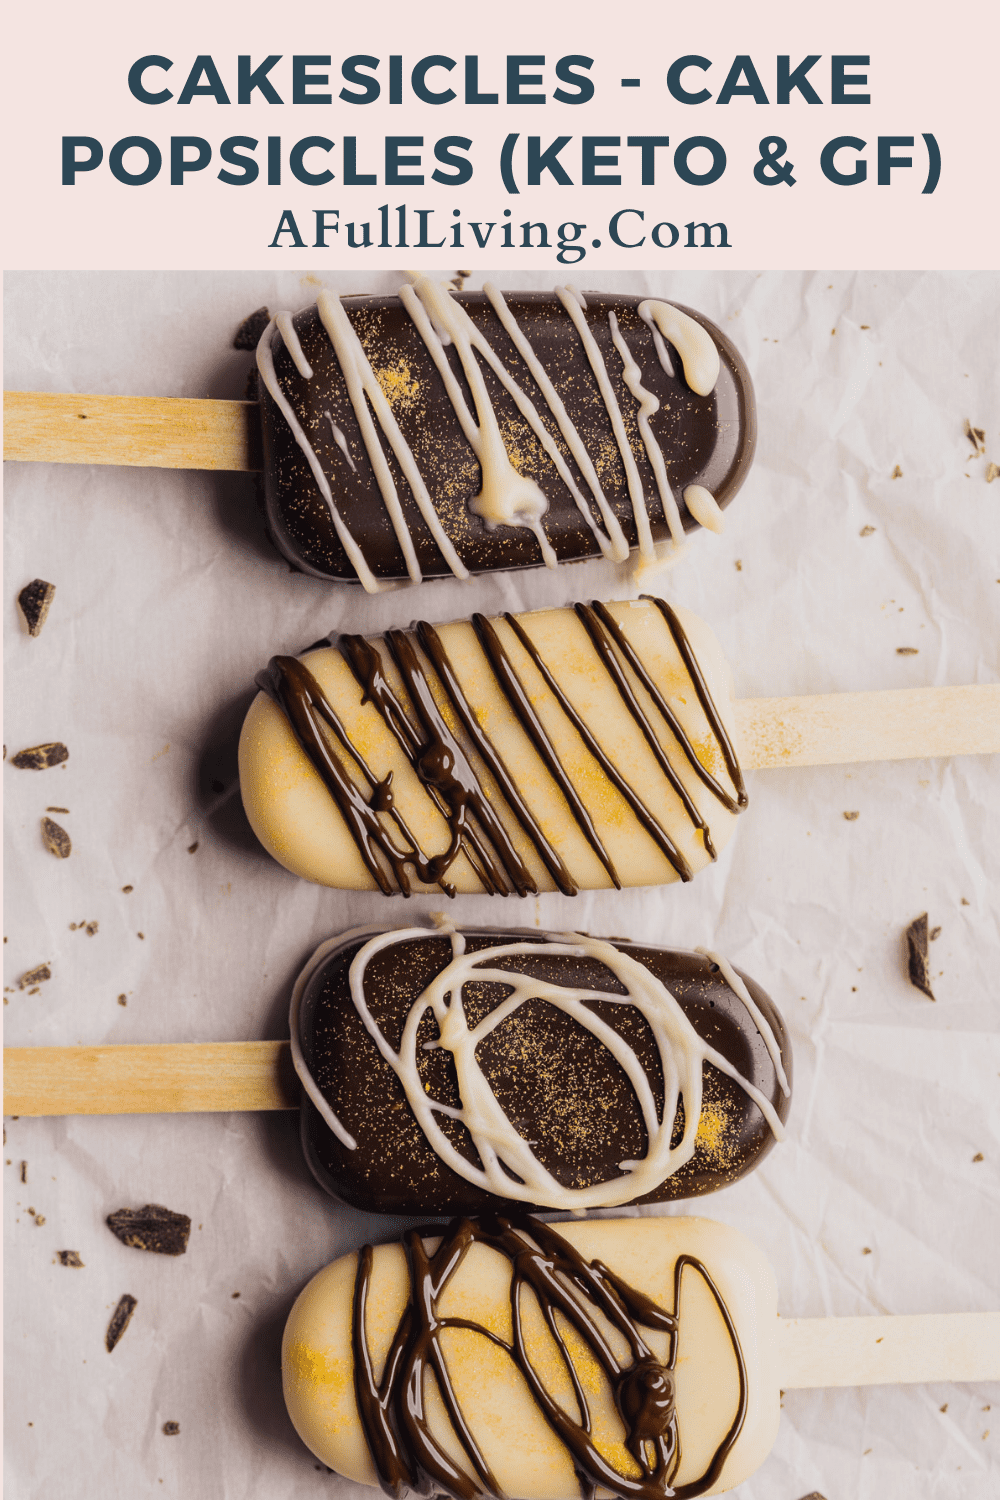
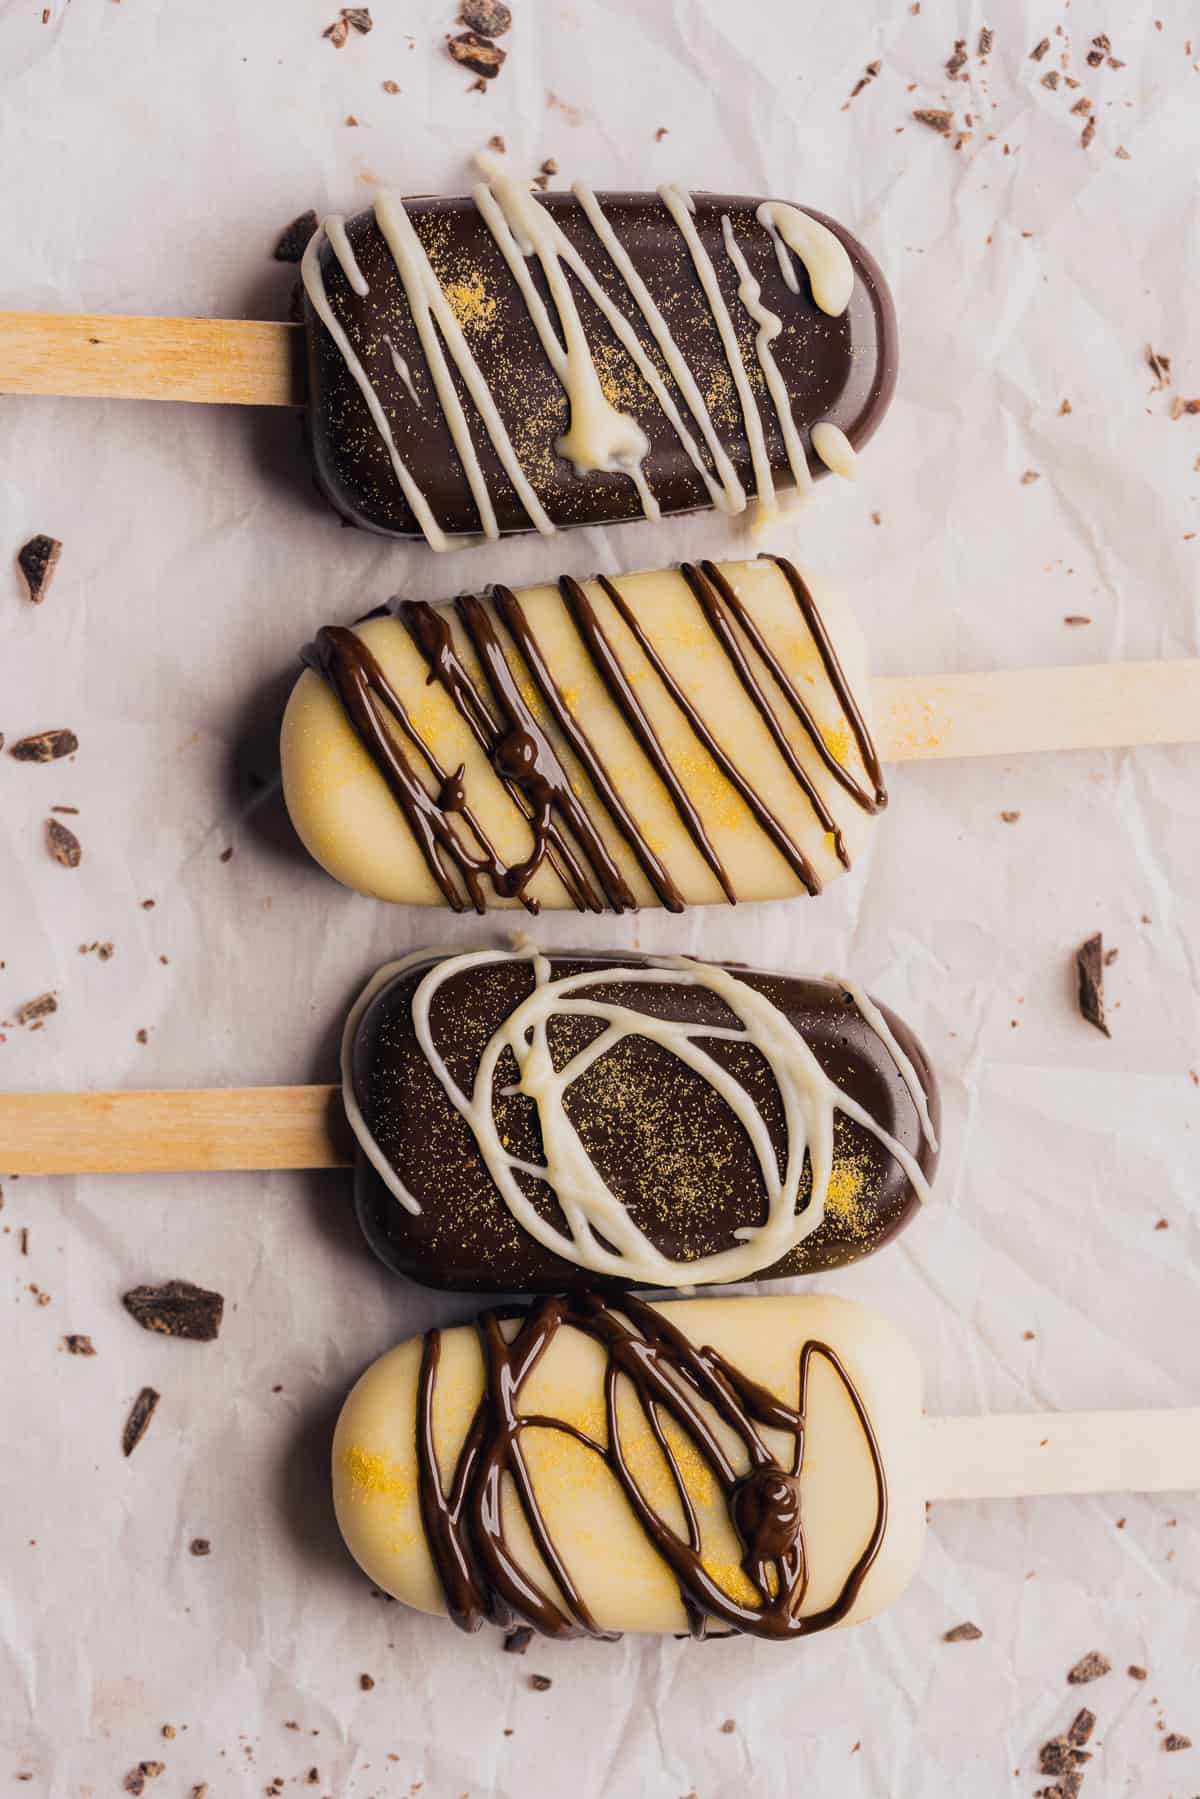
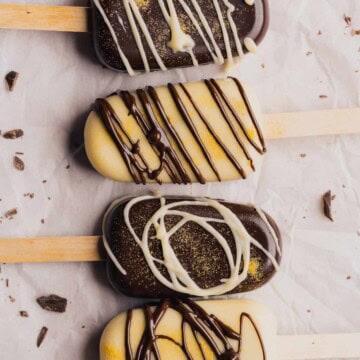
These low carb cakesicles are like the traditional and super popular treat- cake pops, but honestly even easier to make with the right tools and a little patience! They're incredibly customizable and great for gifting, or, do it as a fun activity with loved ones!
If you're looking for more yummy chocolatey keto-friendly sweet treats, be sure to check out these gluten free caramel slice bars, or these delicious white chocolate raspberry cookies.
Note: We do highly recommend reading through our post to see step-by-step instructions & photos on how they come together. There are a few tips and tricks that will be helpful to ensure the best results if making for the first time, otherwise, just skip to the recipe card.
Jump to:
❤️Why we love these
- Elegant & beautiful: If you're looking for the perfect handmade gift for someone with a sweet tooth, these make an incredible gift! They're seriously stunning when decorated.
- Bigger & easier to make than cake pops: Cake pops can be cute and fun to eat, but sometimes you need more than just a bite or two. These cakesicles are about 3-4 bites, which we find to be perfect! Plus, cake pops can crack easily. Since the cake balls are dipped in the chocolate, instead of painting chocolate into silicone molds.
- Easy to customize: Use virtually any cake and frosting flavor you can imagine. The possibilities are endless! You can also customize for any diet type.
- Simple ingredients: This recipe uses baked cake (we used a box mix), chocolate, and any frosting recipe you like. Other than that, you can decorate them however you like.
- Make ahead: You can easily prepare the cake and frosting ahead of time, making assembly on the day-of a breeze.
- Fun to decorate: Make it a fun activity to do with loved ones! Decorate until your hearts content, and let your creativity shine. There's definitely no right or wrong way to do it, and it's hard to mess them up.
🍫Ingredients
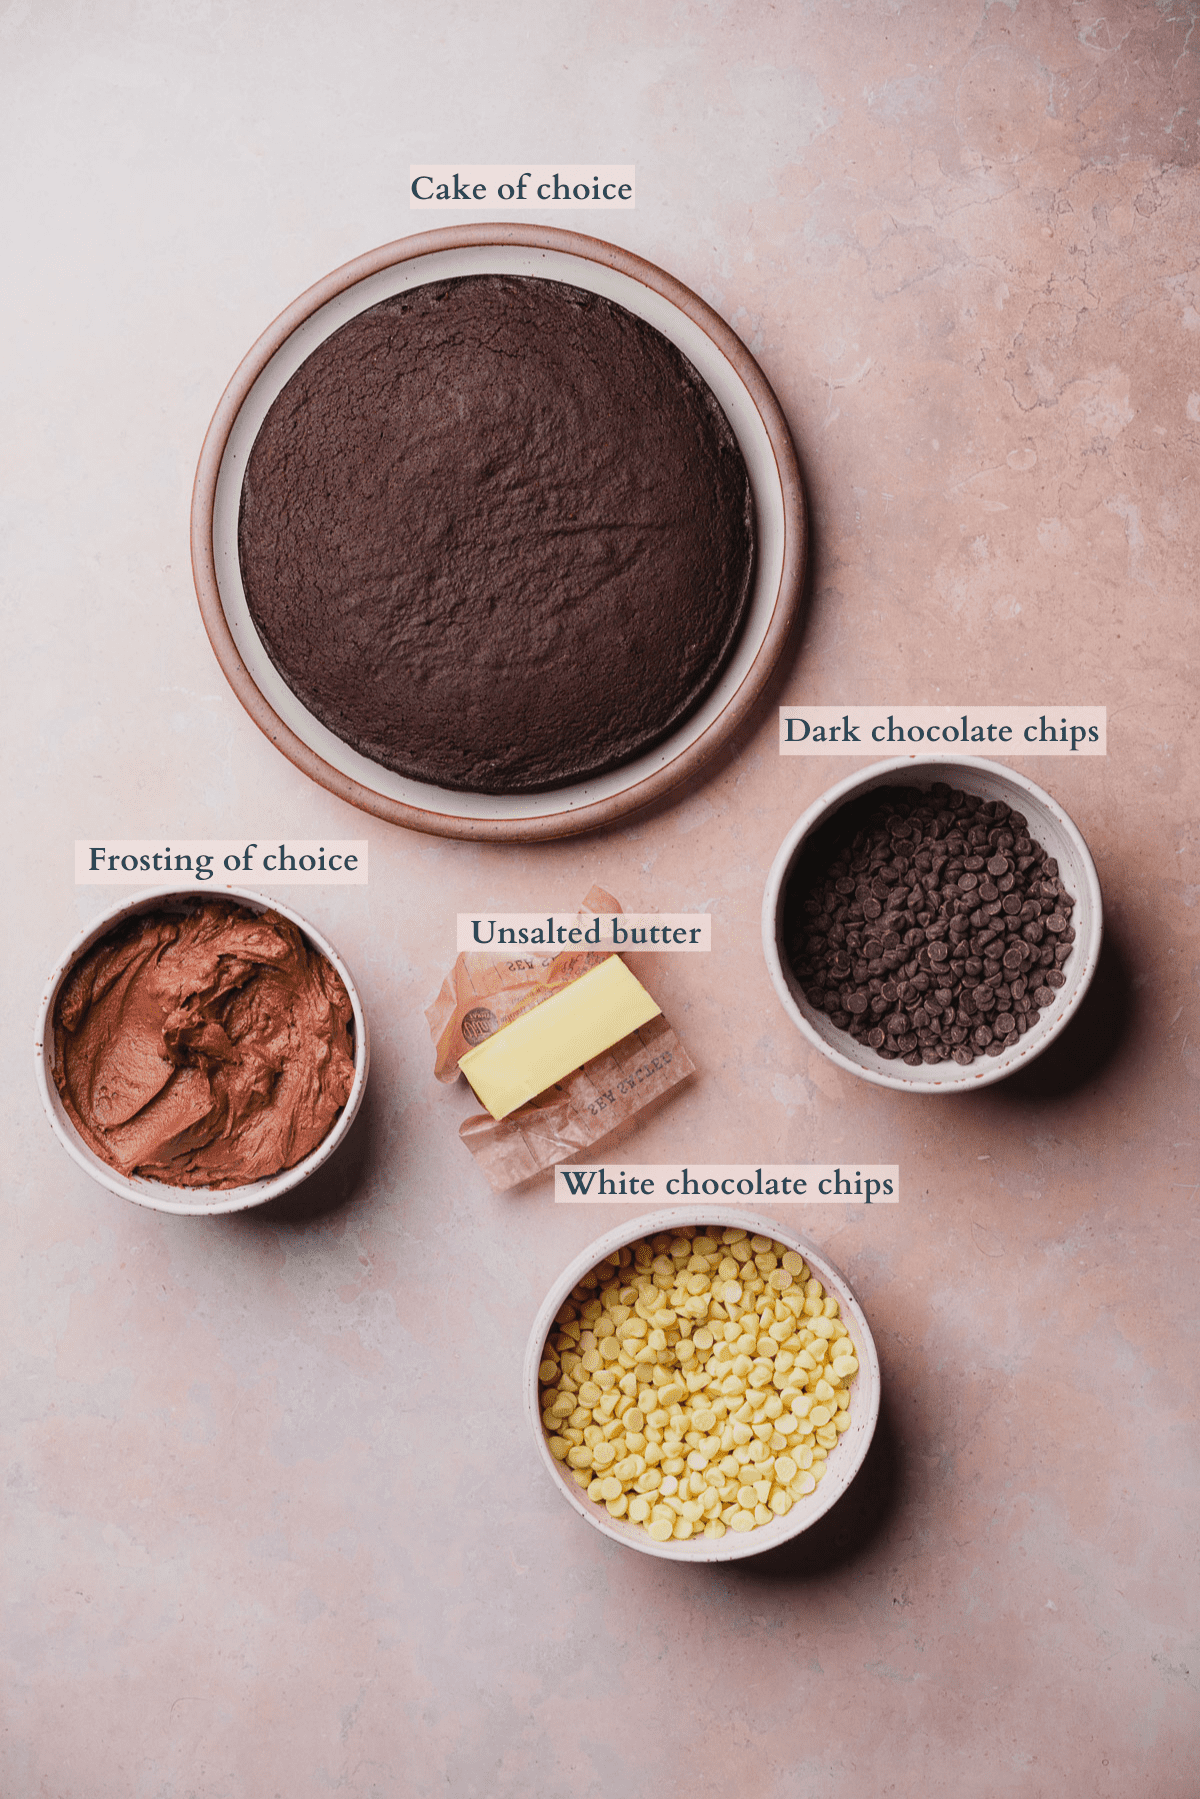
Here are the ingredients you will need to make these.
✏️Ingredient notes
For full quantities, head to the recipe card.
- Cake- You can use any cake recipe you like for these cake popsicles. We used a box mix, we used this keto friendly chocolate cake mix (Amazon affiliate link) by Swerve Sweetener.
- Frosting - You can use any frosting recipe you like, you will just want to make sure the frosting is a similar color to your cake mix, so that you don't end up with a strange colored cake filling. If making a vanilla cake, we'd suggest our keto cream cheese frosting. We built off this base to create a keto friendly chocolate cream cheese frosting. (Full recipe details in the recipe card).
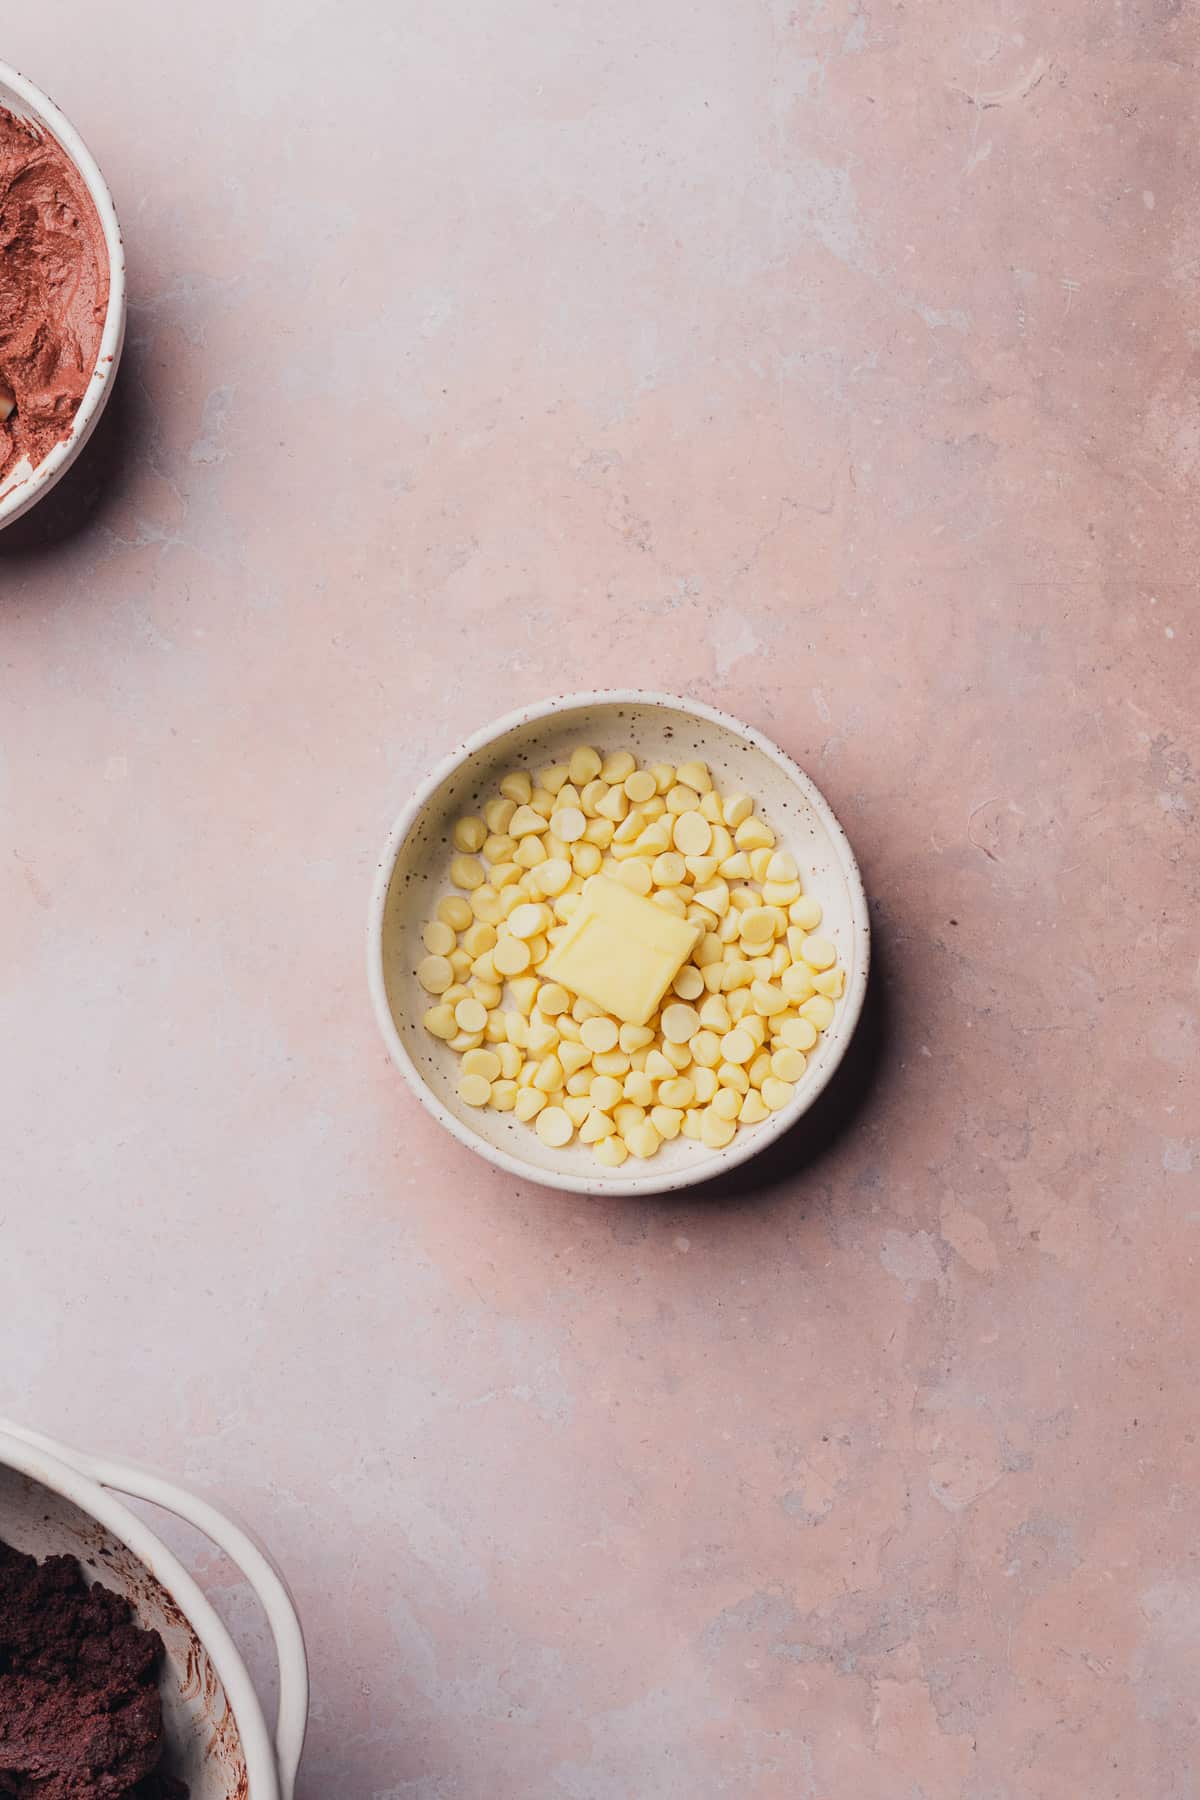
- Unsalted butter - Or coconut oil. Since our recipe is sugar free and we aren't using candy melts, we melt chocolate gently with butter to create a chocolate shell.
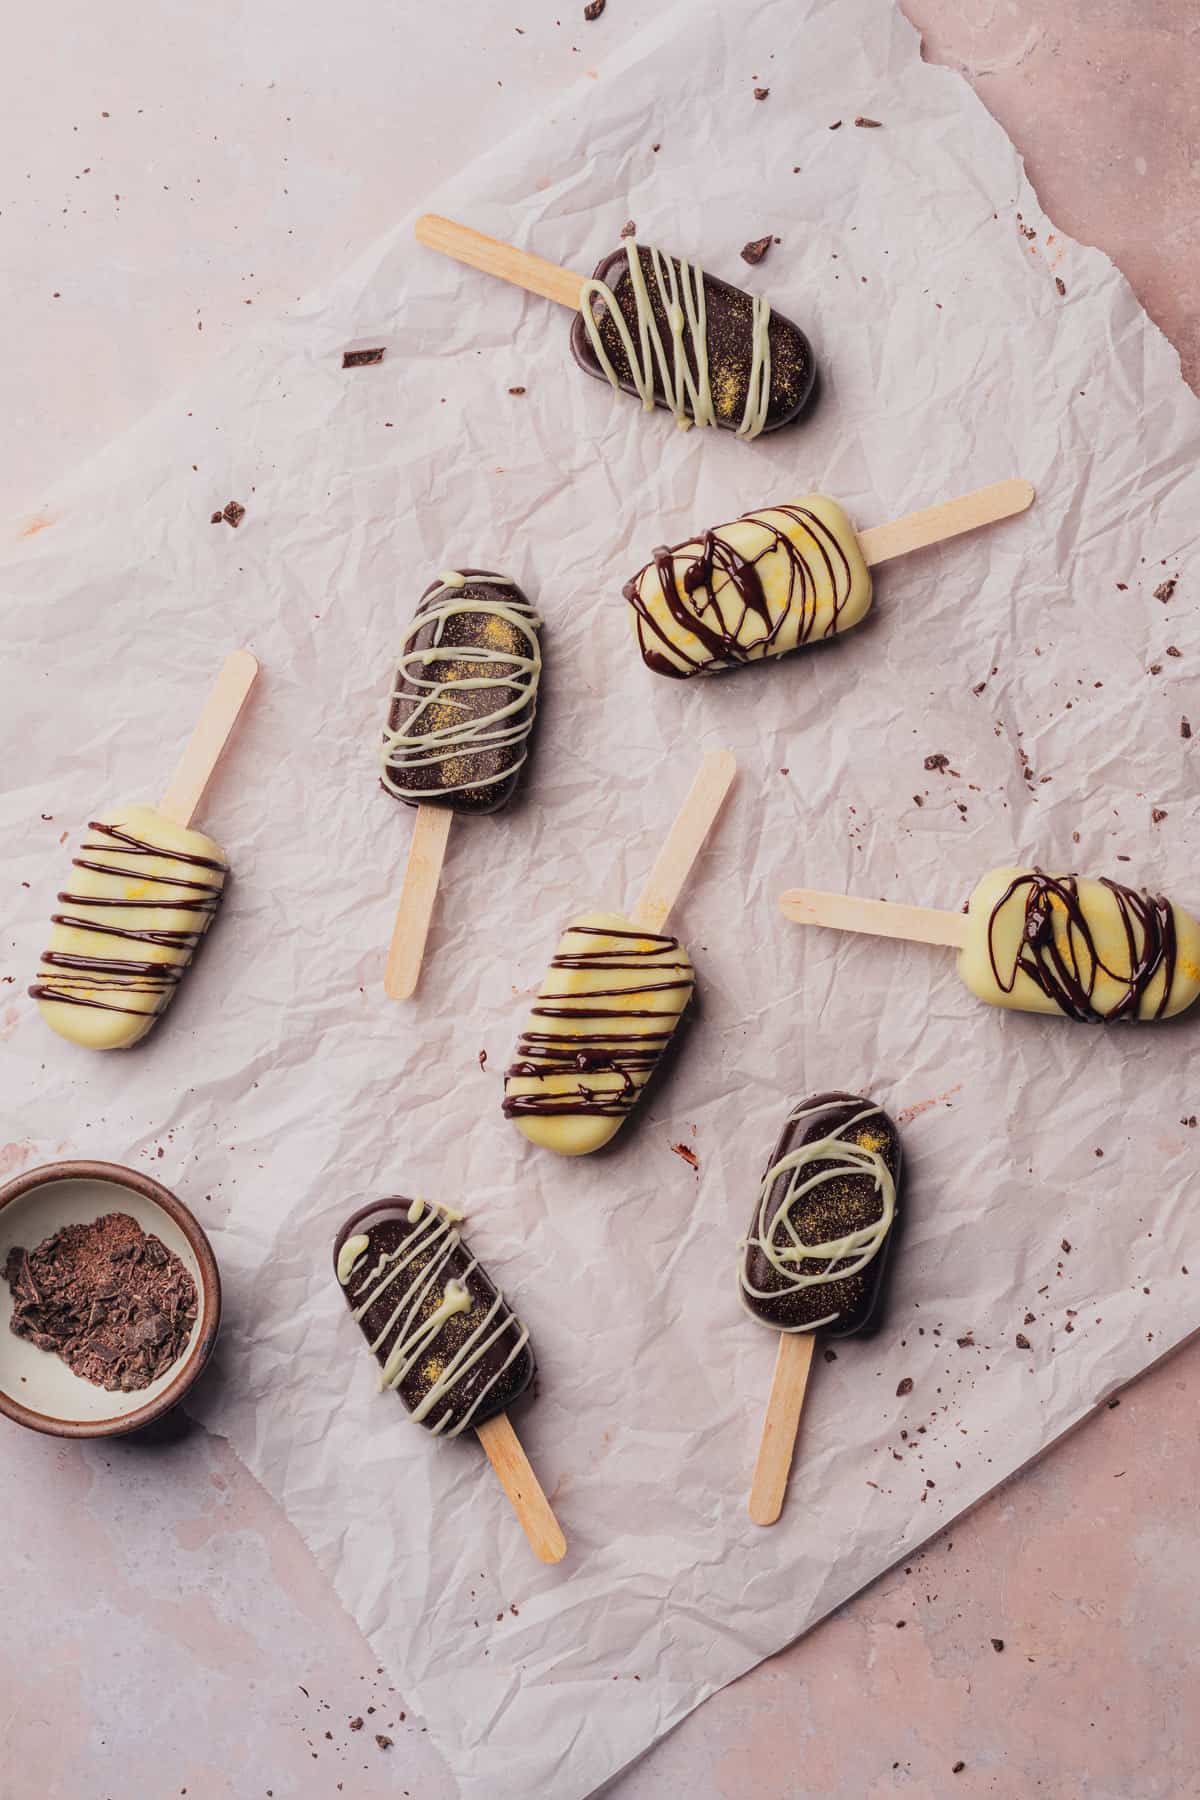
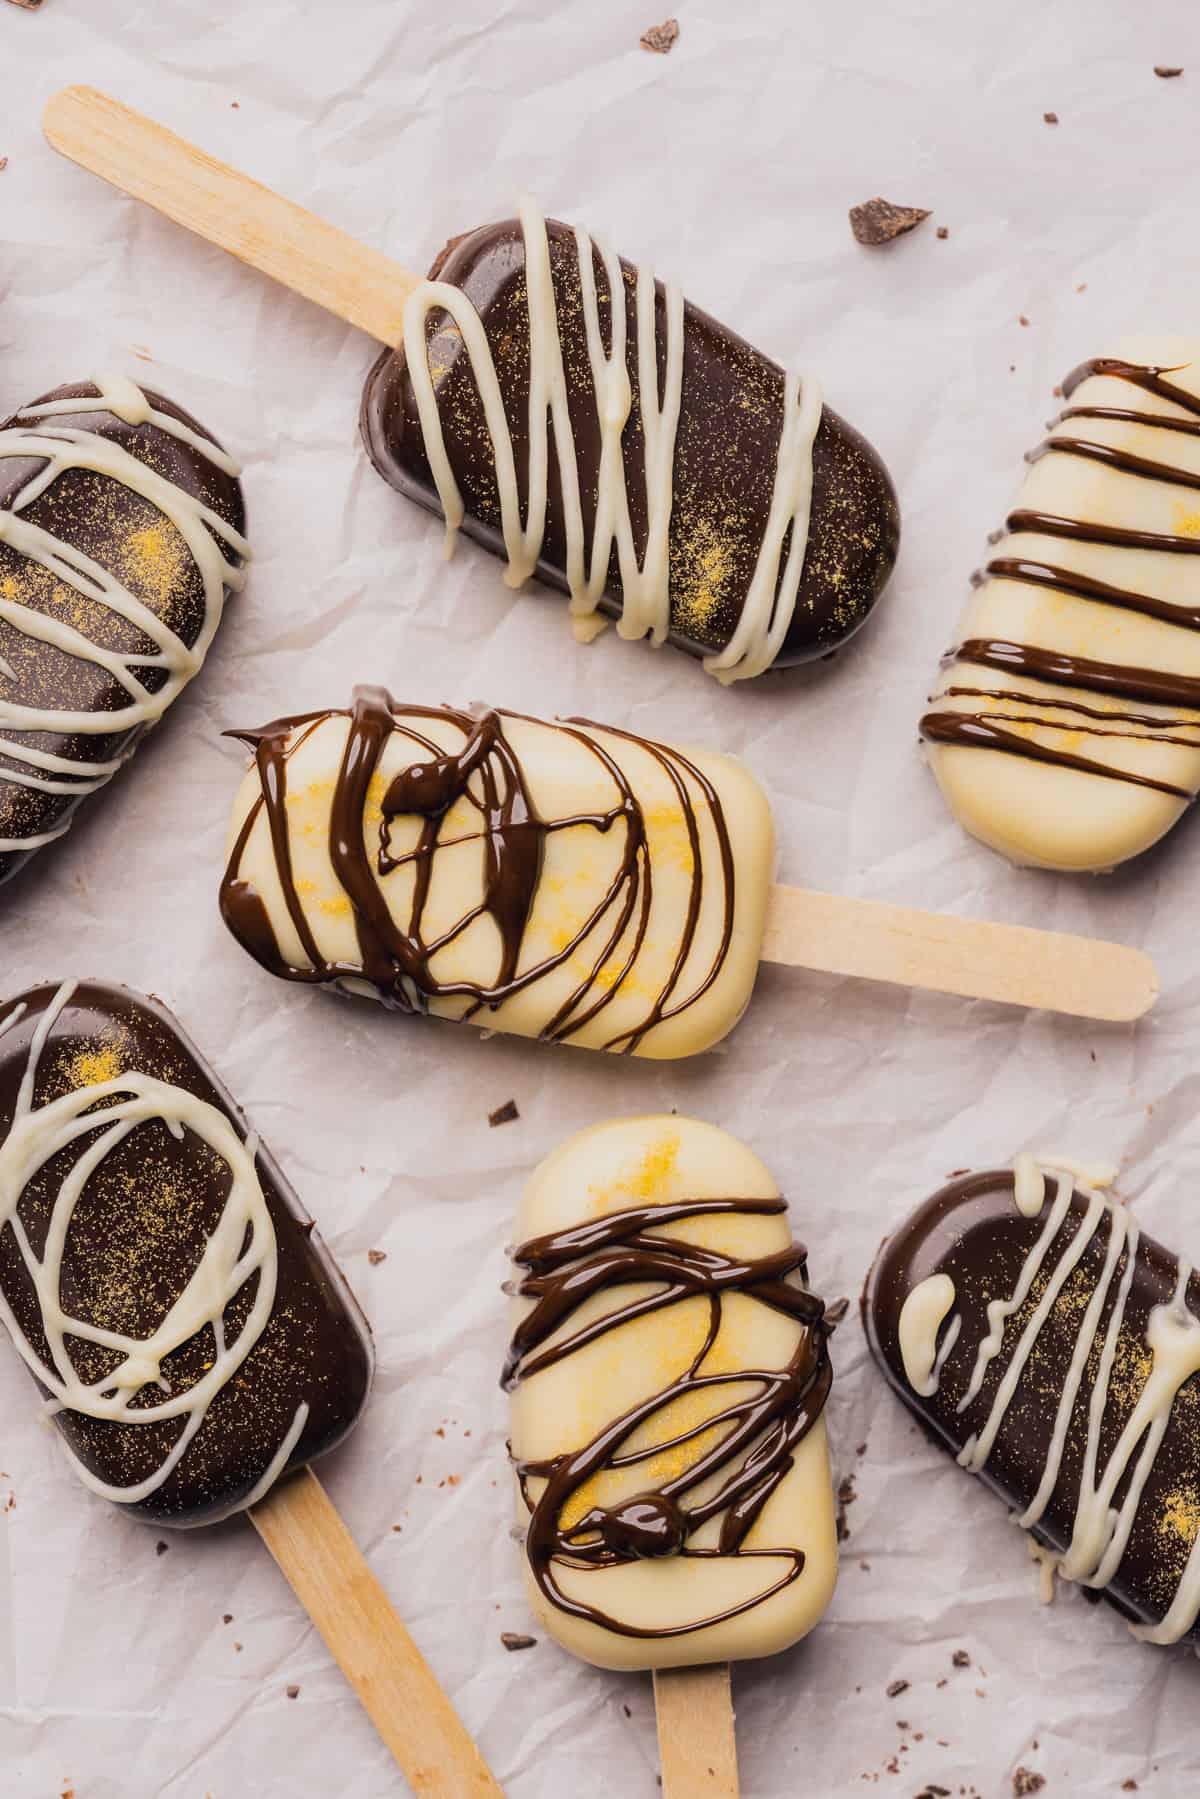
- White & dark chocolate chips - Or truthfully you can use any chocolate chips you want. We love a combo of white chocolate chips and dark chocolate chips to create contrast.
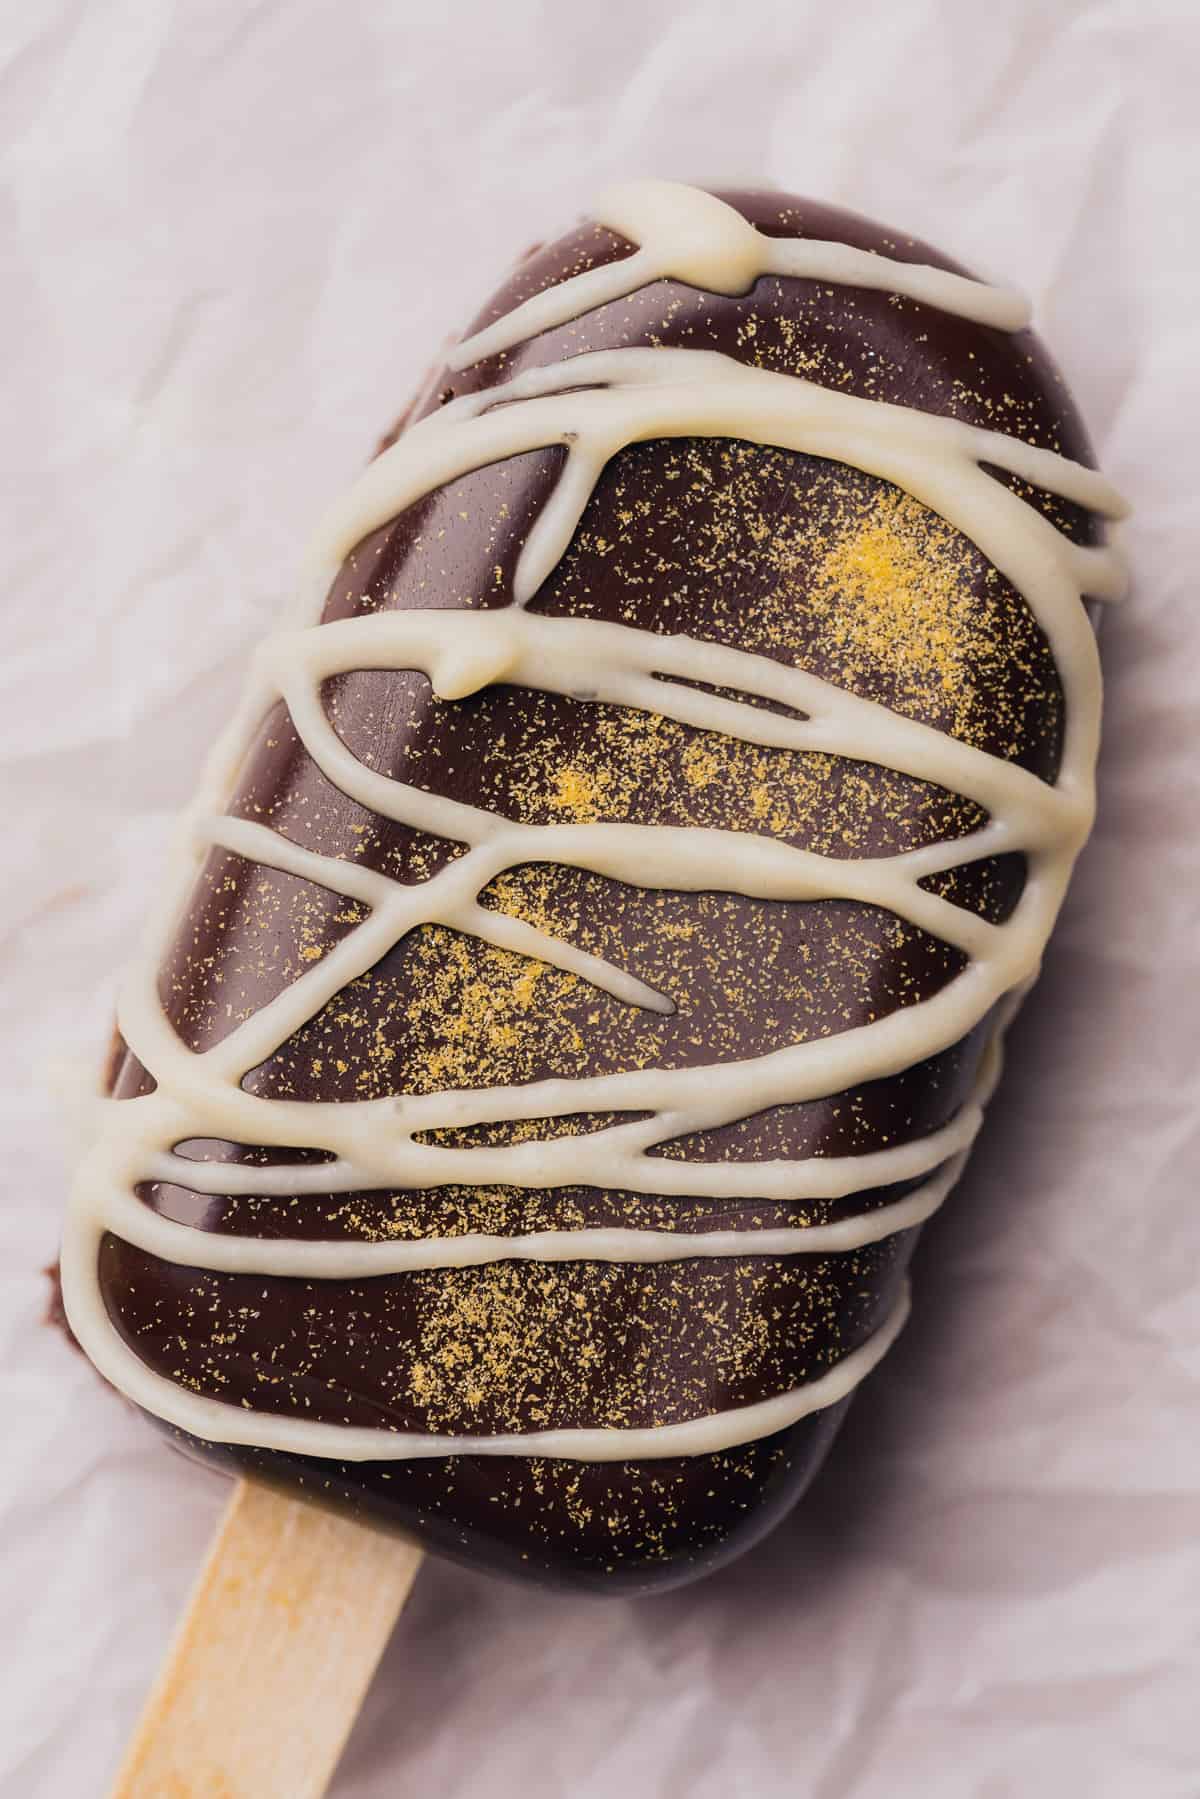
- Edible gold glitter - We love how this edible gold glitter can be sprinkled onto the chocolate to make such a stand out design. To decorate at the end. Totally optional.
📖Instructions
📏Gather your tools
- Cakesicle molds - You can use any shape you prefer. These are the ones we used, which are two small trays of 4. This set also comes with 50 popsicle sticks.
- Popsicle sticks
- Gloves - You will want to wear these when breaking up the breadcrumbs, as well as when you remove the cake pops from the molds, so you don't smudge the chocolate.
- Small baking trays - We love using quarter sheets to chill the cakesicles between steps in the fridge or freezer.
- Parchment paper - Keep our trays cleaner for less scrubbing later.
- Cooling racks - When drizzling chocolate and adding final decor touches at the end.
- Small rubber spatulas or pastry brushes - To brush chocolate inside of the cake mold.
- Kitchen shears - This helps to trim the excess chocolate from the cake popsicles when we take them out later.
🔪Prep work
- Bake any cake you prefer in accordance to package decorations or recipe. All the cake to cool completely before crumbling the cake. This can be done up to 2 days in advance.
- Prepare frosting of choice. Refrigerate until about 1 hour before putting the cakesicles together.
- Allow both frosting and cake to be room temperature before assembling for best results.
Step 1: Make the cake mixture
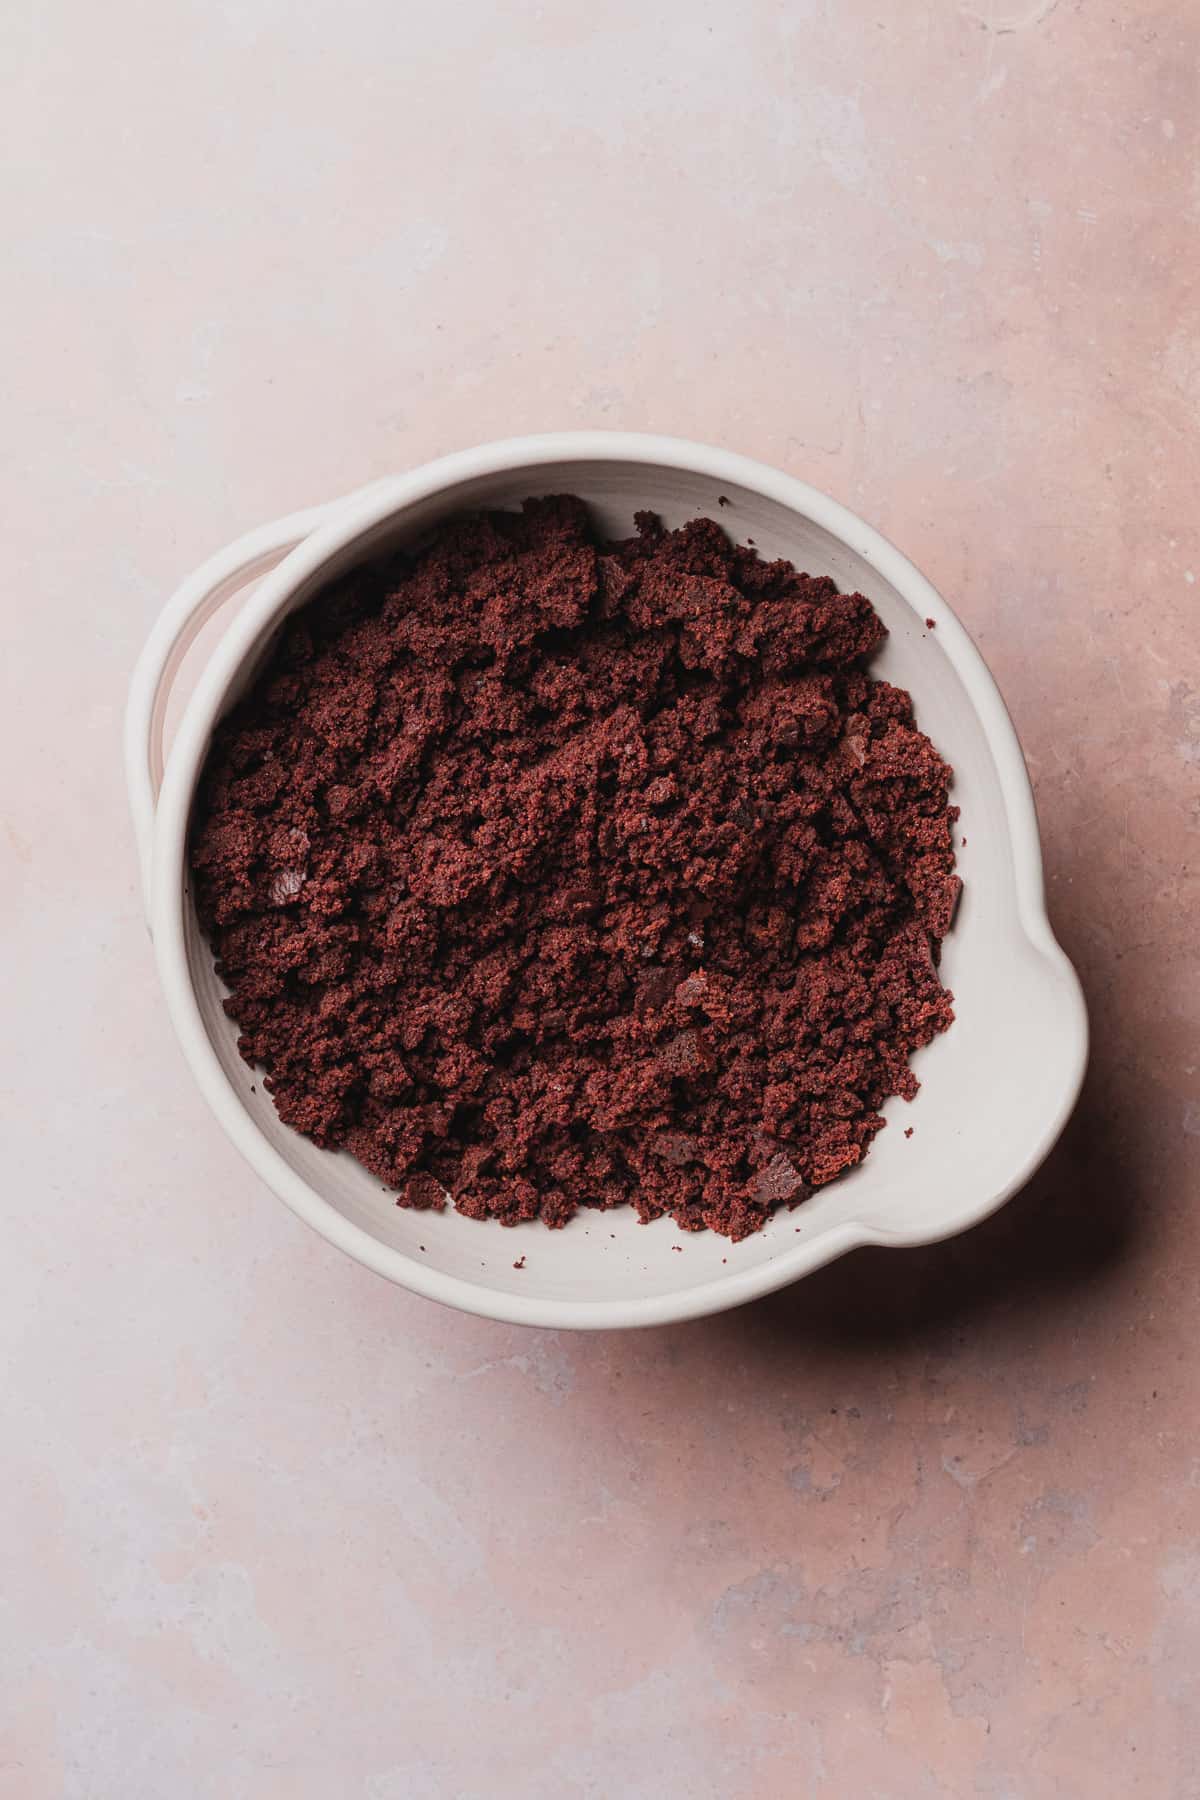
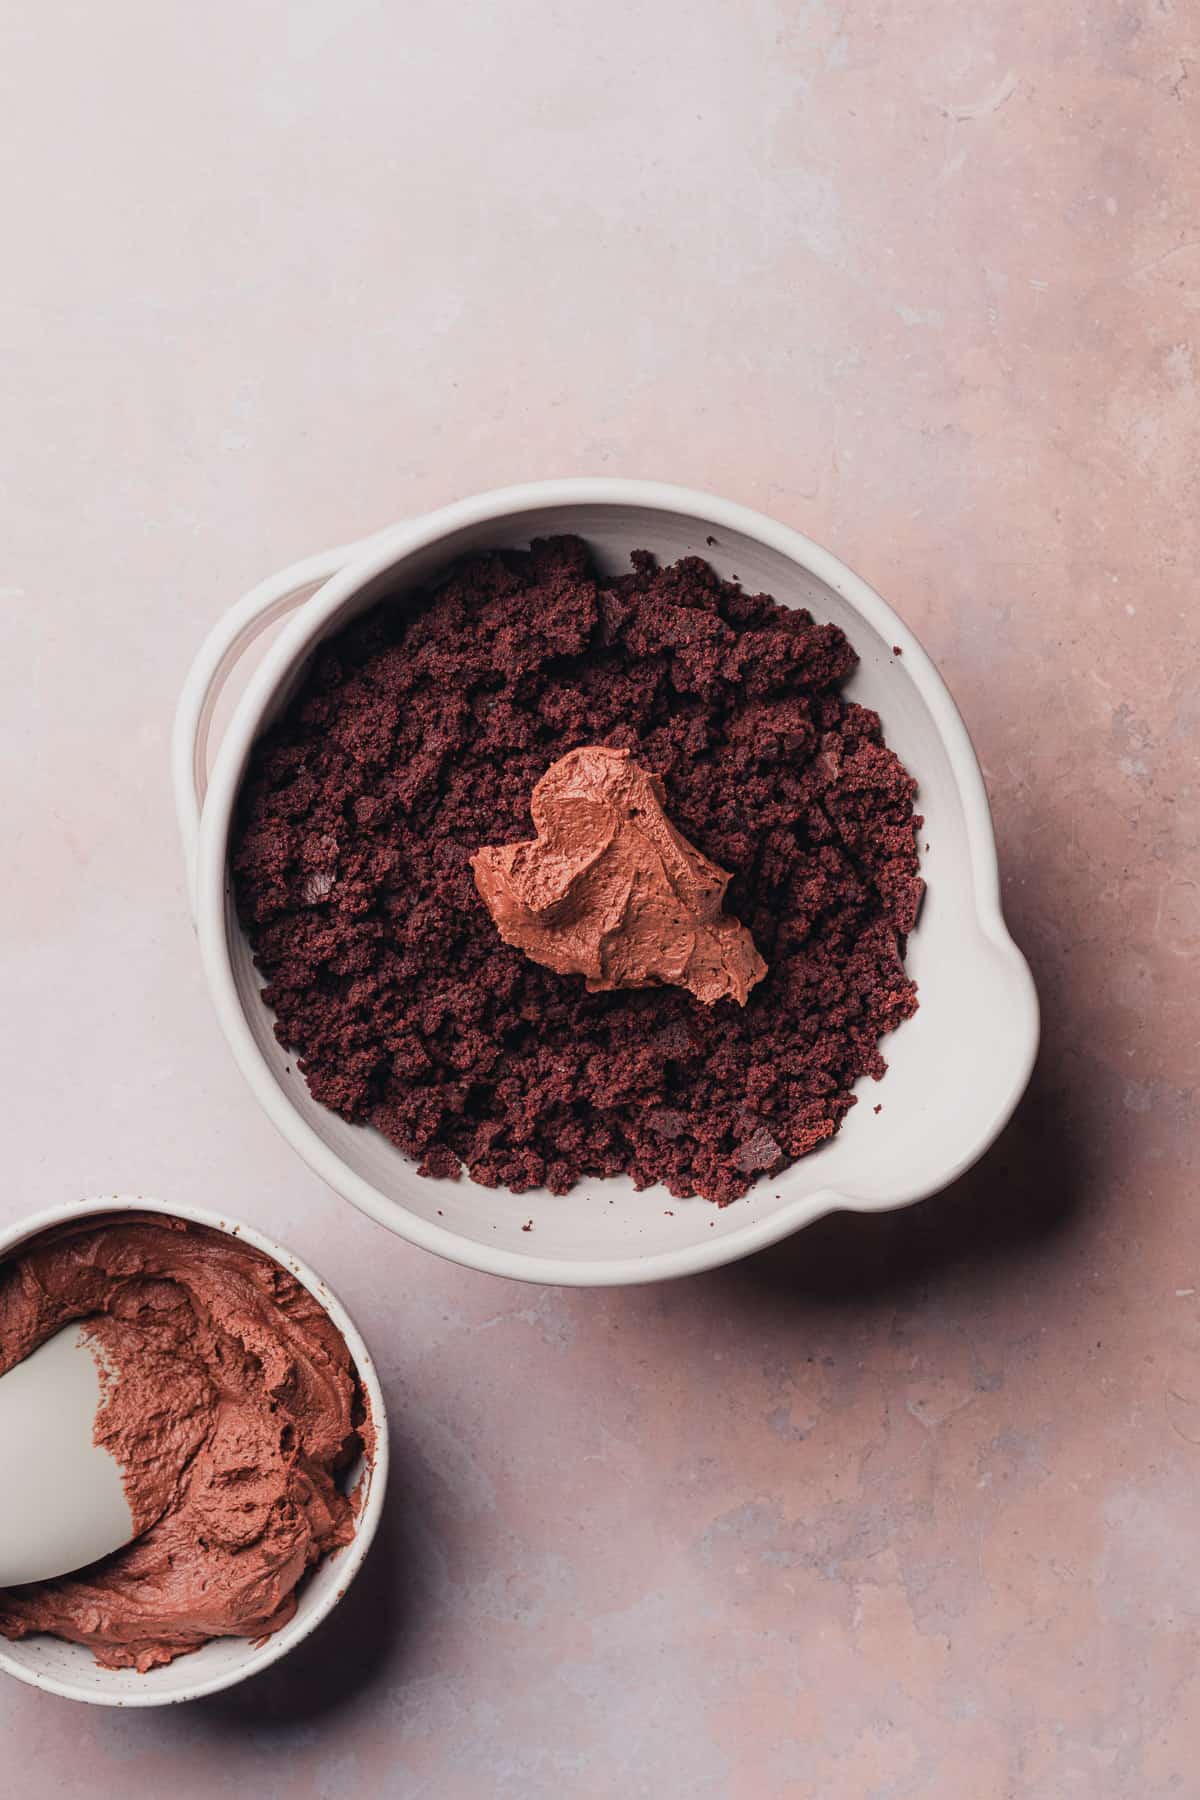
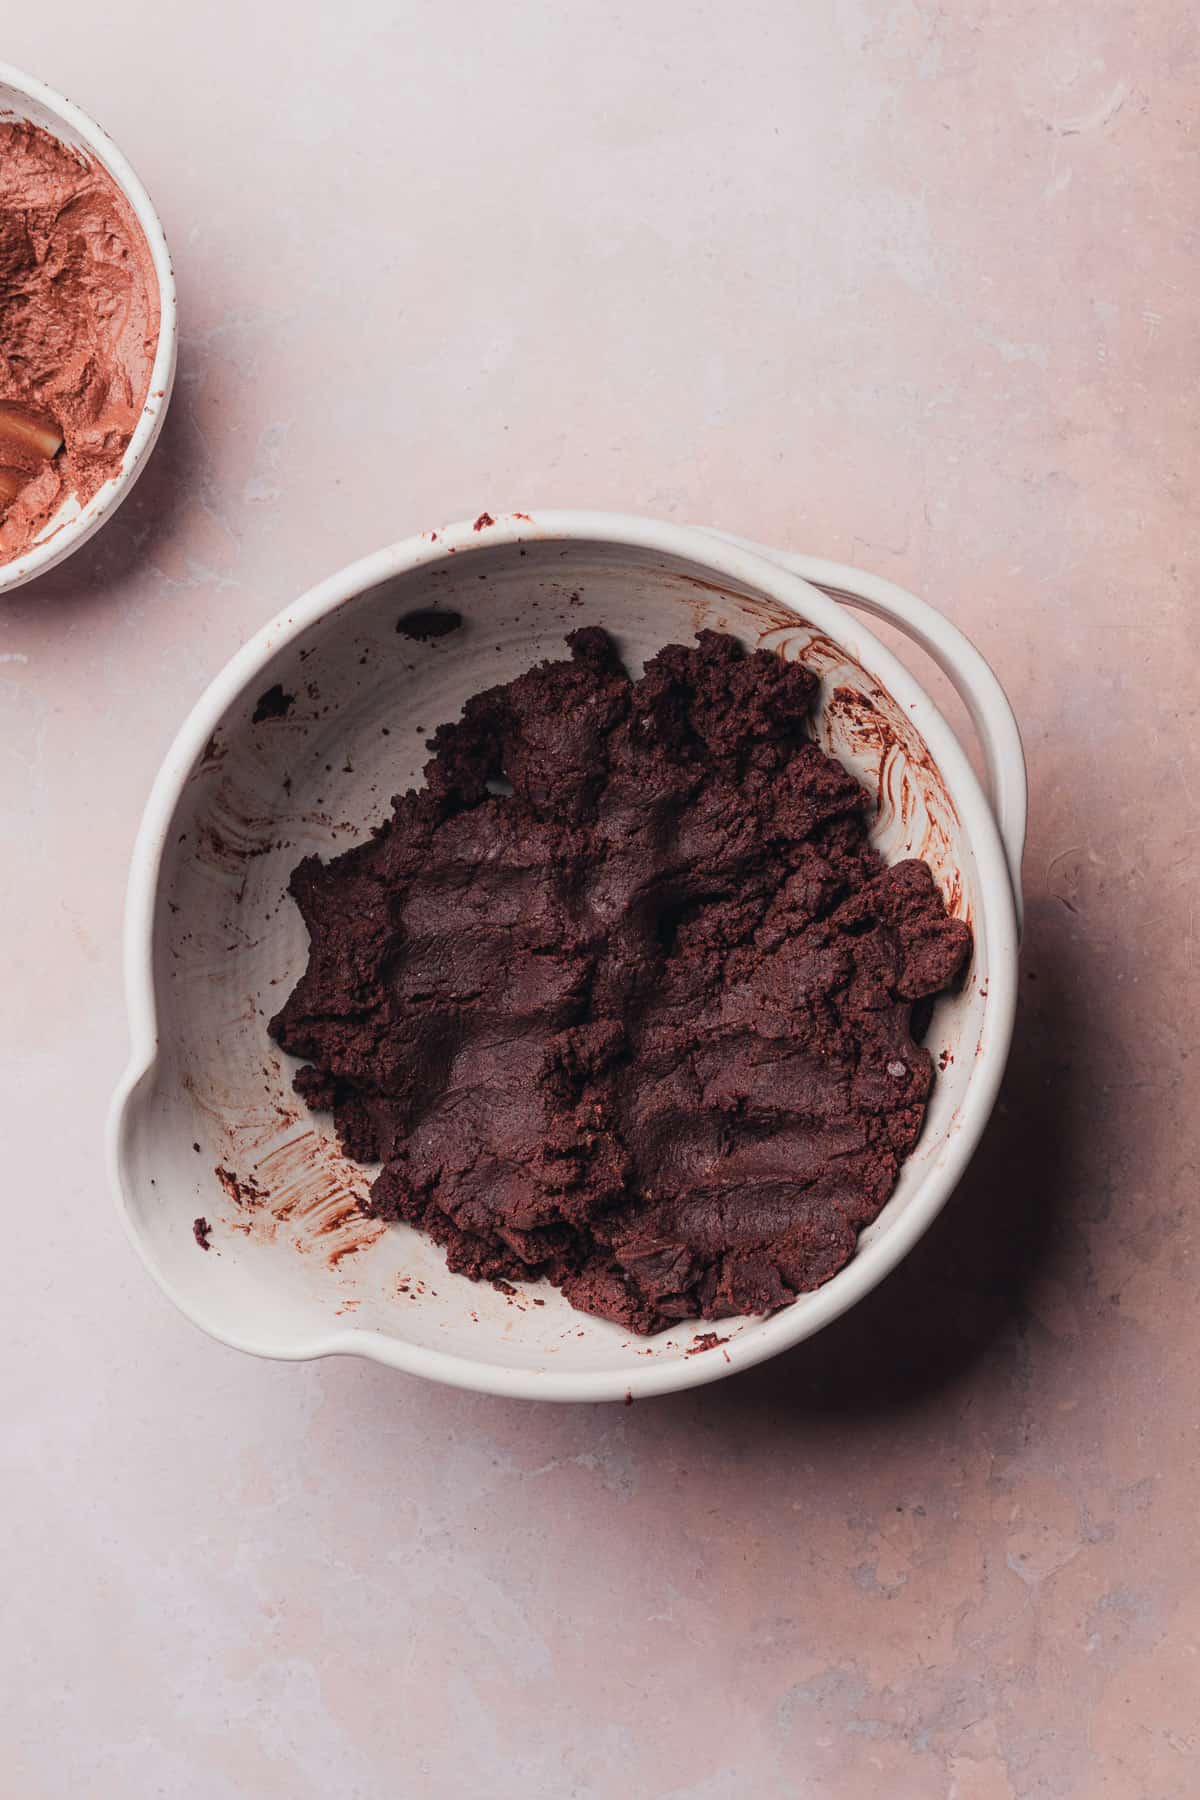
In a large bowl, crumble cake crumbs with wearing gloved hands. Add frosting and combine until crumbs form, and you can easily press together into a round shape. Frosting should be quite sticky.
Set mixture aside until it's time to use.
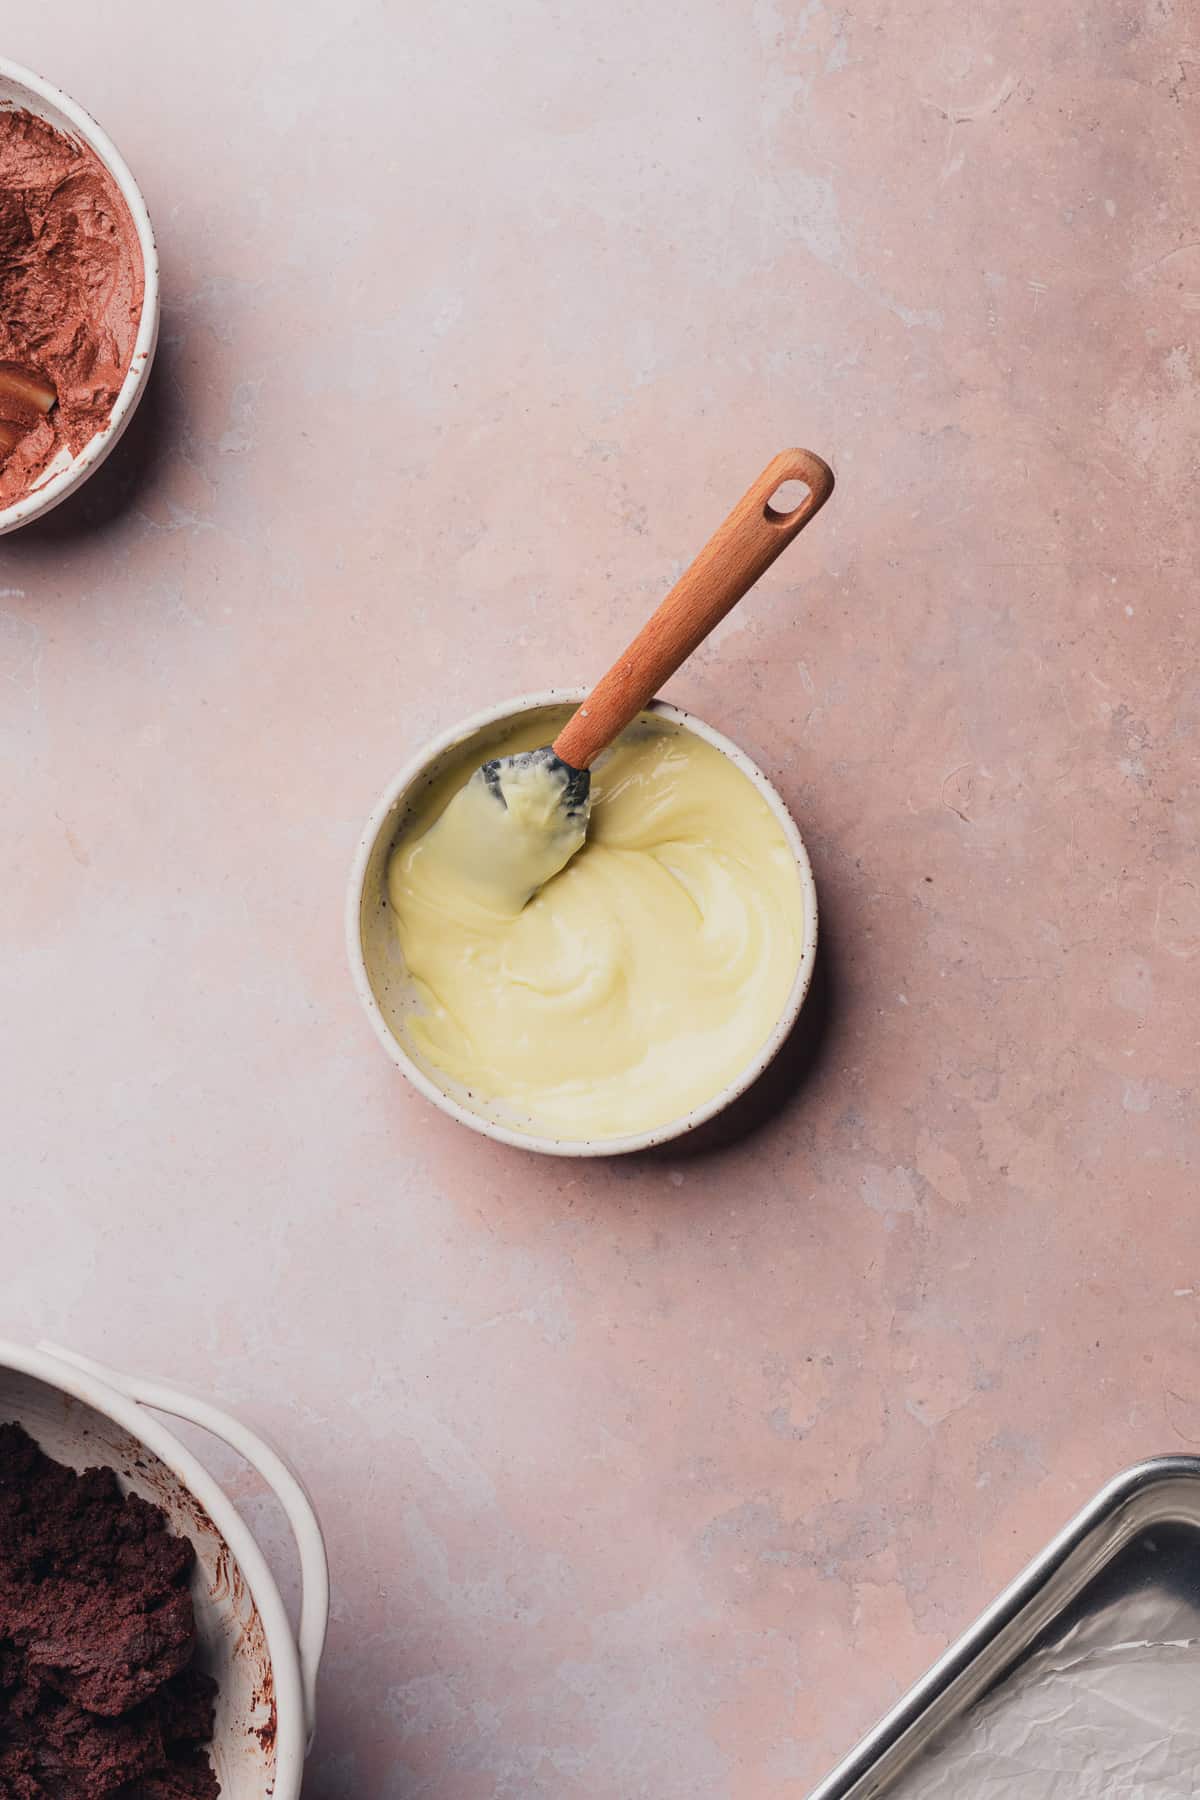
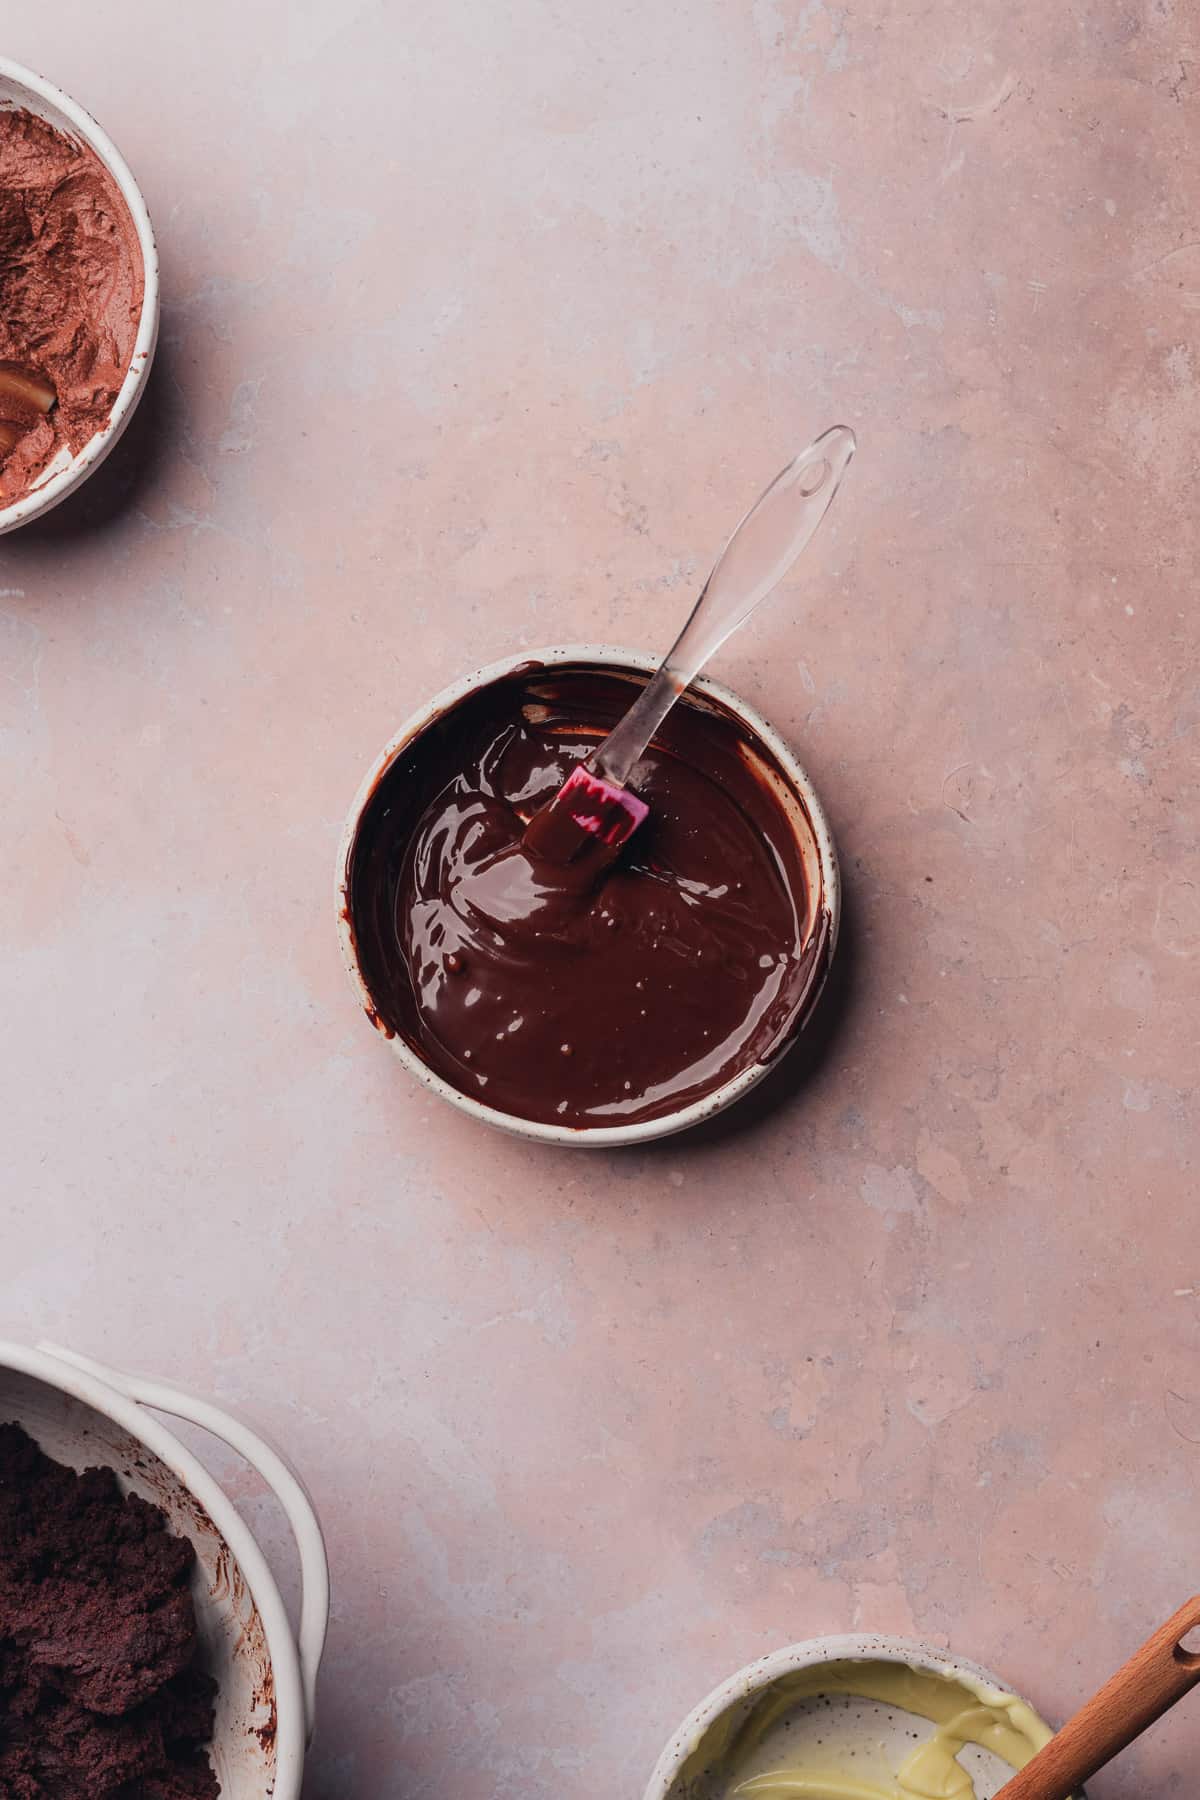
Step 2: Melt the chocolate
Gently melt chocolate with butter or coconut oil to create the chocolate "shell" of your cakesicle. We used the microwave method, but a double boiler method works as well.
For the microwave method, add the chocolate chips to a microwave safe bowl with the oil or butter and melt gently (about 50%) in 10-15 second increments, stirring in between each increment until chocolate is melted.
If the chocolate starts to harden again, it has burned and you will need to start over. Going slow is your best bet.
Keep in mind, that residual heat from the bowl will keep melting the chocolate slowly, so stirring continuously is helpful to get smooth, shiny chocolate.
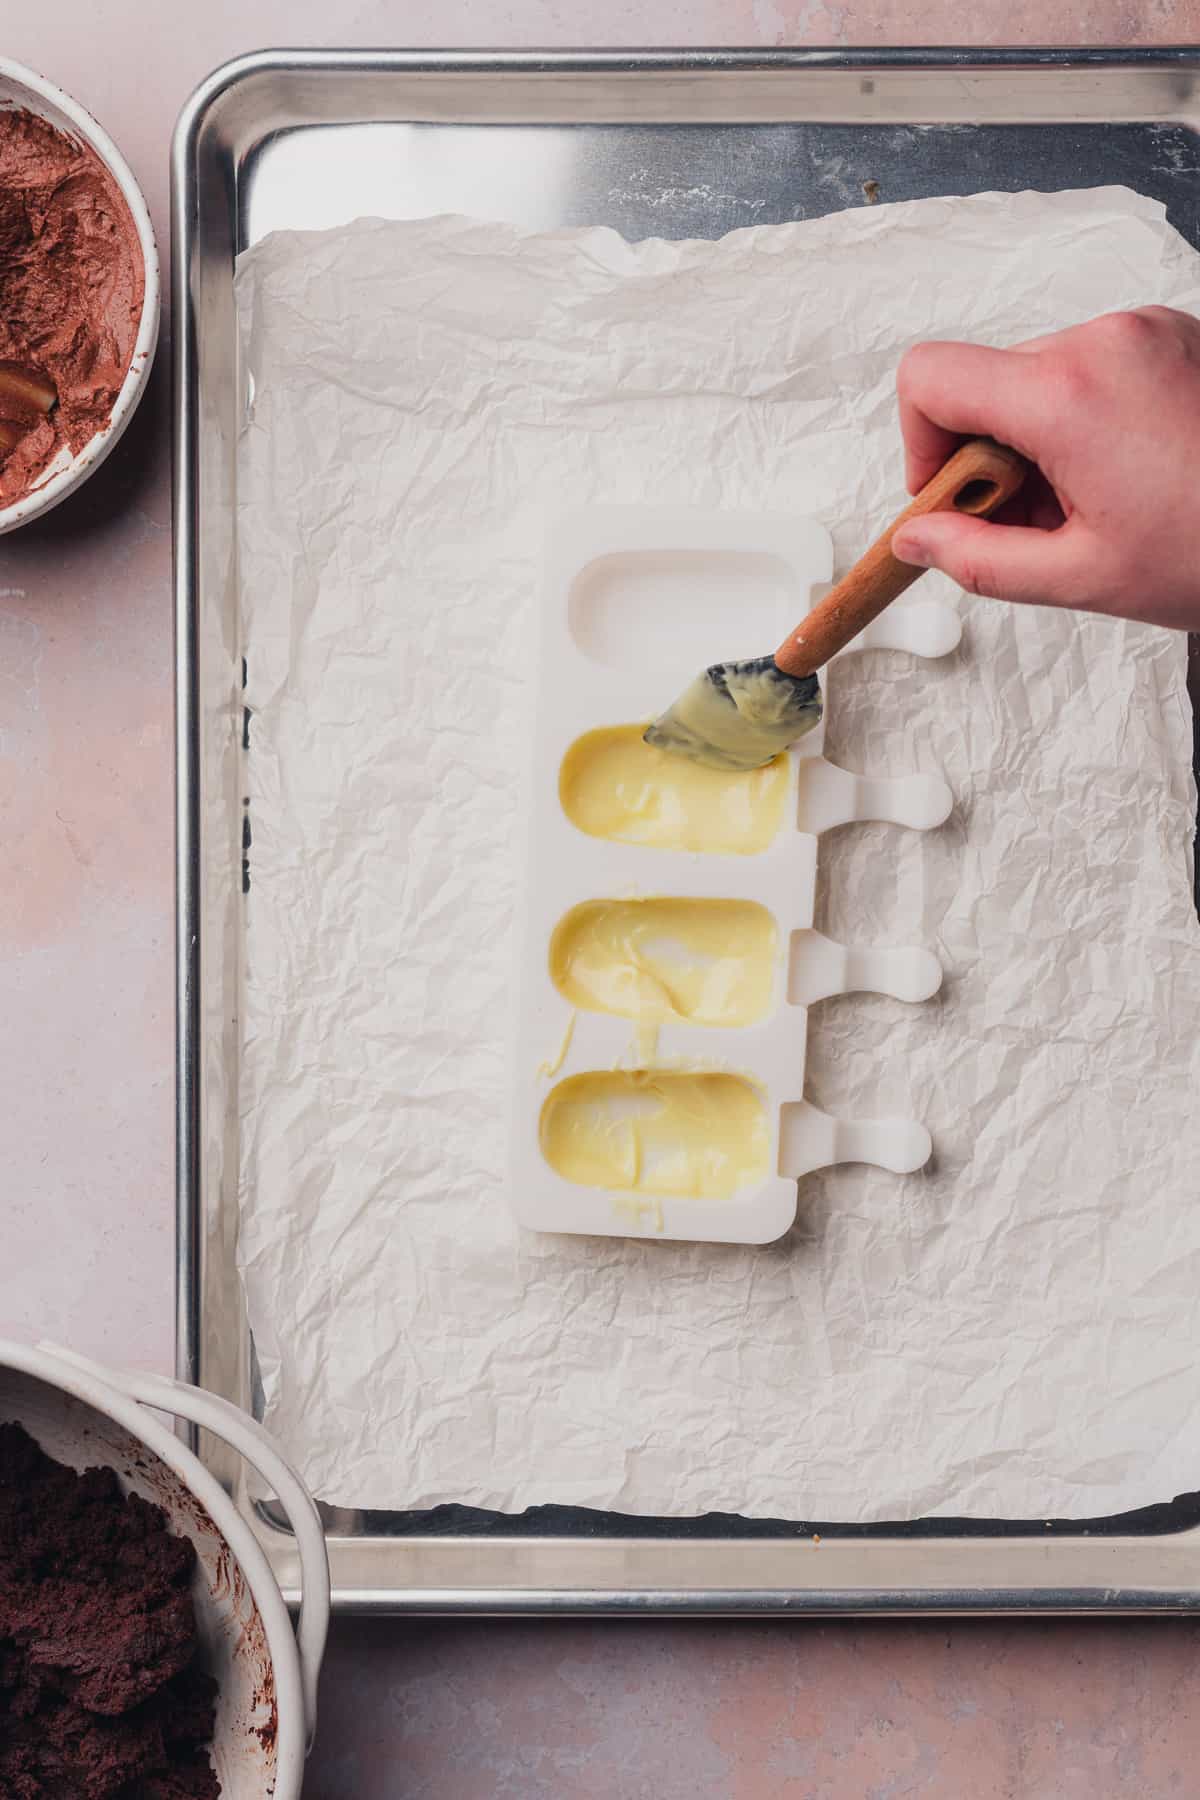
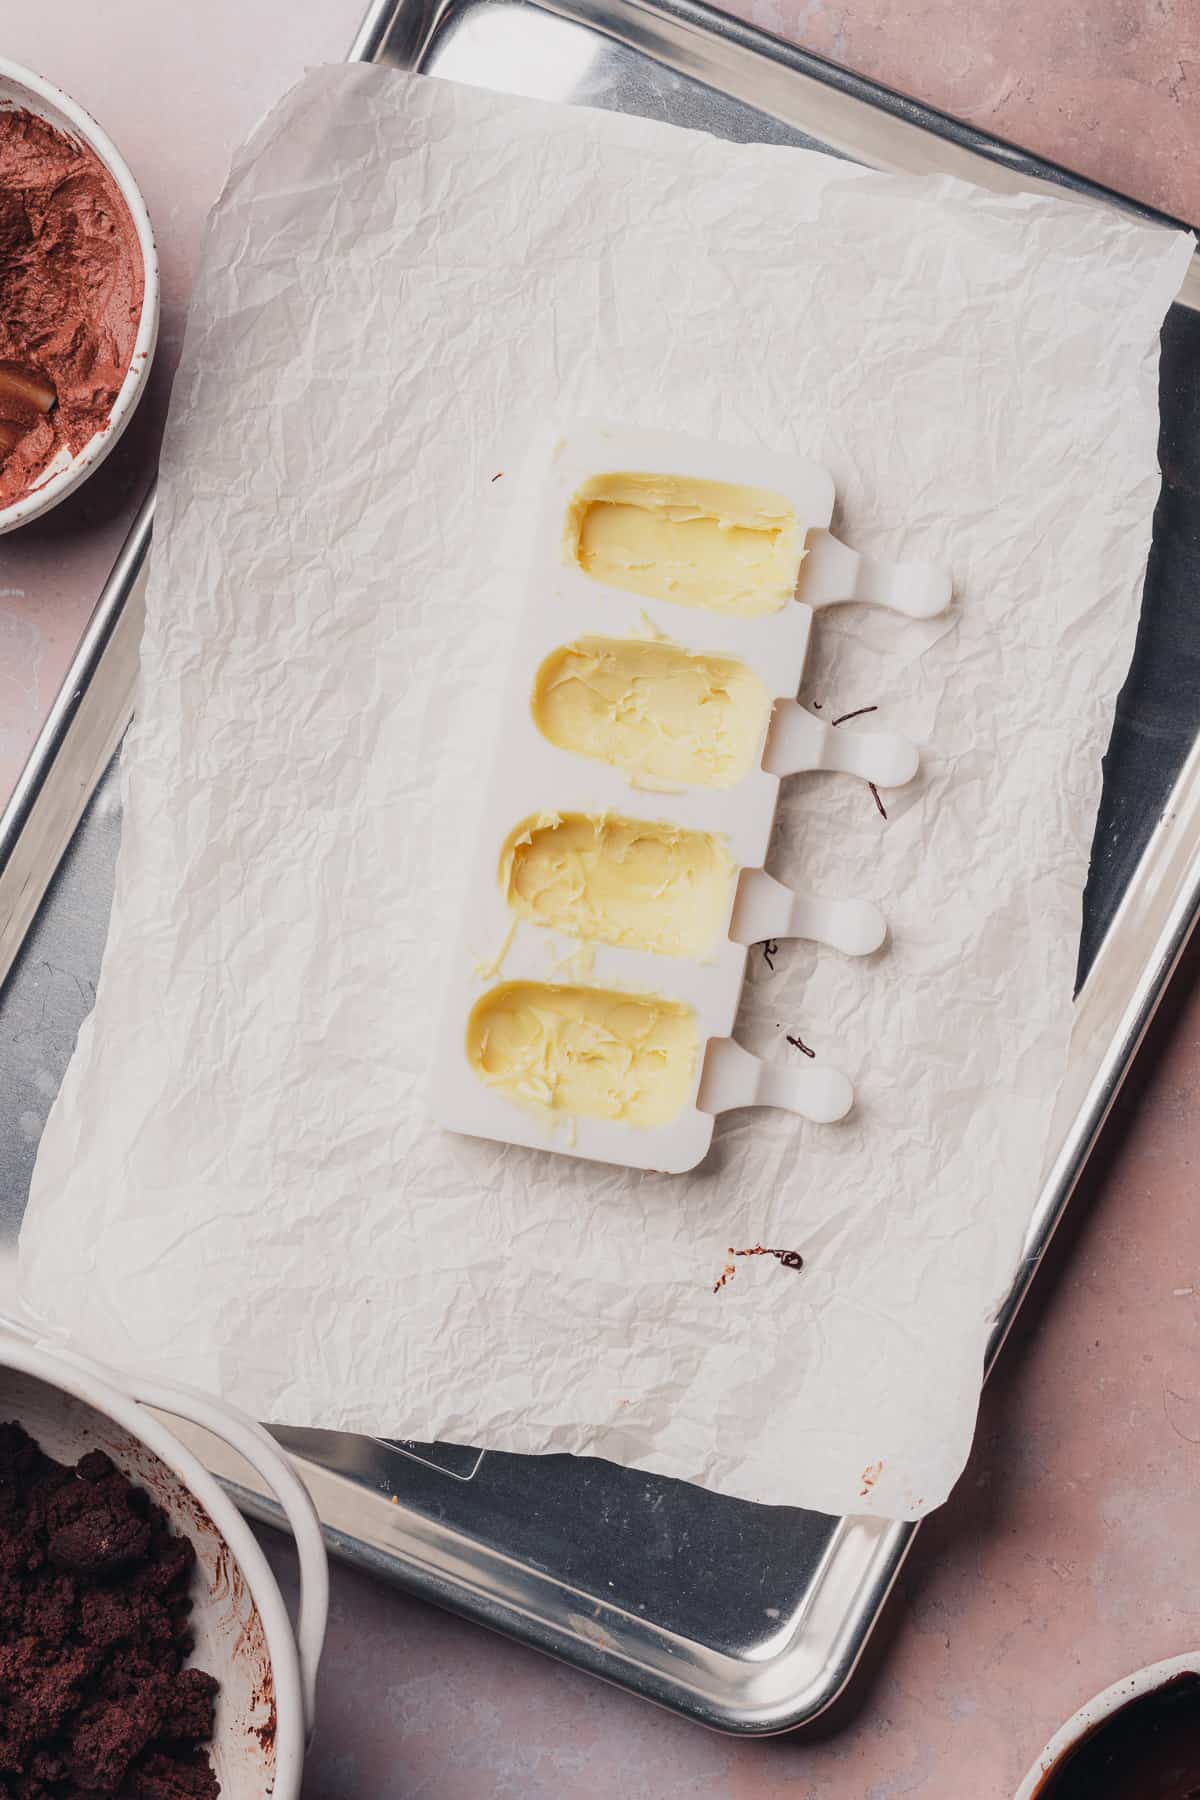
Step 3: Line the cake molds
Using a small rubber spatula, line the inside of the cake molds with chocolate. We like to do two chocolate coatings, with a chilling period of about 10 minutes in the fridge or freezer in between.
Try to cover as many gaps as you can. It won't be pretty, but that's okay, because we won't see it from the outside. The most important part is making sure there are no holes.
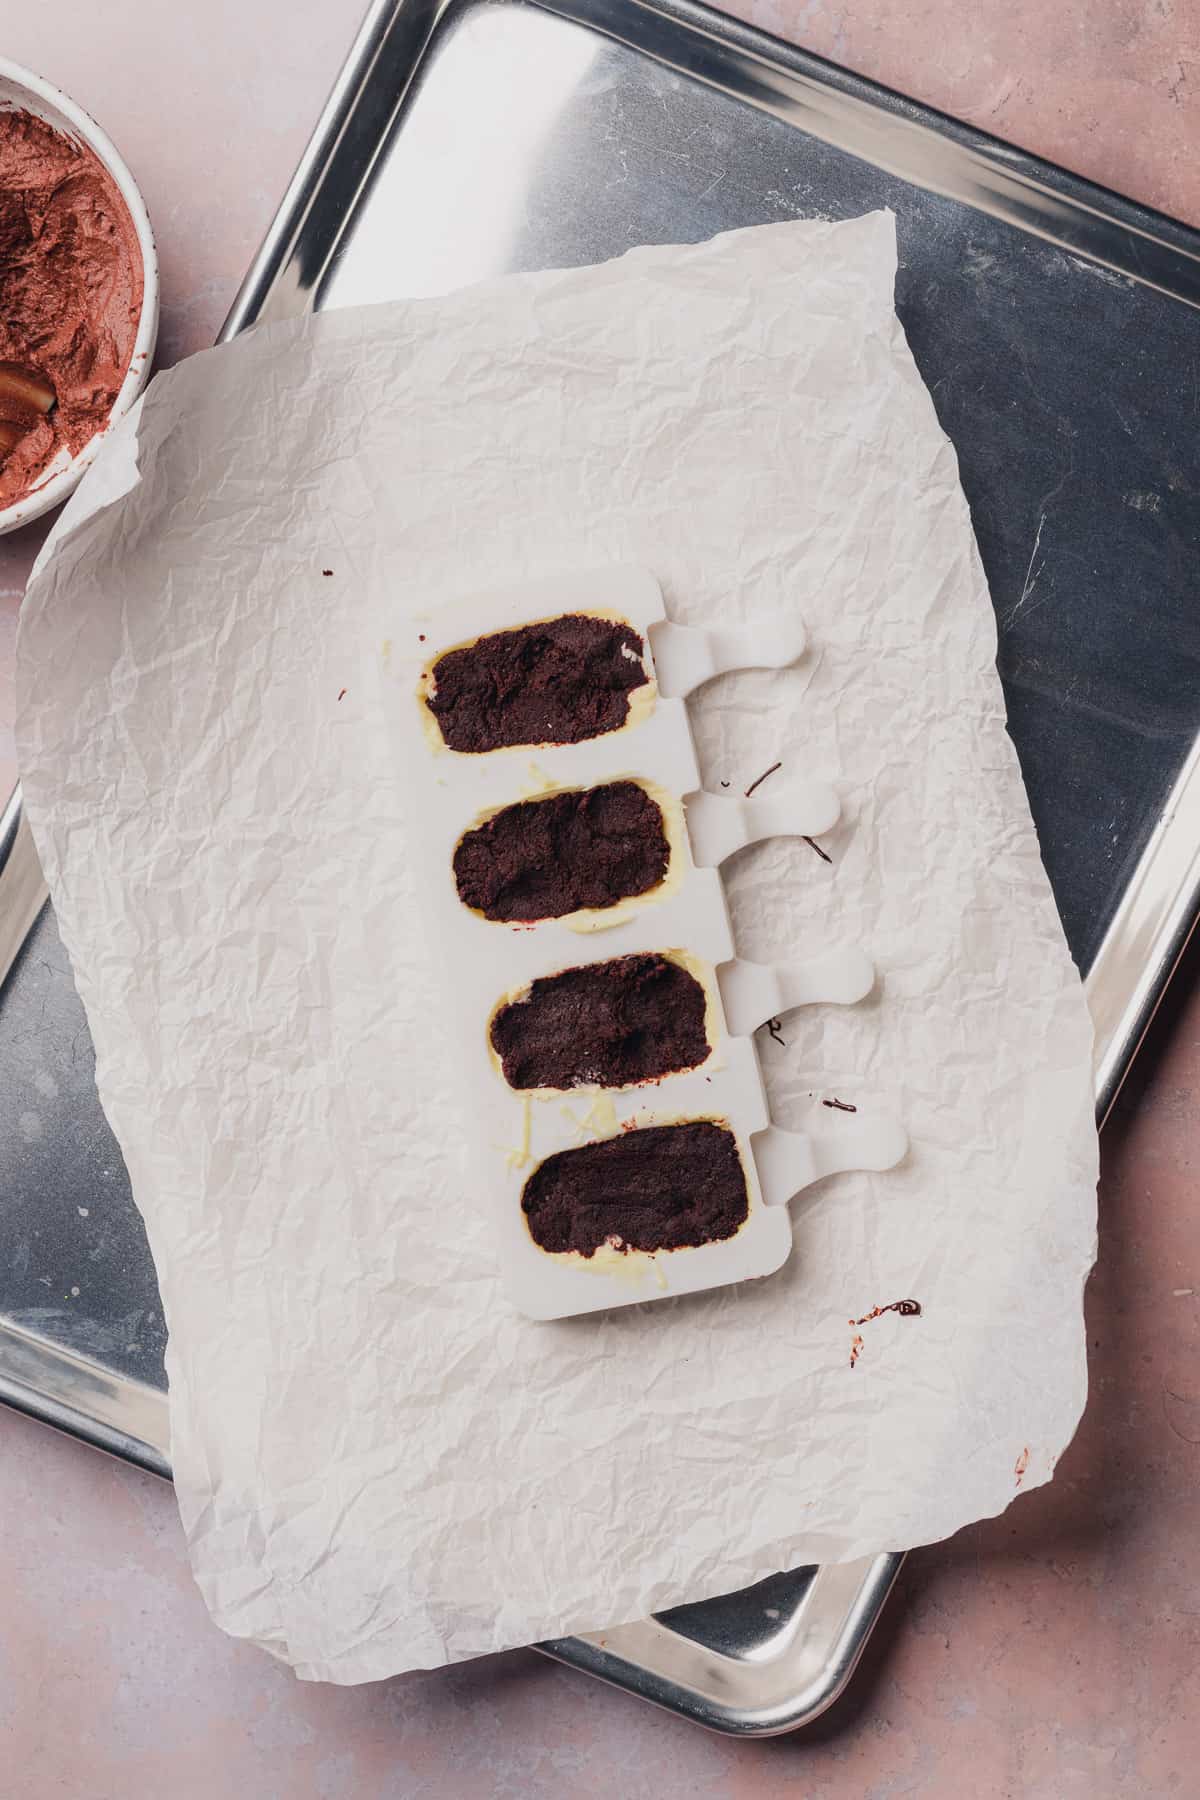
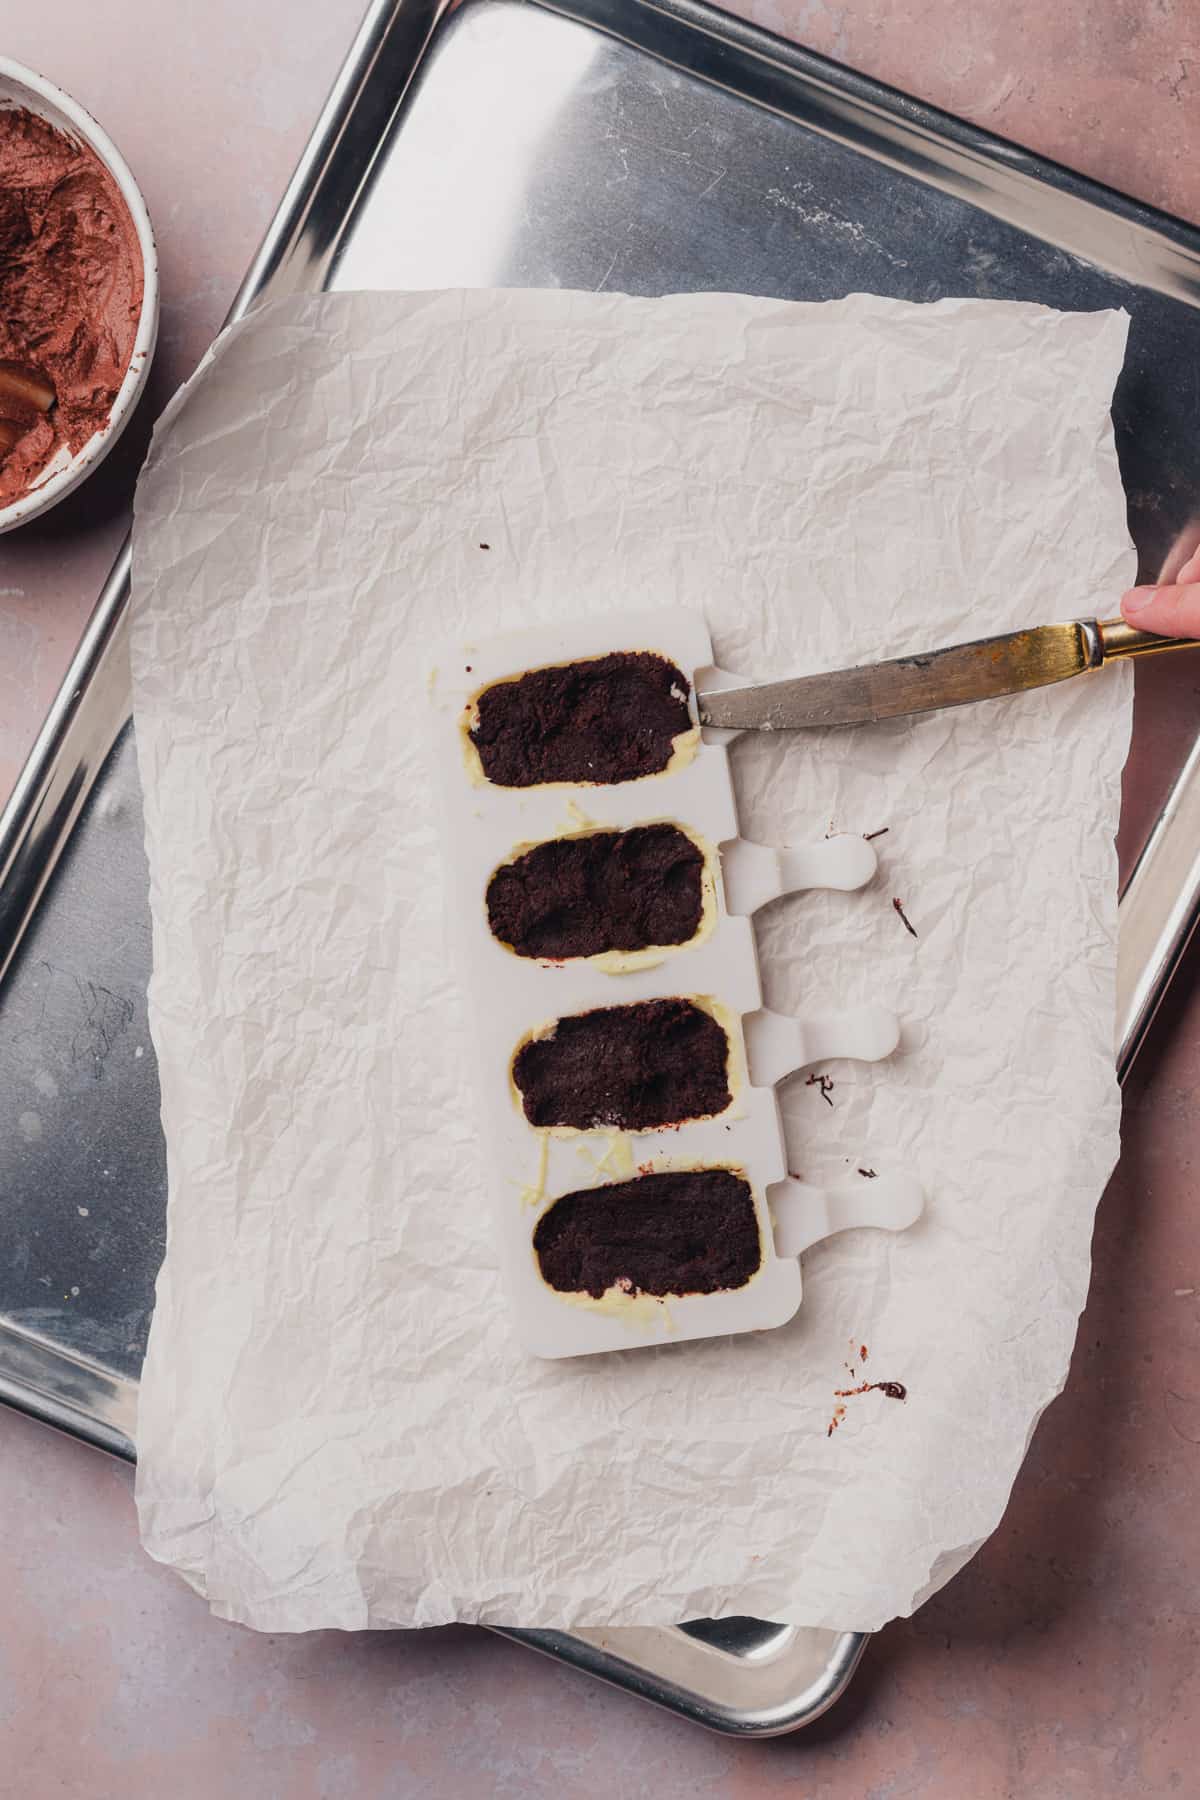
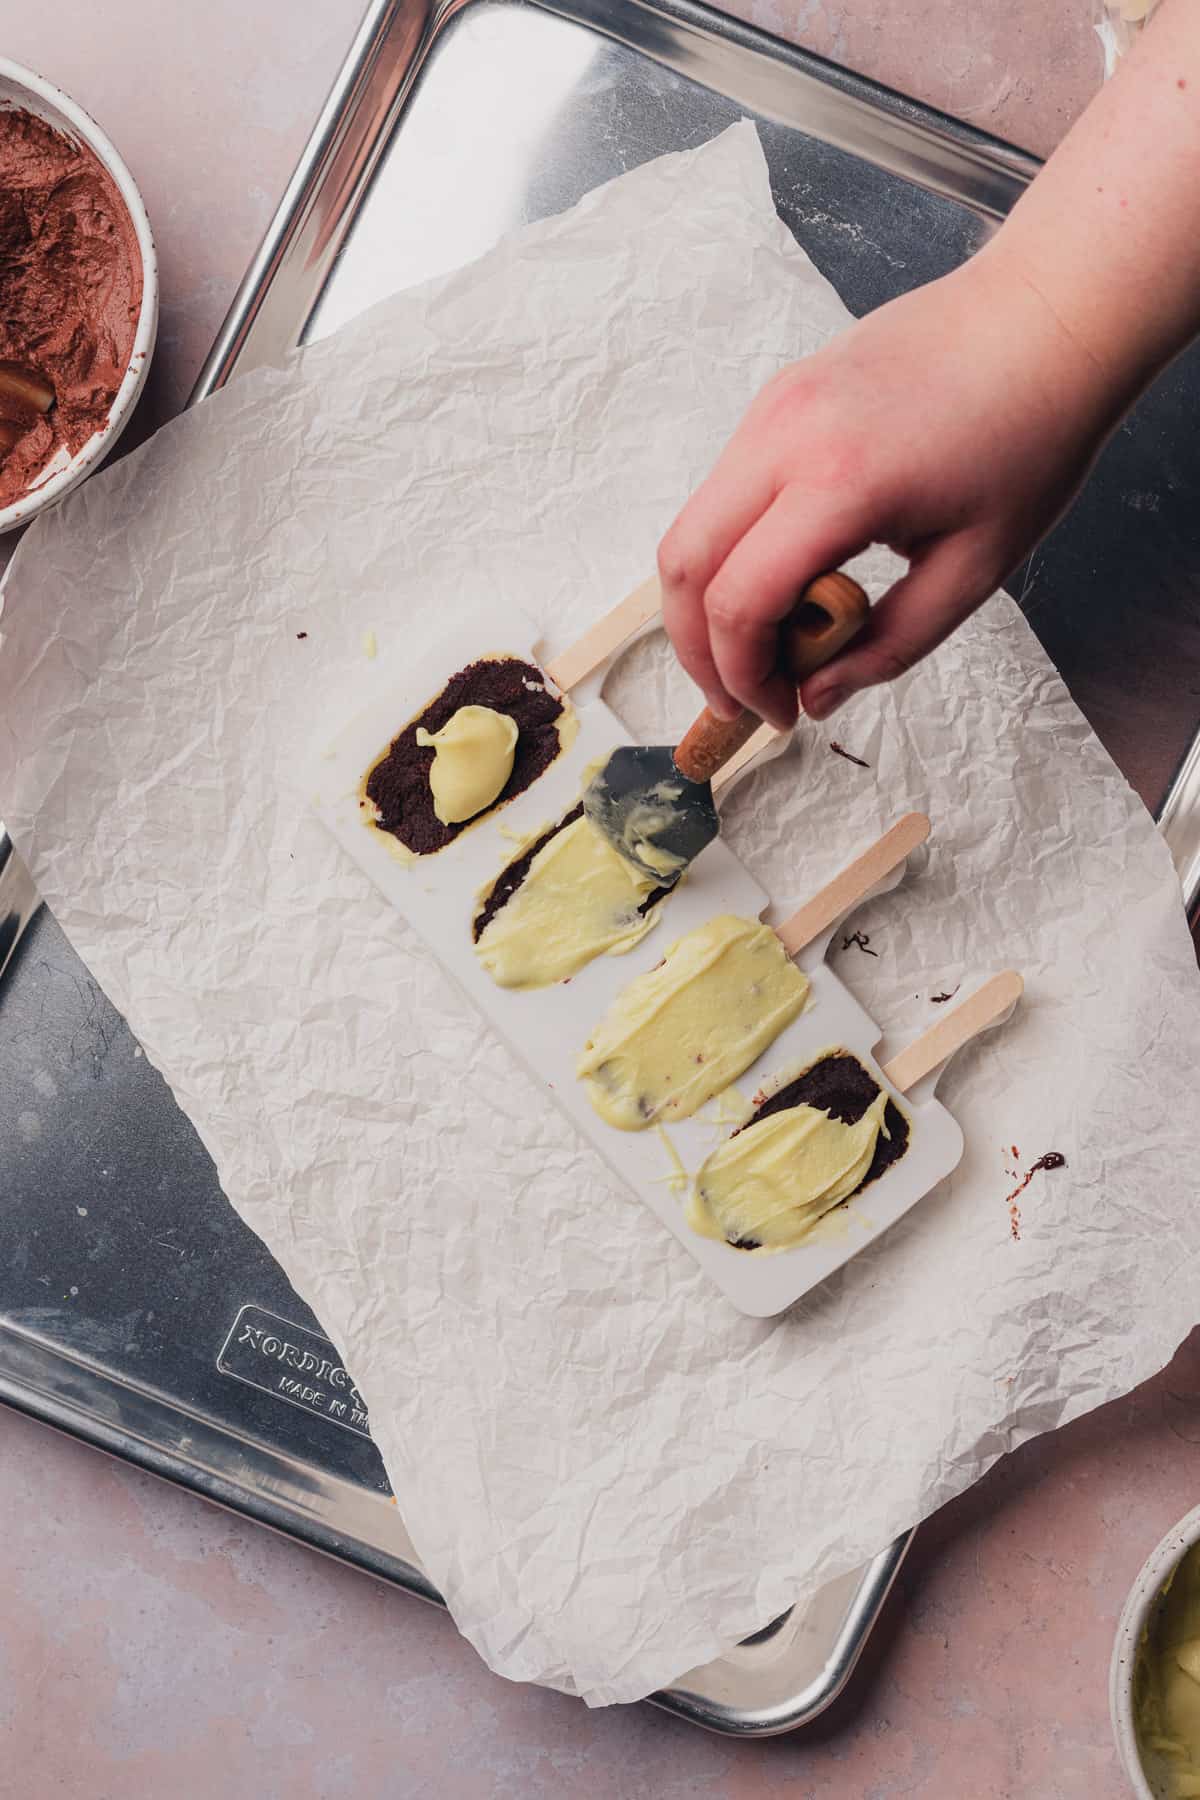
Step 4: Add cake mixture filling
Add cake mixture filling to the molds, leaving a little bit of room up top to add chocolate to the backside of the cakesicle.
Now, use a knife to gently poke through the slit where the popsicle stick will go in. This helps ensure that you can get the cake pop out easily later.
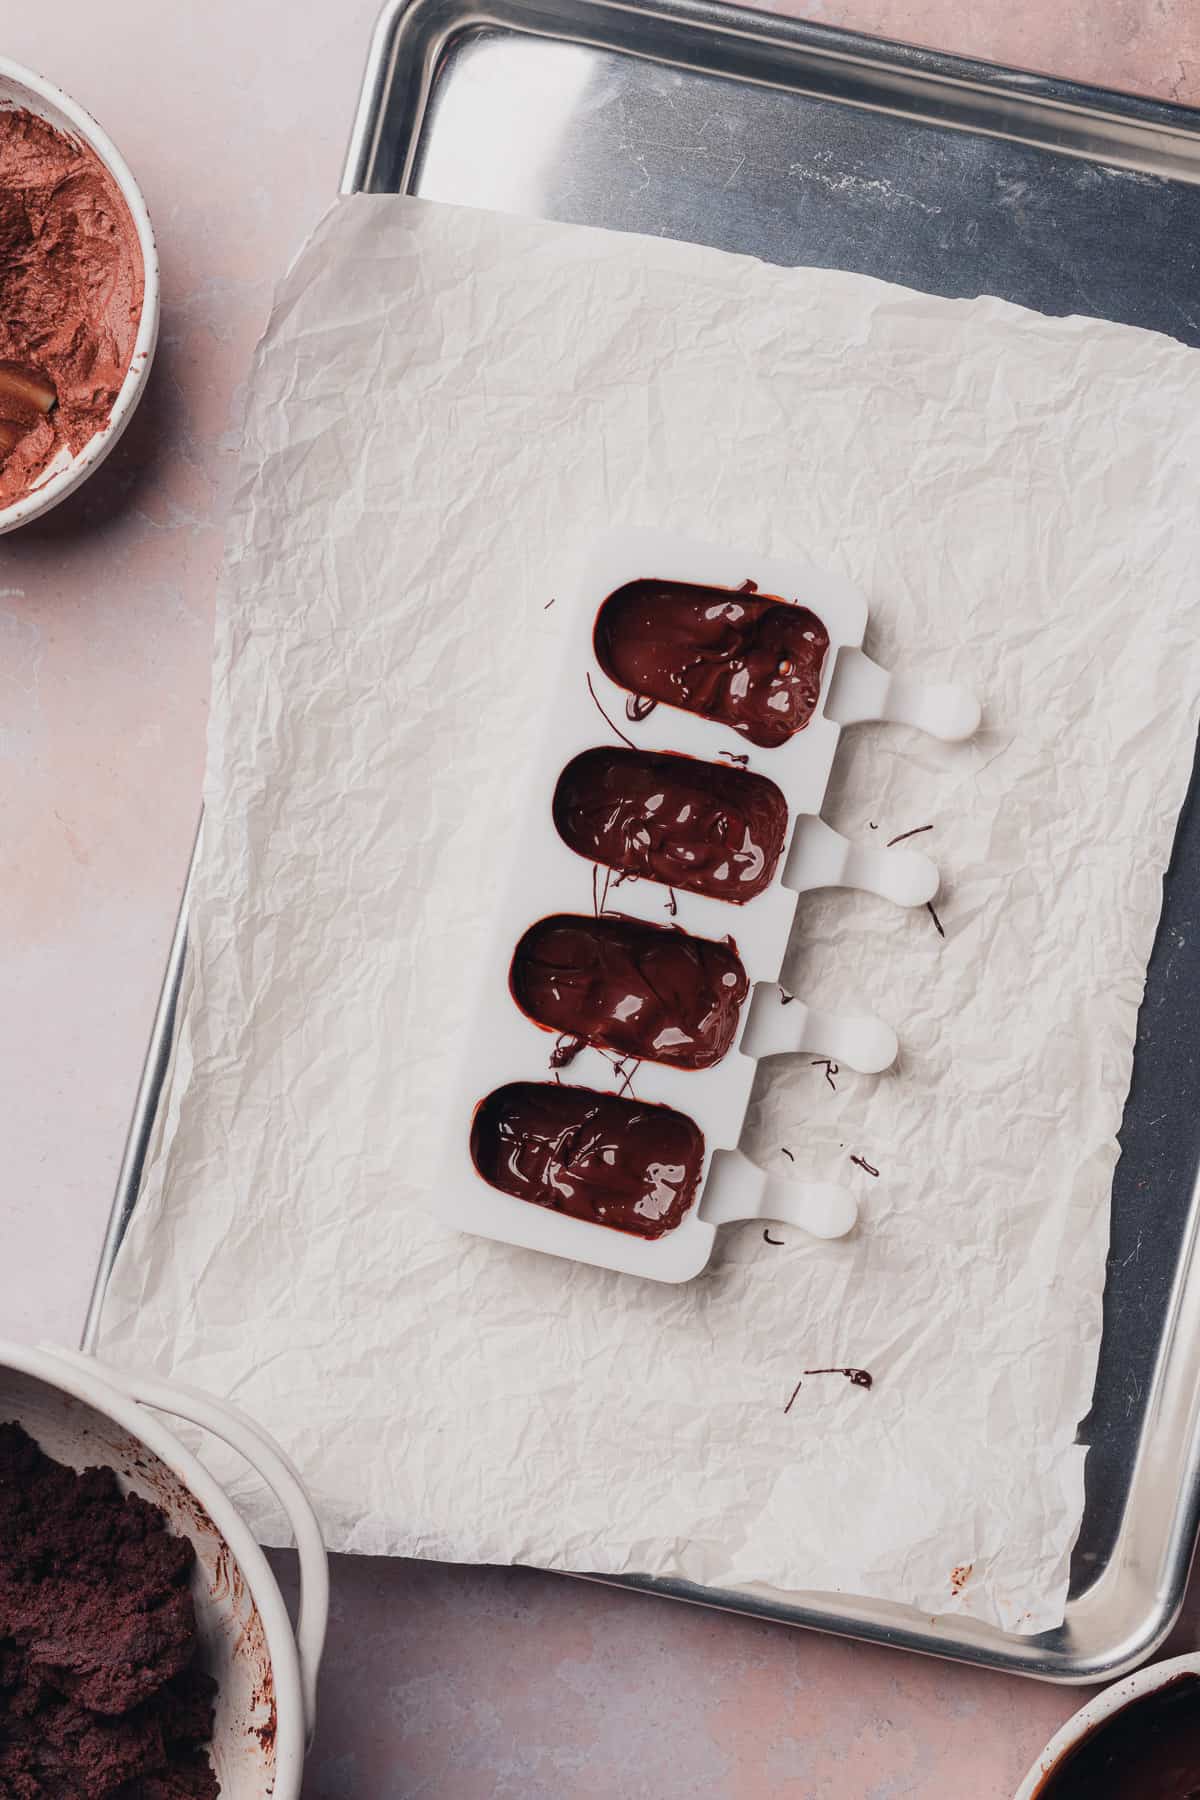
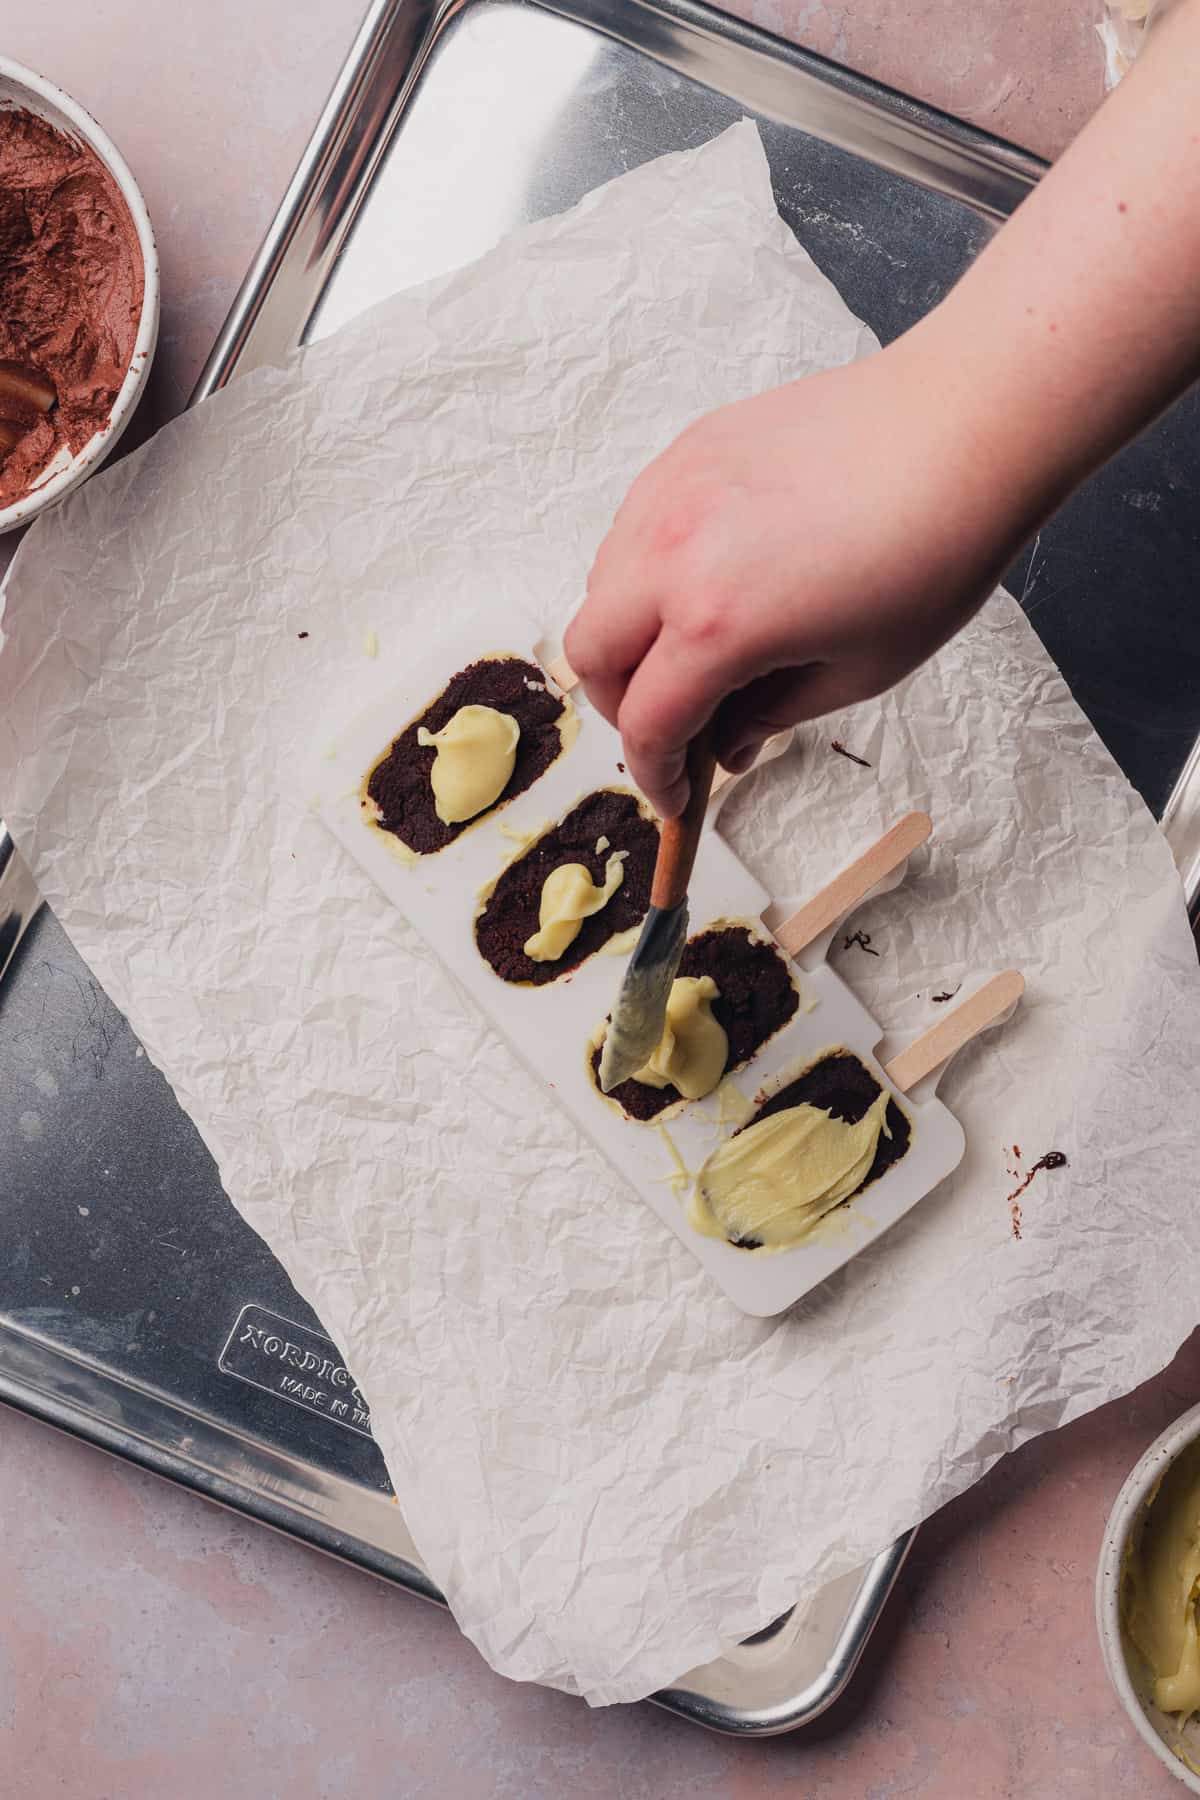
Step 5: Fill with more chocolate & chill
Add a popsicle stick up the center of your cake pop, then spread melted chocolate on the backside of the cakesicle. Make sure there are no gaps. It's okay if the backside is not as pretty, don't worry at all. No one looks at that side anyway!
Chill for an additional 10-15 minutes.
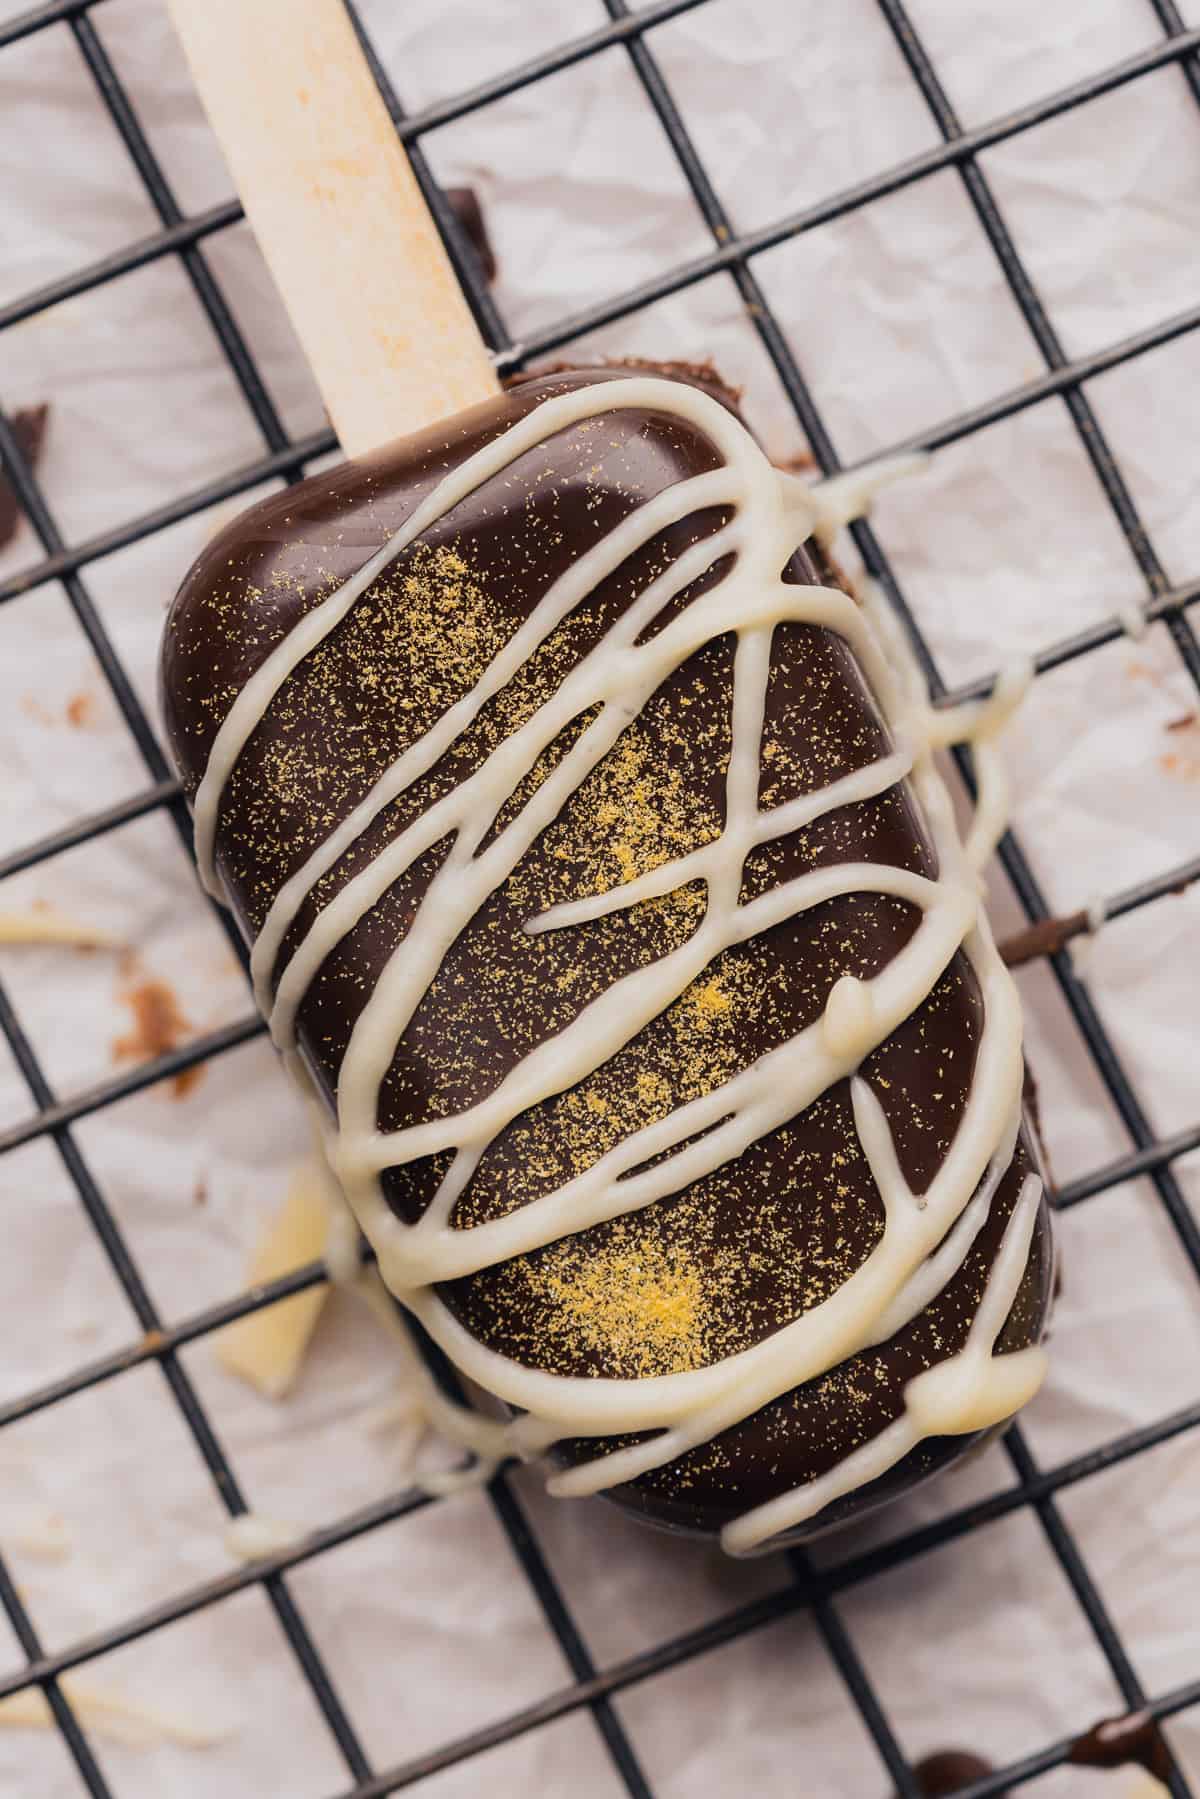
Step 6: Remove, trim & decorate!
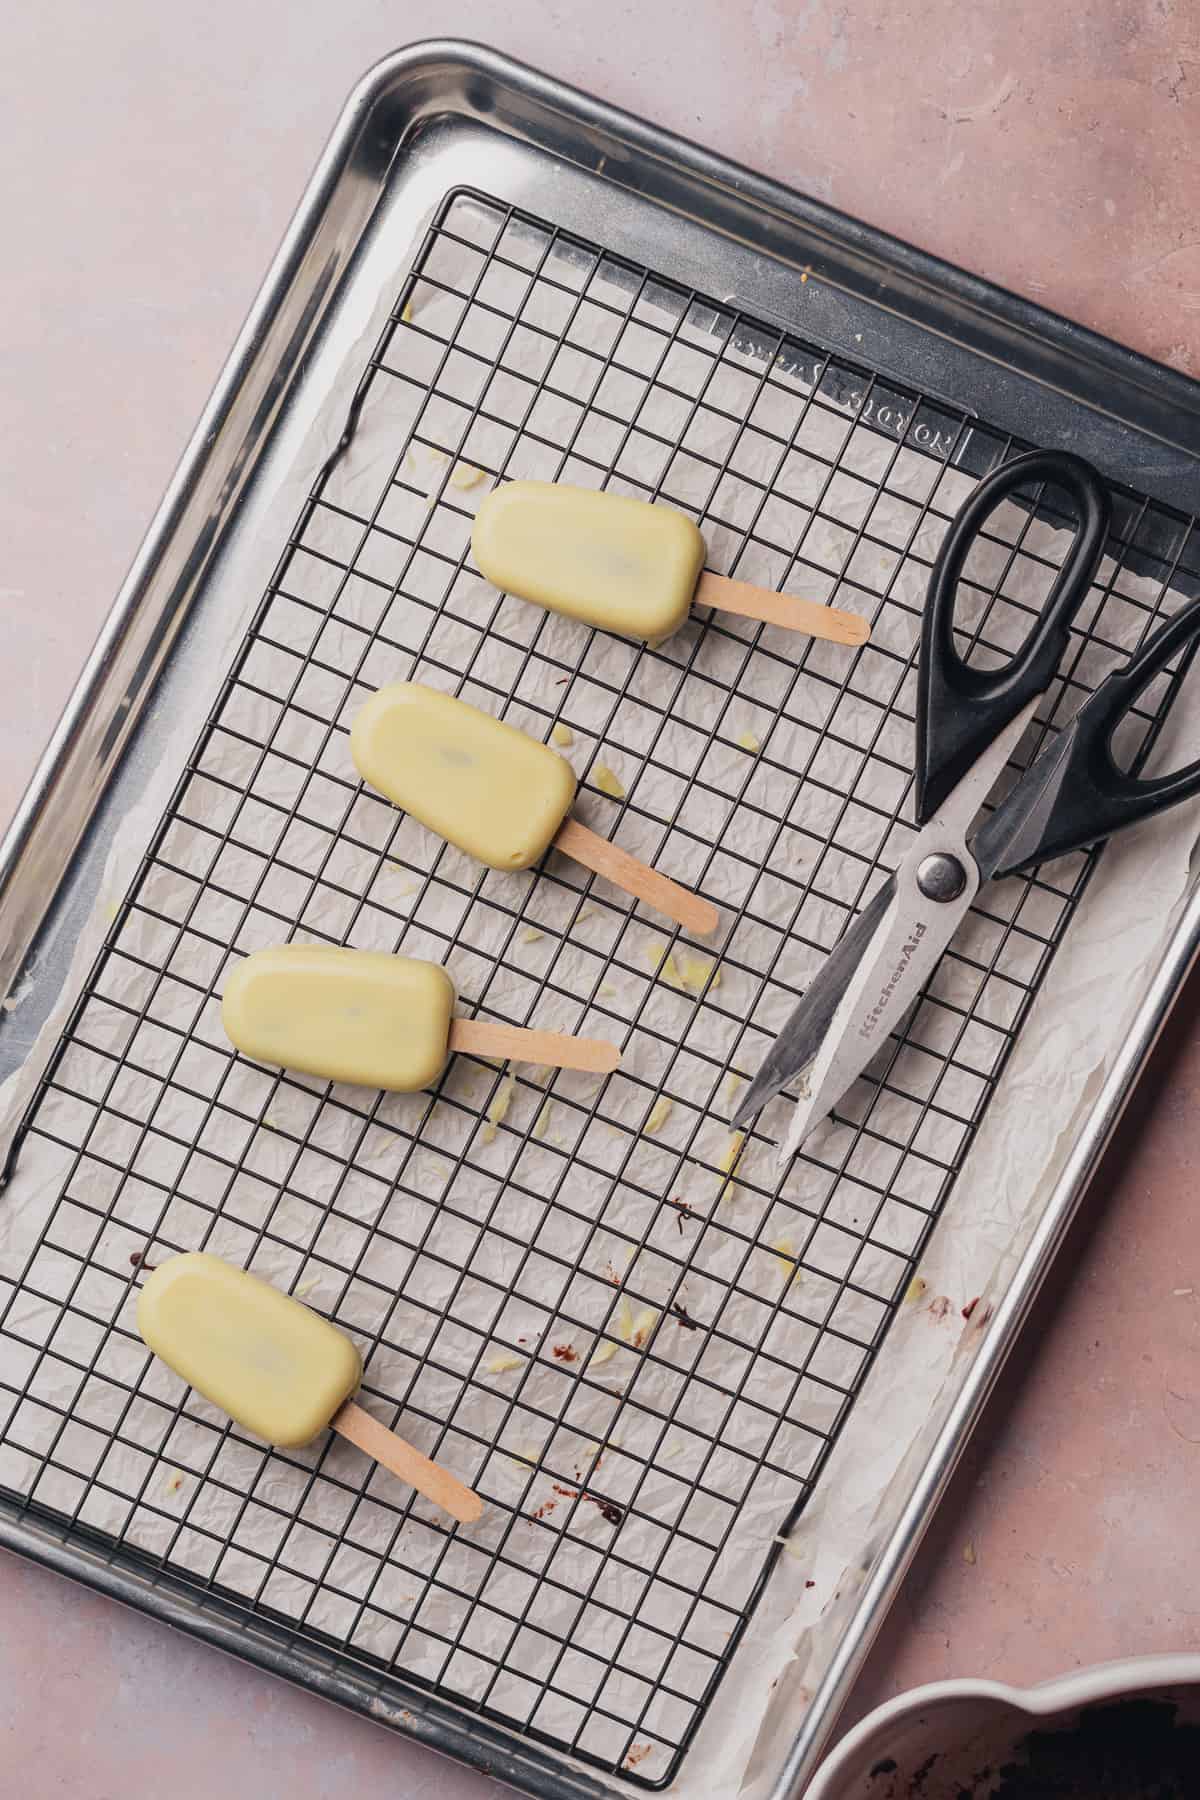
Gently remove cake pops from the molds by carefully pushing the popsicle stick and peeling away the silicone mold around the cakesicle.
After you've removed them from the molds, you can carefully trim away any excess chocolate with kitchen shears.
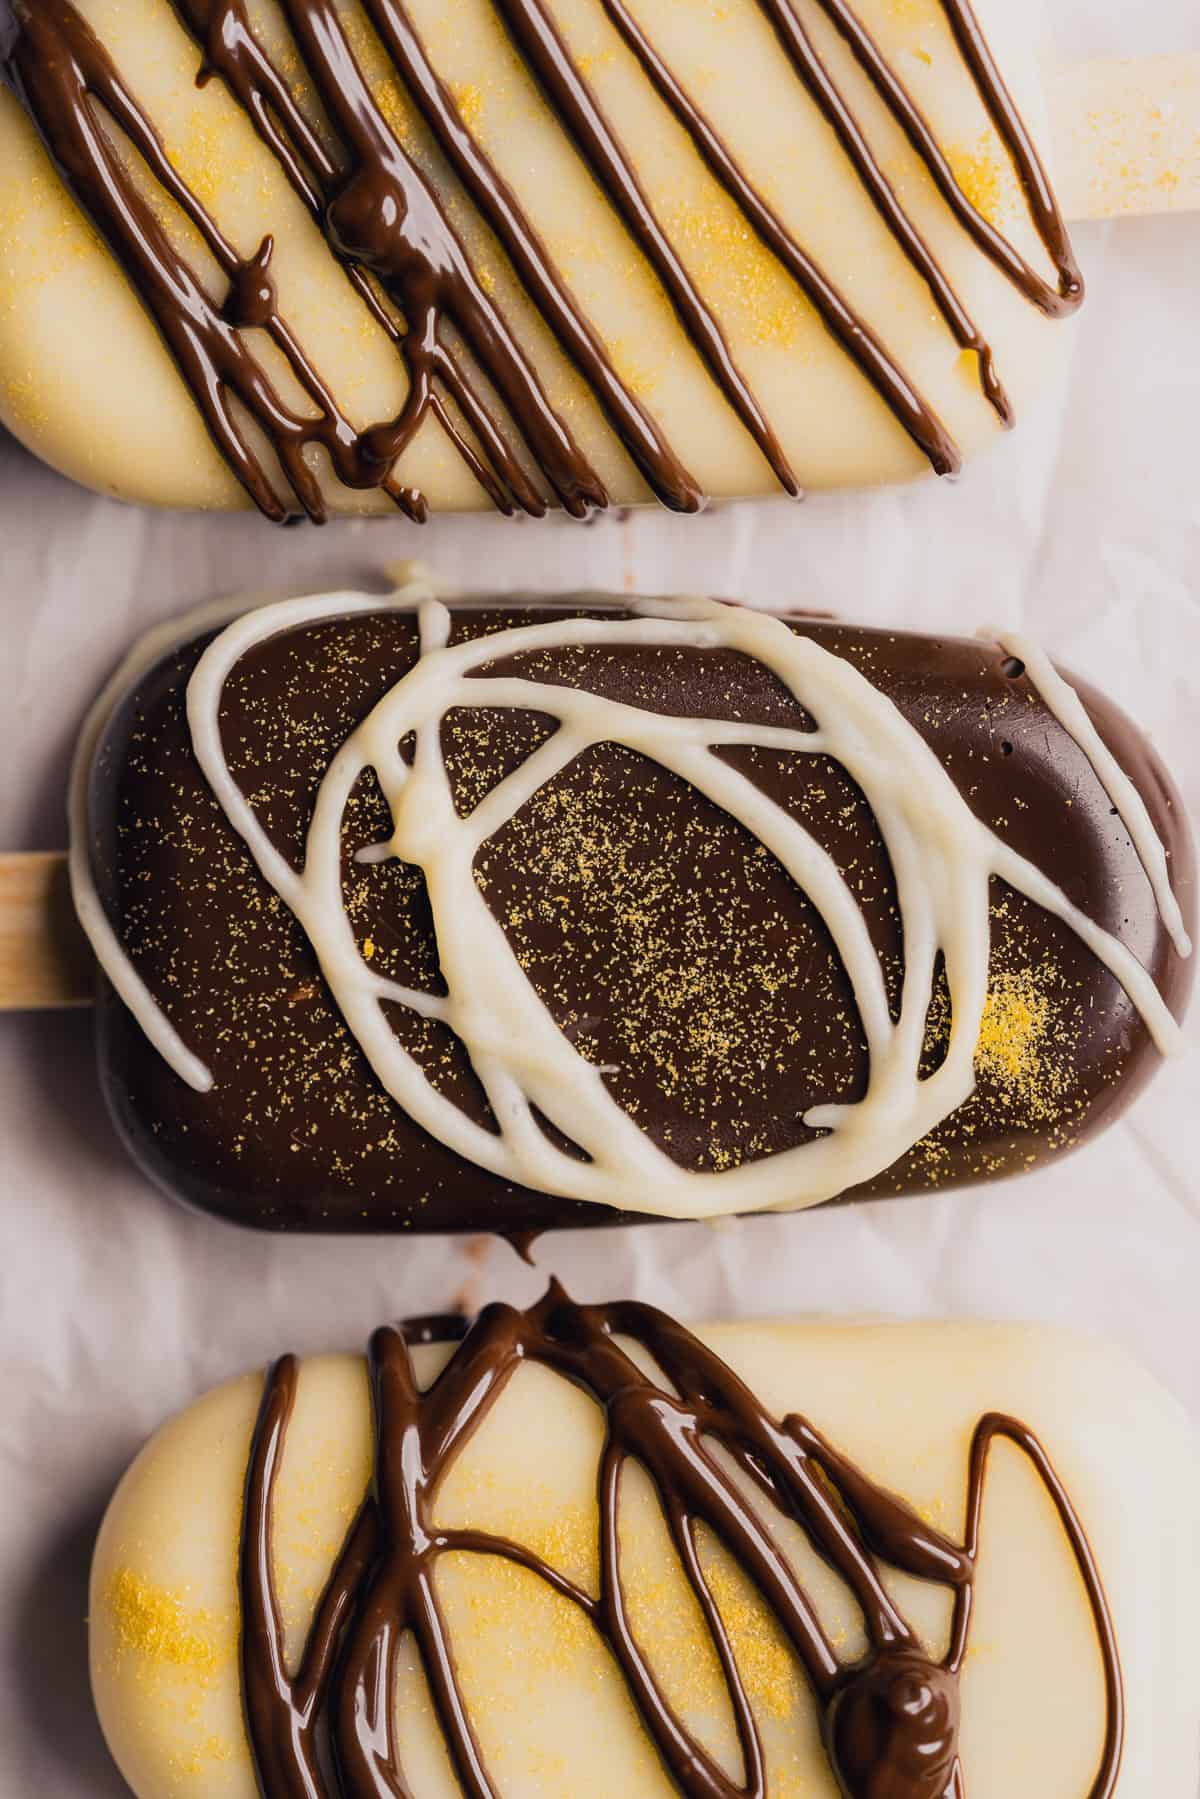
Top with edible gold glitter, more chocolate drizzle, sprinkles, or whatever you prefer!
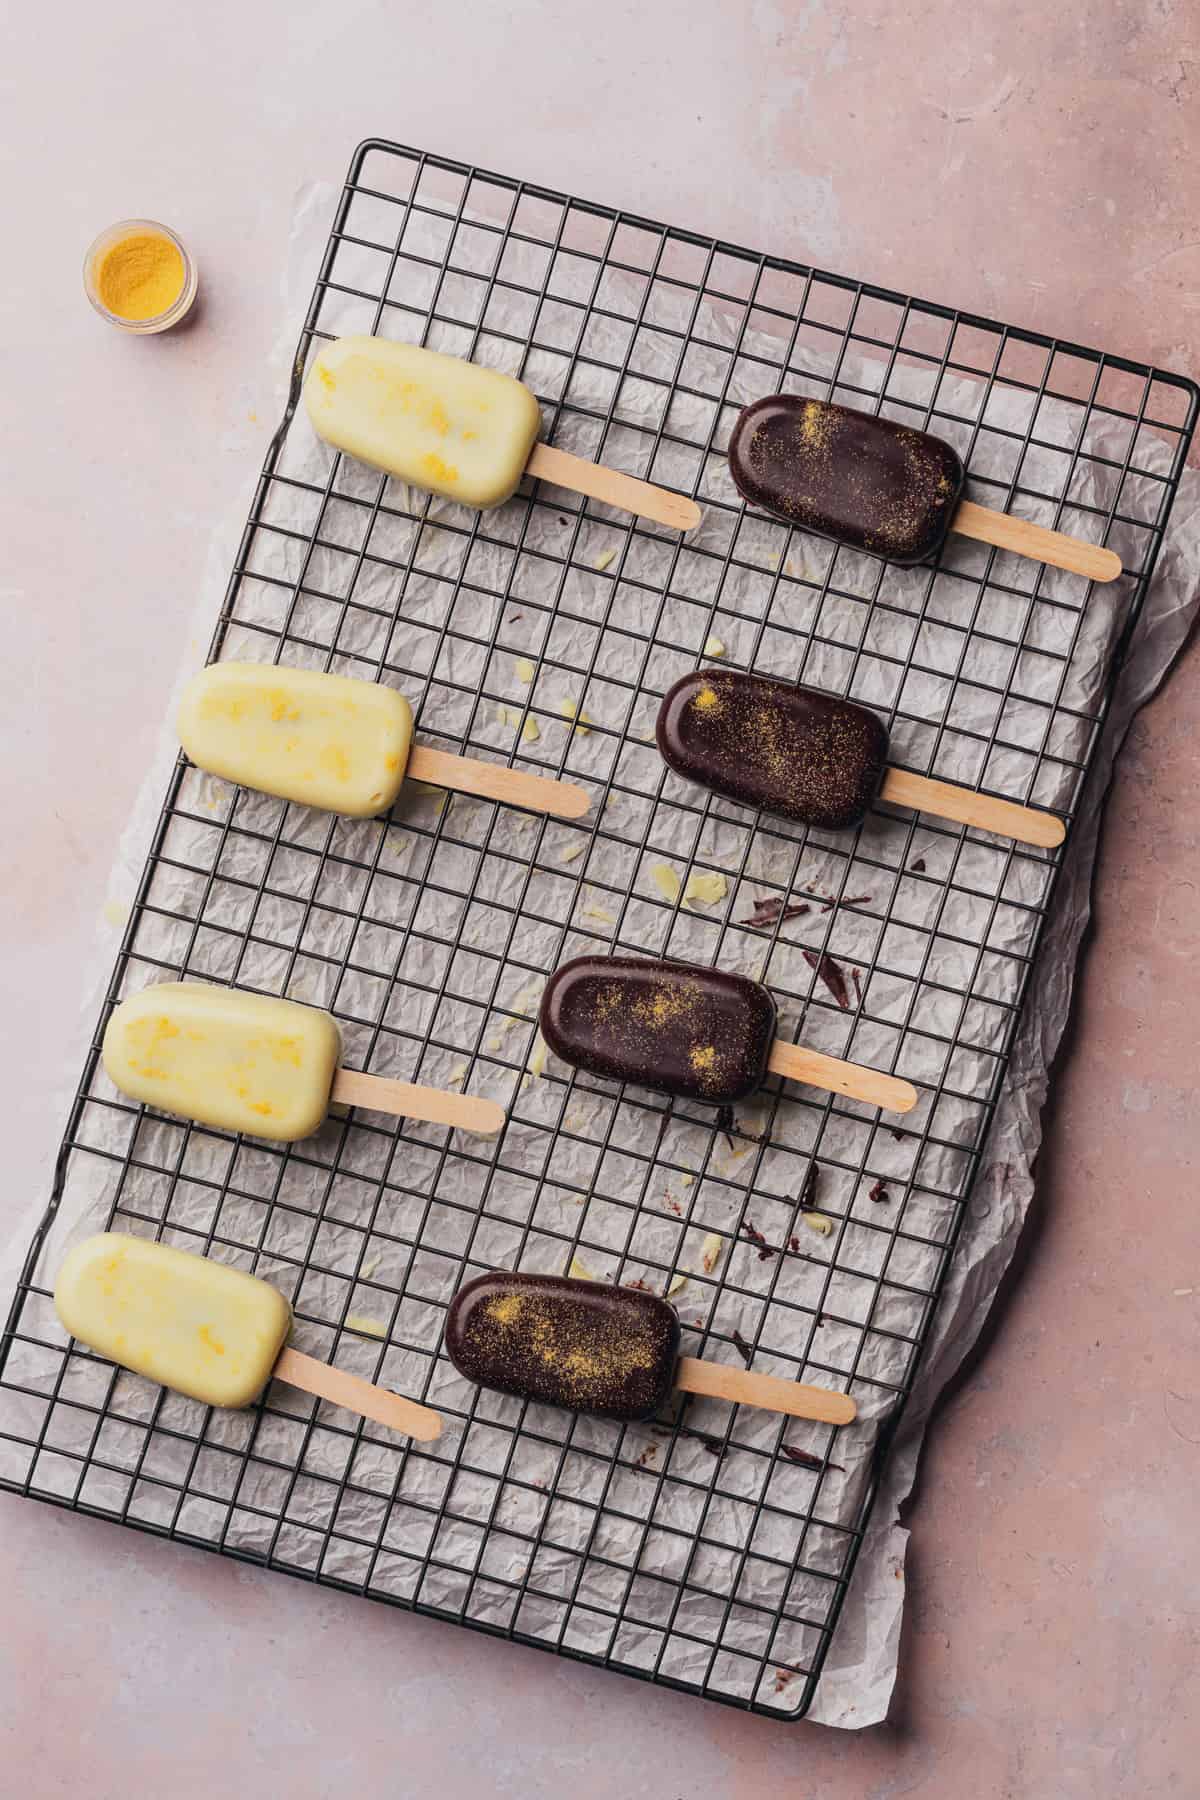

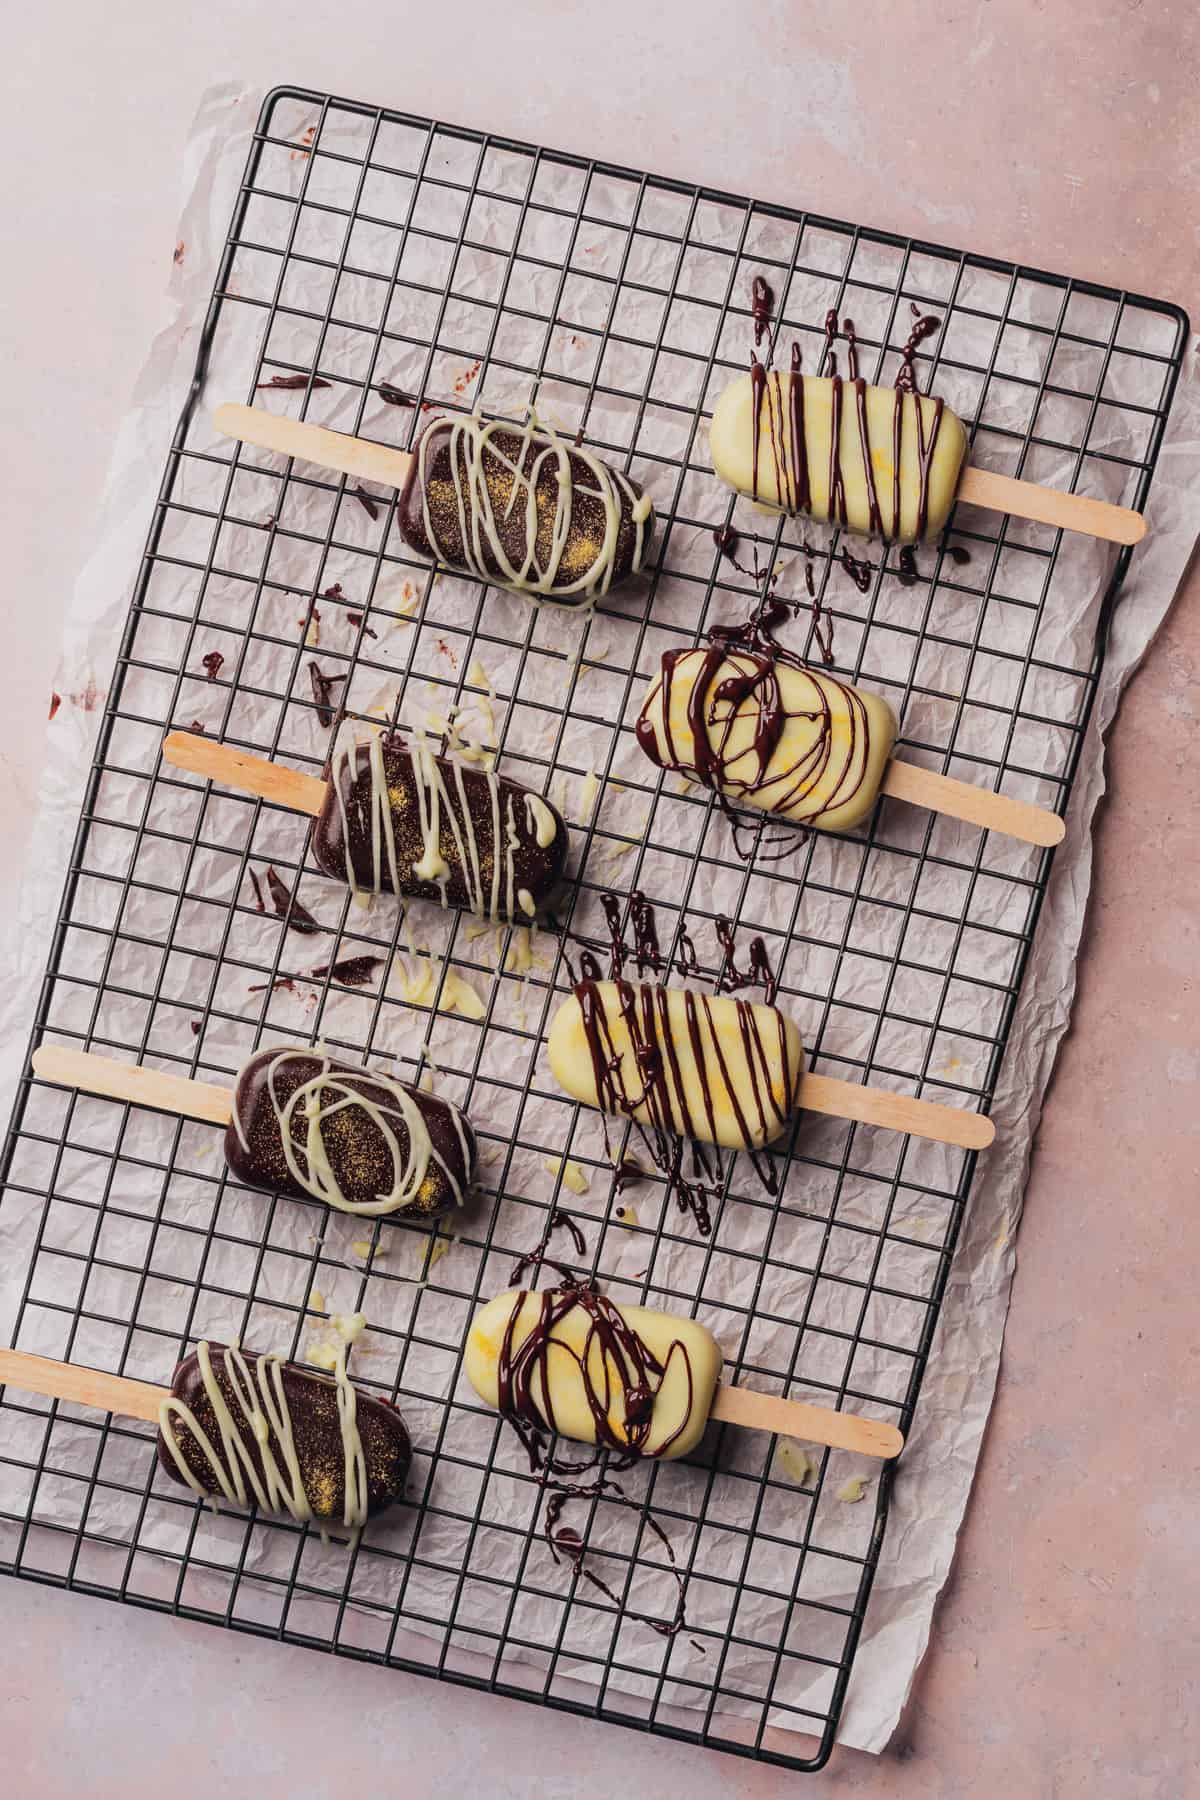
Allow to cool, and enjoy!
✨Tips & tricks
We want you to have the best cakesicles ever! So here are our top tricks.
- Take your time with adding in the chocolate, and make sure there are no gaps. The mistake we have made in the past is missing we have missed a few spots and then the cake pops come out a little funky looking when removed from the mold, or they crack. 😞
- A double layer of chocolate isn't essential once you get the hang of making these, but covering up any gaps after the first pass with chocolate will ensure studier, prettier cakesicles. We know it can be bit more time consuming to do a double layer of chocolate, but we have found this helps us a lot so they come out of the mold nice and easily, especially when making for the first time!
💭Frequently asked questions
The best way to store these cakesicles is allow them to cool completely, then store them in individual bags in an airtight container in the fridge. They will keep quite well for up to 7-10 days in the fridge.
The cakesicles will store if individually wrapped in the freezer for up to 3 months.
You may notice a bit of "wet" looking drops on the chocolate after a bit of time in the fridge or freezer as they are thawed to room temperature, which may cause some ingredients to bleed.
Yes, you can! The size is totally up to you, just be aware that this will impact the yield of cake popsicles.
🛒Shop this recipe
Want to get supplies for this recipe or shop our keto kitchen or pantry? We've linked our favorites above and right here in our Amazon Store!
A Full Living is a participant in the Amazon Services LLC Associate program, an affiliate advertising program designed to promote a means for sites to earn advertising fees by linking products to amazon.com. We only share products we use and love. It doesn't cost you anything extra to shop using our links, but we earn a small commission that helps us keep this site going!
🌟Leave a review!
Make sure to leave a 5-star review below! This helps other readers find our recipes via Google and encourages them to try them. Also, be sure to leave a comment with your experience!
Take a photo and share with us by tagging us on Instagram or follow along on Pinterest for more ideas!
📖 Recipe
Cakesicles Recipe (Keto and Gluten Free)
Ingredients
- 1 box cake mix of choice (we used a keto friendly & gluten free chocolate cake mix)
- 1 batch frosting of choice (we made a keto friendly chocolate cream cheese frosting, see recipe below)
- 18 ounces sugar free white chocolate chips (or any chocolate chip of choice)
- 18 ounces sugar free dark chocolate chips (or any chocolate chip of choice)
For the homemade keto chocolate cream cheese frosting:
- 8 ounces cream cheese, softened
- 8 tablespoons unsalted butter, softened
- 96 grams powdered erythritol (⅔ cup, could be substituted for any sweetener)
- 30 grams cocoa powder
- 1 tablespoon vanilla extract
- ¼ teaspoon kosher salt
Instructions
If making frosting:
- In a stand mixer or with a hand mixer, cream together butter and cream cheese until well combined. Lower the speed to low, and sift in the powdered sweetener, cocoa powder and salt to combine. Mix until creamy and smooth, about 3 minutes of mixing on medium speed.
Assembling the cakesicles:
- Prepare a 13-inch cake according to package instructions or recipe, All the cake to cool completely before crumbling the cake. This can be done up to 2 days in advance. Make sure frosting and cake are room temperature before beginning.
- In a large bowl, crumble cake crumbs with wearing gloved hands. Add frosting and combine until crumbs form, and you can easily press together into a round shape. Frosting should be quite sticky.Set mixture aside until it's time to use.
- Gently melt chocolate with butter or coconut oil to create the chocolate "shell" of your cakesicle. We used the microwave method, but a double boiler method works as well.For the microwave method, add the chocolate chips to a microwave safe bowl with the oil or butter and melt gently (about 50%) in 10-15 second increments, stirring in between each increment until chocolate is melted.If the chocolate starts to harden again, it has burned and you will need to start over. Going slow is your best bet.Keep in mind, that residual heat from the bowl will keep melting the chocolate slowly, so stirring continuously is helpful to get smooth, shiny chocolate.
- Using a small rubber spatula, line the inside of the cake molds with chocolate. We like to do two chocolate coatings, with a chilling period of about 10 minutes in the fridge or freezer in between.Try to cover as many gaps as you can. It won't be pretty, but that's okay, because we won't see it from the outside. The most important part is making sure there are no holes.
- Add cake mixture filling to the molds, leaving a little bit of room up top to add chocolate to the backside of the cakesicle.Now, use a knife to gently poke through the slit where the popsicle stick will go in. This helps ensure that you can get the cake pop out easily later.
- Add a popsicle stick up the center of your cake pop, then spread melted chocolate on the backside of the cakesicle. Make sure there are no gaps. It's okay if the backside is not as pretty, don't worry at all. No one looks at that side anyway!Chill for an additional 10-15 minutes.
- Gently remove cake pops from the molds by carefully pushing the popsicle stick and peeling away the silicone mold around the cakesicle.After you've removed them from the molds, you can carefully trim away any excess chocolate with kitchen shears. Top with edible gold glitter, more chocolate drizzle, sprinkles, or whatever you prefer!
- Allow to cool and enjoy! These will keep wrapped individually and stored in the fridge for up to 10 days, and up to 3 months if frozen.
Save This Recipe! 💌
Notes
- Specific nutrition facts cannot be determined if you decide to use other recipes or products. We determined nutrition facts using the products linked, and they will vary quite a bit depending on the brands or recipes you use.
- Serving sizes will depend on how much chocolate and cake mix you use per cakesicle, and it's impossible to determine. It's probable you will use less chocolate with more practice, as you may not need as thick of a second chocolate layer. You may find the need to use more chocolate to prepare your cakesicles, or you may end up with more cakesicles than 32.


Comments
No Comments