Keto Pie Crust Recipe (Gluten Free)
This Gluten Free & Keto Pie Crust is delicious. Tender, flaky and buttery. The perfect, roll out pie crust for any pie recipe. This recipe makes both a bottom and top crust.
Servings: 16 servings
Calories: 259kcal
Ingredients
- 4 cups almond flour, finely ground (448 grams)
- ⅔ cup granular erythritol sweetener, or to taste (or sweetener)
- 6 tablespoons coconut flour (45 grams)
- 2 teaspoons xanthan gum (do not omit)
- 1.5 teaspoons kosher salt
- 1 teaspoon baking powder (to help tenderize the crust)
- 2 teaspoons apple cider vinegar
- 1 teaspoon vanilla extract, optional
- 14 tablespoons cold unsalted butter, cut into chunks
- 1 whole egg, lightly beaten
- egg wash (optional, for top crust)
Instructions
For the bottom crust:
- In a large bowl, combine almond flour, granular sweetener, coconut flour, xanthan gum, kosher salt and baking powder. Use a pastry cutter or whisk to mix ingredients together well until there are no lumps. Alternatively, you can pulse in a food processor until combined.
- Add apple cider vinegar, vanilla extract and cold butter chunks to the mixture. Cut the butter into the dough with the pastry cutter or by pulsing in the food processor until the dough forms a wet sandy texture. Don't over-mix. Add in egg, and mix until just combined.
- Shape the dough into a ball shape, then cut the dough into two pieces. One piece should be slightly larger than the other, the larger piece will be for the bottom crust. This will be roughly a 60/40 ratio. Press to flatten each piece of dough into a round on plastic wrap. Wrap tightly with plastic wrap, and then freeze for 20 - 30 minutes, or refrigerate for 1 hour.
- After the dough has chilled, place between two pieces of parchment paper, and roll the larger portion of dough into a circle that is a few inches in diameter larger than your skillet. Chill the rolled out dough in the fridge or freezer on a baking sheet for an additional 15 minutes to help stiffen the dough.
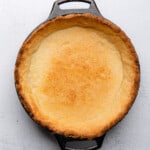
- After dough has chilled, flip the chilled dough into a lightly greased pie pan. Don’t be alarmed that the edges of the dough will fall off and crack. This is normal since the dough is so delicate. Use the extra pieces of dough to patch any cracks in the pie crust and fill the sides of the skillet with dough using your hands. It doesn’t need to be perfect. Once you are happy with the look of your dough, set your pie pan in the fridge for 15 minutes to chill while you preheat the oven to 400°F.
- After the dough is chilled for the final time, add a piece of parchment to the center and fill with pie weights to help keep it from rising too much. Bake for 10 minutes, then remove the pie weights. Keep a close eye on the crust, as it will brown quickly since it is made from almond flour. If you notice your crust browning too much, simply cover it with aluminum foil or a pie shield.
- Return to the oven for an additional 10-15 minutes without pie weights, but with the edges covered until the center is golden brown. Remove from the oven and cool. Make sure to cool completely before adding a filling that is chilled and doesn't need to be baked. If your pie filling needs to be baked, be sure to cover the edges with foil again to prevent more browning. Continue on to pie top directions if baking further and you'd like a crust to top your pie.
For the pie top or lattice:
- Roll out the second piece of pie crust dough between two pieces of parchment. If creating a lattice shape or any designs, make those now. If just doing a simple round pie top, roll into a circle that is the size of your pie, giving yourself a little extra room around the edges. Add to the freezer on a baking sheet to chill for 15-20 minutes before moving forward.
- If making a lattice, gently break the frozen strips away from each other, and carefully weave or create your design over top of your desired pie filling. The dough is very delicate, so work quickly to keep things as cold as possible. If the dough becomes hard to work with, simply add back to the freezer for a few minutes to stiffen up. Truthfully, we don't have much luck in the design area, so we simply laid the strips over top of each other in a nice pattern. If using a simple pie top that covers your filling, make sure to cut slits in the top to allow steam to release while the pie cooks.
- Fix any cracks in the dough by piecing together with extra pieces and pressing together. After the pie top or lattice is in place, brush with an egg wash by mixing together 1 egg with 1 tablespoon of cream or milk if desired. Bake according to the pie recipe's instructions.
- To save leftover keto pie crust, wrap in plastic wrap and store in the fridge for up to 5 days, or in the freezer for up to 4 months. You can bake your bottom crust a day or so in advance of filling your pie and store at room temperature.
Notes
- This recipe makes a top and bottom crust. You will have leftovers if using a 10.25" cast iron baker’s skillet.
- To cut this recipe in half, simply add more almond flour one tablespoon at a time after adding the egg until the consistency is easy to work with.
- The calorie count and nutrition facts will vary based on how much of the actual pie dough is used. Nutrition facts provided include all of the crust, and you may not use all of it.
- You must use cold butter to create this pie dough.
- For best results, don't overwork the crust. Pieces of butter in the dough are welcome and will help create a very flakey crust while the pie bakes.
- We cannot recommend any substitutions at the time. This recipe has been tested numerous times to create the proper consistency, and we hope to add more tips as time goes on. Until that point, we recommend following the instructions exactly.
- We do recommend chilling the pie crust between each stage. There are 4 stages that we recommend chilling the dough. After first combining the dough, after rolling out the dough (on a baking sheet on parchment in the freezer), after adding the crust to the pie pan, and after cutting the top crust into lattice strips in order to separate the pieces.
- You need to make sure to roll the dough between two pieces of parchment. It is VERY sticky, and it will stick to the rolling pin other wise.
- The dough is extremely delicate, it's not like a regular gluten dough in terms of pliability. It tastes like a regular pie crust, but it is very crumbly and will break easily when working with it. This is why we recommend chilling and/or freezing the dough to work with it.
- Weaving the lattice strips felt like an impossible feat for us without breaking them, so we just lay the strips over top of each other in nice design.
- You can use more or less sweetener in the dough according to your tastes. Taste before adding the eggs to determine if you'd like to add more.
- Vanilla extract is optional. Other great add-ins for this pie crust would be cinnamon, citrus juice or zest, almond extract and more depending on the type of pie you're making.
- To make a savory pie crust, omit the sweetener and vanilla, then add ¼ cup additional almond flour (for a total of 4 and ¼ cups almond flour). You can also add in savory seasonings of choice including garlic powder, onion powder, and savory herbs of choice.
- Since this crust recipe is an almond flour base, it will brown quickly. You will need to keep a close on eye on it to prevent over browning.
- Once the crust starts to brown a bit, you will need to cover the edges with aluminum foil to prevent burning.
Nutrition
Calories: 259kcal | Carbohydrates: 8g | Protein: 6g | Fat: 24g | Saturated Fat: 8g | Trans Fat: 1g | Cholesterol: 27mg | Sodium: 262mg | Potassium: 5mg | Fiber: 4g | Sugar: 1g | Vitamin A: 306IU | Calcium: 77mg | Iron: 1mg